(no subject)
Requested by thespian_muse and seriouslywir
(these are not the exact same ones you requested, but the procedure is the same since I had to remake them.)
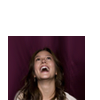
to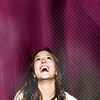
Difficulty: Easy
Contains: Brightness/Contrast, Curves, and color balance.
Translatable?: Yep.
.PSD: Yes xD
1. Prepare your base.
2. I duplicated the base layer then smudged the duplicated layer till I was happy. Then I erased some parts from the duplicated layer that was part of leighton. Merge Visible (CTRL + SHIFT + E).
3. I duplicated the merged layer and set it to SCREEN at 100% opacity. (This would depend on your picture.)
4. Brightness/contrast layer: -9, 9
5. Color balance:
M: -10, -21, -7
S: -10, -10, 0
H: 0, 0, -6
6. Curves Layer:
RGB
First point
Input: 97
Output: 94
Second point
Input: 179
Output: 190
7. Copy merge the layer (CRTL ALT SHIFT E). Sharpen it. EDIT>>Fade sharpen lower the opacity to your liking.
8. Now this step is mostly texture work.
- I got a soft brush (about 45-60 px) and place only two dots around leighton. I set them on NORMAL at 21%.
- I used this texture (icons_are_hot and set it on SOFTLIGHT at 20%.
- I used this texture (??) and set it on SCREEN at 9% and I erased some parts I didn't like.
-I used this texture (??) and set this on SOFTLIGHT at 40% FILL. I erased the parts that were covering leighton.
And ta-da, ICON! :D
LOOK BELOW FOR THE PSD.
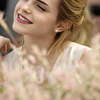
to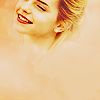
Difficulty: Medium
Contains: Channel Mixer, Selective coloring, curves, brightness/contrast.
Translatable?: Afraid not.
.PSD: Yep. I suggest you read the tutorial first though, since it's hard to understand w/o it.
1. Prepare your base. Mine didn't need much.
2. I used the eyedrop tool and chose a color from the background that would suit emma and that would blend easier with the background. I colored emma's background leaving only emma's head left.
3. I duplicated the base and placed it on top. I set it on SOFTLIGHT at 100% and I erased the parts from the background.
4. Brightness/Contrast Layer: -13, -12
5. Curves Layer:
RGB
First point
Input:43
Output: 72
Second point
Input: 146
Output: 181
RED
First point
Input: 155
Output: 168
GREEN
First point
Input: 167
Output: 185
BLUE
First point
Input: 100
Output: 70
Second point
Input: 160
Output: 175
6. New fill layer: #f6a9c8 set on SOFTLIGHT at 100%
7. Duplicate the base and bring it to the top. I set it to SCREEN at 100%. Erase the background, leaving only the head or any other body part you want.
8. Channel mixer layer:
RED
R: +82
G: +18
B: +14
GREEN
R: -2
G: +108
B: 0
BLUE
R: -14
G: +24
B: +92
9. New Fill Layer: #f9cd9b set on MULTIPLY at 30%.
10. Get this texture (marishna) and set it on SOFTLIGHT at 100% (if you want better results, go to her LJ and search for textures with cloudy effects on them.)
11. Curves Layer:
RGB
First point
Input: 82
Output: 34
Second point
Input: 194
Output: 144
12. Copy merge (CTRL ALT SHIFT E)and set this layer on SOFTLIGHT at 40%. erase the background leaving only her head or any part of your subject.
13. I used a soft brush about 40-60 px and I placed a dot around emma and the background. I used the smudge tool and smudged it to places where I wanted it to *shine*. I set that to SOFTLIGHT at 100%.
14. (>_<) New fill layer: #efeeec and I set it on LINEAR BURN at 100%. Gives a muted yet conrasted look.
15. Selective Coloring:
BLACKS
Black: -20
16. Curves Layer
RGB
First point
Input: 57
Output: 69
Second Point
Input: 159
Output: 172
RED
First point
Input: 153
Output: 170
BLUE
First point
Input: 150
Output: 160
17. Using another soft brush (40-60 px) I place a dot on emma's head and set it to NORMAL at 21%.
18. Copy merge (CTRL ALT SHIFT E) then set that layer on MUTLIPLY 100% then you erase the background.
19. Copy merge again (CTRL ALT SHIFT E) then you sharpen it. Edit>>Fade sharpen then you lower the opacity to your liking.
20. Make it a bit darker by using a Brightness/Contrast layer and setting the Brightness option to -6.
21. Copy merge everything and set that layer to OVERLAY at 5%.
And you're done! :)
COMMENT FOR THE .PSDS HERE
and please place your comments and questions there as well.
(these are not the exact same ones you requested, but the procedure is the same since I had to remake them.)

to

Difficulty: Easy
Contains: Brightness/Contrast, Curves, and color balance.
Translatable?: Yep.
.PSD: Yes xD
1. Prepare your base.
2. I duplicated the base layer then smudged the duplicated layer till I was happy. Then I erased some parts from the duplicated layer that was part of leighton. Merge Visible (CTRL + SHIFT + E).
3. I duplicated the merged layer and set it to SCREEN at 100% opacity. (This would depend on your picture.)
4. Brightness/contrast layer: -9, 9
5. Color balance:
M: -10, -21, -7
S: -10, -10, 0
H: 0, 0, -6
6. Curves Layer:
RGB
First point
Input: 97
Output: 94
Second point
Input: 179
Output: 190
7. Copy merge the layer (CRTL ALT SHIFT E). Sharpen it. EDIT>>Fade sharpen lower the opacity to your liking.
8. Now this step is mostly texture work.
- I got a soft brush (about 45-60 px) and place only two dots around leighton. I set them on NORMAL at 21%.
- I used this texture (icons_are_hot and set it on SOFTLIGHT at 20%.
- I used this texture (??) and set it on SCREEN at 9% and I erased some parts I didn't like.
-I used this texture (??) and set this on SOFTLIGHT at 40% FILL. I erased the parts that were covering leighton.
And ta-da, ICON! :D
LOOK BELOW FOR THE PSD.

to

Difficulty: Medium
Contains: Channel Mixer, Selective coloring, curves, brightness/contrast.
Translatable?: Afraid not.
.PSD: Yep. I suggest you read the tutorial first though, since it's hard to understand w/o it.
1. Prepare your base. Mine didn't need much.
2. I used the eyedrop tool and chose a color from the background that would suit emma and that would blend easier with the background. I colored emma's background leaving only emma's head left.
3. I duplicated the base and placed it on top. I set it on SOFTLIGHT at 100% and I erased the parts from the background.
4. Brightness/Contrast Layer: -13, -12
5. Curves Layer:
RGB
First point
Input:43
Output: 72
Second point
Input: 146
Output: 181
RED
First point
Input: 155
Output: 168
GREEN
First point
Input: 167
Output: 185
BLUE
First point
Input: 100
Output: 70
Second point
Input: 160
Output: 175
6. New fill layer: #f6a9c8 set on SOFTLIGHT at 100%
7. Duplicate the base and bring it to the top. I set it to SCREEN at 100%. Erase the background, leaving only the head or any other body part you want.
8. Channel mixer layer:
RED
R: +82
G: +18
B: +14
GREEN
R: -2
G: +108
B: 0
BLUE
R: -14
G: +24
B: +92
9. New Fill Layer: #f9cd9b set on MULTIPLY at 30%.
10. Get this texture (marishna) and set it on SOFTLIGHT at 100% (if you want better results, go to her LJ and search for textures with cloudy effects on them.)
11. Curves Layer:
RGB
First point
Input: 82
Output: 34
Second point
Input: 194
Output: 144
12. Copy merge (CTRL ALT SHIFT E)and set this layer on SOFTLIGHT at 40%. erase the background leaving only her head or any part of your subject.
13. I used a soft brush about 40-60 px and I placed a dot around emma and the background. I used the smudge tool and smudged it to places where I wanted it to *shine*. I set that to SOFTLIGHT at 100%.
14. (>_<) New fill layer: #efeeec and I set it on LINEAR BURN at 100%. Gives a muted yet conrasted look.
15. Selective Coloring:
BLACKS
Black: -20
16. Curves Layer
RGB
First point
Input: 57
Output: 69
Second Point
Input: 159
Output: 172
RED
First point
Input: 153
Output: 170
BLUE
First point
Input: 150
Output: 160
17. Using another soft brush (40-60 px) I place a dot on emma's head and set it to NORMAL at 21%.
18. Copy merge (CTRL ALT SHIFT E) then set that layer on MUTLIPLY 100% then you erase the background.
19. Copy merge again (CTRL ALT SHIFT E) then you sharpen it. Edit>>Fade sharpen then you lower the opacity to your liking.
20. Make it a bit darker by using a Brightness/Contrast layer and setting the Brightness option to -6.
21. Copy merge everything and set that layer to OVERLAY at 5%.
And you're done! :)
COMMENT FOR THE .PSDS HERE
and please place your comments and questions there as well.