Phantom icon tutorial
Someone asked me if I could make a tutorial for the icon I am using here. It's very simple and I made it using Photoshop Elements so it should translate well to any other photoshop program.
We'll be making this icon.
I found these two pictures at the official “Phantom of the Opera” web site.

and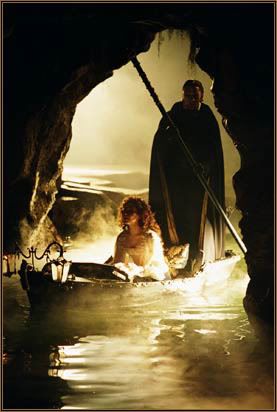
Using your cropping tool set at 100 x100 crop the one sheet so that you get a base that looks like this.

In your layers palette make a copy of your base.
Sharpen your base one time.
Using your eyedropper tool click it over the black part of your base on the left side.
Use a 3 or 5 pixel round brush and paint over any text that is on your base.
The left side of the base should be solid black now.
Open the picture of the Phantom and Christine in the boat paddling through the cave.
Use your cropping tool again set at 100 x 100 and crop a base that looks like this.
Make sure you get the curvy wall of the cave on the right side of your base.
Sharpen one time.
Drag this base onto your one sheet base so that the right side of the cave base over-laps the Phantoms face a little bit. And make sure Christine is in the picture on the left edge of the icon. It should be on a new layer. And it should look like this.

Make sure your cave base is highlighted.
Now use your eraser tool on the right side of the cave to erase any black up to the curvy wall of the cave.
You should be able to see the Phantoms face now and any small parts of Christine that were covered.
It should look like this now.

I tried using some different brushes but really the curvy wall of the cave looks fine the way it is. Feel free to experiment though.
I only used one border brush on this icon. No gradients because I thought the lighting that is already in the pictures looks just fine.
This is the border brush I used.

By quebelly
Take your eyedropper tool and click it in the golden light in the cave base. This is the exact color I used for the border.

Click on your brush tool and put the border brush on a new layer.
You should have a golden colored border around your icon now.
Set it to “vivid light”.
And that’s basically it. Pretty darn easy.
Feel free to experiment with different borders and brushes etc. or text if you can find a good place to put it on the icon.
If you have any questions or suggestions please let me know. Hope you like the tut.
We'll be making this icon.

I found these two pictures at the official “Phantom of the Opera” web site.

and

Using your cropping tool set at 100 x100 crop the one sheet so that you get a base that looks like this.

In your layers palette make a copy of your base.
Sharpen your base one time.
Using your eyedropper tool click it over the black part of your base on the left side.
Use a 3 or 5 pixel round brush and paint over any text that is on your base.
The left side of the base should be solid black now.
Open the picture of the Phantom and Christine in the boat paddling through the cave.
Use your cropping tool again set at 100 x 100 and crop a base that looks like this.

Make sure you get the curvy wall of the cave on the right side of your base.
Sharpen one time.
Drag this base onto your one sheet base so that the right side of the cave base over-laps the Phantoms face a little bit. And make sure Christine is in the picture on the left edge of the icon. It should be on a new layer. And it should look like this.

Make sure your cave base is highlighted.
Now use your eraser tool on the right side of the cave to erase any black up to the curvy wall of the cave.
You should be able to see the Phantoms face now and any small parts of Christine that were covered.
It should look like this now.

I tried using some different brushes but really the curvy wall of the cave looks fine the way it is. Feel free to experiment though.
I only used one border brush on this icon. No gradients because I thought the lighting that is already in the pictures looks just fine.
This is the border brush I used.

By quebelly
Take your eyedropper tool and click it in the golden light in the cave base. This is the exact color I used for the border.

Click on your brush tool and put the border brush on a new layer.
You should have a golden colored border around your icon now.
Set it to “vivid light”.
And that’s basically it. Pretty darn easy.
Feel free to experiment with different borders and brushes etc. or text if you can find a good place to put it on the icon.
If you have any questions or suggestions please let me know. Hope you like the tut.