[Loo] TUTORIAL 004
This uses Photoshop CS2 and is about at medium difficulty, though I was very thorough with my explanation so it should be beginner friendly as well. Is translatable to PSP.
I figured this out while seeing what could be done with the Luminosity blend mode. I think it's pretty neat, so I hope it's useful! It works the best on animated images, though it can look nice on television promo pictures or very good quality screencaps. Experiment!
TO
→ 001
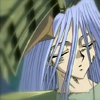
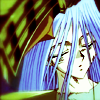
First off, get your base all ready. I used a screencap of Kisara and High Priest Seto from Yuugiou. I used Image → Adjustments → Auto Contrast on this particular image, but you won't need to all the time. Only if it's a bit dark or murky looking.
→ 002
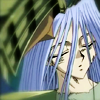
Duplicate your base - by hitting Ctrl + J or right clicking on the layer and going to Duplicate Layer - and set that layer's blend mode to Soft Light. This ups the contrast a bit and just makes it look a whole lot nicer.
TO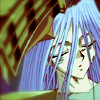
→ 003
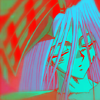
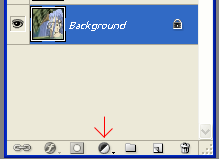
Now, this is where the fun part starts. Create a new Adjustment Layer by either clicking on the black and white circle at the bottom of the layer palette and click on Curves or going to Layer → New Adjustment Layer → Curves. Make sure this is it's own separate layer and you're not doing this to just one specific layer.
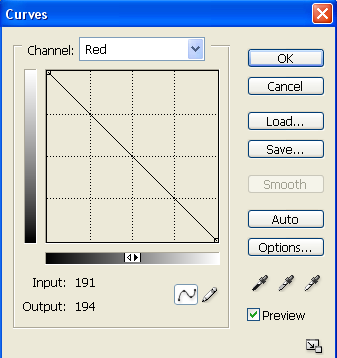
Go to the Red Channel. See how the line is going up from left to right? All you need to do is reverse it. Click on the node on the bottom left and drag it up; click on the node in the upper right and drag it down. Click here for a visual.
Looks ugly, right? Well, to fix that change the blend mode of that layer to Soft Light. There! This in itself is a nice coloring and is rather fun to play with. I don't typically use a lot of points in my Curves when I use it. I find messing around with the main nodes and changing to blend mode to Soft Life makes a nice coloring.
You can also do that with the Blue or Green channel if you so choose. Like I said, experiment!
→ 004
Now, there a few ways you can accomplish this next step. I use the keyboard shorthand version, but I'll explain the other ways. Please note, the shorthands will only work in Photoshop.
Create a new layer: Layer → New → Layer or click the square to the left of the trashcan on the bottom of the layer palette. Then hold down Ctrl + Alt + Shift + E all at once on your keyboard. It copies all that you've done to the image so far and creates it as a new layer.
Alternatively, you can go to Select → All or hit Ctrl + A to select the entire image, go to Edit → Copy Merged or hit Shift + Ctrl + C, then create a new layer and go to Edit → Paste or hit Ctrl + V to achieve the same.
Set that layer to Overlay.
→ 005
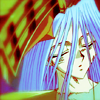
Create a new layer UNDERNEATH the one you just made. Fill it with the color #49c1ba. Alternately in Photoshop, you could use the Adjustment Layer version Solid Color, which is what I prefer since it changes size if you're dragging it from one different sized image to another.
Set this layer's opacity to 80% and set the blend mode to Luminosity. I believe it's called Luminance in PSP.
→ 006
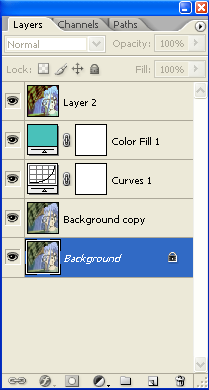
If you like the above result, you could stop there. To continue, go back to the Curves layer you made it Step 003. See the eye icon next to the layer? Click on it and the layer is invisible. And that's that! Click here to view the layer palette at the end.
As I've said many times, just experiment! Here other other results you can achieve: using the Red channel, Blue channel, and Green channel.

I'd love to see your results and I hope this all made sense! ♥
I figured this out while seeing what could be done with the Luminosity blend mode. I think it's pretty neat, so I hope it's useful! It works the best on animated images, though it can look nice on television promo pictures or very good quality screencaps. Experiment!
TO
→ 001
First off, get your base all ready. I used a screencap of Kisara and High Priest Seto from Yuugiou. I used Image → Adjustments → Auto Contrast on this particular image, but you won't need to all the time. Only if it's a bit dark or murky looking.
→ 002
Duplicate your base - by hitting Ctrl + J or right clicking on the layer and going to Duplicate Layer - and set that layer's blend mode to Soft Light. This ups the contrast a bit and just makes it look a whole lot nicer.
TO
→ 003
Now, this is where the fun part starts. Create a new Adjustment Layer by either clicking on the black and white circle at the bottom of the layer palette and click on Curves or going to Layer → New Adjustment Layer → Curves. Make sure this is it's own separate layer and you're not doing this to just one specific layer.
Go to the Red Channel. See how the line is going up from left to right? All you need to do is reverse it. Click on the node on the bottom left and drag it up; click on the node in the upper right and drag it down. Click here for a visual.
Looks ugly, right? Well, to fix that change the blend mode of that layer to Soft Light. There! This in itself is a nice coloring and is rather fun to play with. I don't typically use a lot of points in my Curves when I use it. I find messing around with the main nodes and changing to blend mode to Soft Life makes a nice coloring.
You can also do that with the Blue or Green channel if you so choose. Like I said, experiment!
→ 004
Now, there a few ways you can accomplish this next step. I use the keyboard shorthand version, but I'll explain the other ways. Please note, the shorthands will only work in Photoshop.
Create a new layer: Layer → New → Layer or click the square to the left of the trashcan on the bottom of the layer palette. Then hold down Ctrl + Alt + Shift + E all at once on your keyboard. It copies all that you've done to the image so far and creates it as a new layer.
Alternatively, you can go to Select → All or hit Ctrl + A to select the entire image, go to Edit → Copy Merged or hit Shift + Ctrl + C, then create a new layer and go to Edit → Paste or hit Ctrl + V to achieve the same.
Set that layer to Overlay.
→ 005
Create a new layer UNDERNEATH the one you just made. Fill it with the color #49c1ba. Alternately in Photoshop, you could use the Adjustment Layer version Solid Color, which is what I prefer since it changes size if you're dragging it from one different sized image to another.
Set this layer's opacity to 80% and set the blend mode to Luminosity. I believe it's called Luminance in PSP.
→ 006
If you like the above result, you could stop there. To continue, go back to the Curves layer you made it Step 003. See the eye icon next to the layer? Click on it and the layer is invisible. And that's that! Click here to view the layer palette at the end.
As I've said many times, just experiment! Here other other results you can achieve: using the Red channel, Blue channel, and Green channel.
I'd love to see your results and I hope this all made sense! ♥