6th icon tutorial, Prison Break season 2
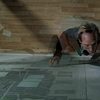
Go from 
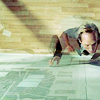
to
using ps cs2, uses curves, levels and selective colour. .psd file included

Crop, resize to 100x100. Sharpen it once, then fade the sharpen (edit -> fade sharpen) to 60%

New adjustment layer -> Levels
RGB
0, 1.20, 213
RED
0, 0.83, 183
GREEN
0, 1.00, 201
BLUE
0, 1.00, 237
set that layer to screen 100%

duplicate the levels layer, set it to Softlight 50%

new adjustment layer -> curves
RGB
first point 52/55,
second point 106/118
RED
first point 58/71,
second point 131/123
GREEN
first point 73/61,
second point 134/124
BLUE
first point 59/71,
second point 132/118,
third point 191/182
leave this layer set to normal 100%

new adjustment layer -> Selective colour
REDS
+100/0/+91/0
WHITES
24/51/43/-2
NEUTRALS
-3/10/-17/24
And you're done!
PSD FILE for those who want to input the curves layer the easy way lol
If you are not sure of anything, don't be afraid to ask I'll do my best to help.
Comments make me all warm and fuzzy, I'd to see how this works out for everyone too
to
using ps cs2, uses curves, levels and selective colour. .psd file included
Crop, resize to 100x100. Sharpen it once, then fade the sharpen (edit -> fade sharpen) to 60%
New adjustment layer -> Levels
RGB
0, 1.20, 213
RED
0, 0.83, 183
GREEN
0, 1.00, 201
BLUE
0, 1.00, 237
set that layer to screen 100%
duplicate the levels layer, set it to Softlight 50%
new adjustment layer -> curves
RGB
first point 52/55,
second point 106/118
RED
first point 58/71,
second point 131/123
GREEN
first point 73/61,
second point 134/124
BLUE
first point 59/71,
second point 132/118,
third point 191/182
leave this layer set to normal 100%
new adjustment layer -> Selective colour
REDS
+100/0/+91/0
WHITES
24/51/43/-2
NEUTRALS
-3/10/-17/24
And you're done!
PSD FILE for those who want to input the curves layer the easy way lol
If you are not sure of anything, don't be afraid to ask I'll do my best to help.
Comments make me all warm and fuzzy, I'd to see how this works out for everyone too