#109 - Tutorials
Ok, seeing as people have said they wanna see them, here are two tutorials for you! (the Momo/Kaji tutorial I shall do later on.)
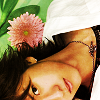
GO FROM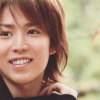
TO
TUTORIAL #1 - KENTA KAMAKARI (KenKen)
So, we start of with a base, which I got by simply resizing and cropping. This one is Kenta Kamakari. ♥. If you have any usual icon tricks (such as sharpening, smoothing, etc) then this is the time to do it.
Add a new layer and fill it with #ffcc00. Which is a nasty sicky yellow colour. Set this to Multiply @ 100%. Looks gross, huh?

Another new layer, this time fill it with #8dcff5 (light blue) and set it to Screen @ 50%. Still looks hella gross...

So duplicate the base layer (the one with KenKen on it) twice and drag both to the top. Set them both to Soft Light @ 100%. This is so we can see KenKen's face a little clearer. Because damn, has he got a pretty face.

Another new layer, #00246e (dark blue). Guess what we're gonna do with this? Yeah I know. Set it to Exclusion @ 100%

Duplicate your base layer and Desaturate - press Ctrl + H and drag the 'Saturation' down to -50. Then duplicate that layer twice more (so you end up with three Desaturated KenKens). Drag all three to the top and set to Soft Light @ 100%
~*~*~*~*~*~*~*~
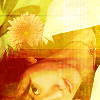
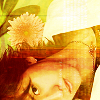
GO FROM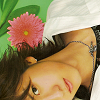
TO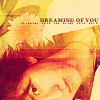
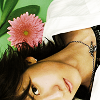
TUTORIAL #2 - HIROKI AIBA
OK! Next! This is a base this time featuring Hiroki Aiba. ♥ What can I say, I love my TeniMyu boys. Again, if you want to sharpen, etc. Do it now.
Duplicate and Desaturate - do this by pressing Ctrl + H and bringing the Saturation level right down to -100. Set this layer to Hard Light @ 100%
Use this texture by immoraland set it to Overlay @ 100%.
Another texture by immoral - set to Hard Light @ 100%.
Duplicate the Desaturated layer and bring it up to the top. Set to Soft Light @ 100%. Merge.
Add another texture by immoraland set to Soft Light @ 100%.

Another new layer, #00246e (dark blue). Set it to Exclusion @ 100%

Duplicate the merged layer and bring it to the top, setting it at Soft Light, 100%.

And finally, add some text! I used Georgia, bold at size 4 and some tiny text by ohpaintbrush.
This may not be the most coherent of tutorials as I've just come back from a long day of lectures (bleh) so any questions or comments I'll happily answer. And if you managed to make a nice looking icon from this I'd love to see it ♥
Previous tutorials by killabarbie - click here :)
GO FROM
TO
TUTORIAL #1 - KENTA KAMAKARI (KenKen)
So, we start of with a base, which I got by simply resizing and cropping. This one is Kenta Kamakari. ♥. If you have any usual icon tricks (such as sharpening, smoothing, etc) then this is the time to do it.
Add a new layer and fill it with #ffcc00. Which is a nasty sicky yellow colour. Set this to Multiply @ 100%. Looks gross, huh?
Another new layer, this time fill it with #8dcff5 (light blue) and set it to Screen @ 50%. Still looks hella gross...
So duplicate the base layer (the one with KenKen on it) twice and drag both to the top. Set them both to Soft Light @ 100%. This is so we can see KenKen's face a little clearer. Because damn, has he got a pretty face.
Another new layer, #00246e (dark blue). Guess what we're gonna do with this? Yeah I know. Set it to Exclusion @ 100%
Duplicate your base layer and Desaturate - press Ctrl + H and drag the 'Saturation' down to -50. Then duplicate that layer twice more (so you end up with three Desaturated KenKens). Drag all three to the top and set to Soft Light @ 100%
~*~*~*~*~*~*~*~
GO FROM
TO
TUTORIAL #2 - HIROKI AIBA
OK! Next! This is a base this time featuring Hiroki Aiba. ♥ What can I say, I love my TeniMyu boys. Again, if you want to sharpen, etc. Do it now.
Duplicate and Desaturate - do this by pressing Ctrl + H and bringing the Saturation level right down to -100. Set this layer to Hard Light @ 100%
Use this texture by immoraland set it to Overlay @ 100%.
Another texture by immoral - set to Hard Light @ 100%.
Duplicate the Desaturated layer and bring it up to the top. Set to Soft Light @ 100%. Merge.
Add another texture by immoraland set to Soft Light @ 100%.
Another new layer, #00246e (dark blue). Set it to Exclusion @ 100%
Duplicate the merged layer and bring it to the top, setting it at Soft Light, 100%.
And finally, add some text! I used Georgia, bold at size 4 and some tiny text by ohpaintbrush.
This may not be the most coherent of tutorials as I've just come back from a long day of lectures (bleh) so any questions or comments I'll happily answer. And if you managed to make a nice looking icon from this I'd love to see it ♥
Previous tutorials by killabarbie - click here :)