A Makeup Tutorial~
Hey there!
I've been seeing several posts lately by some new gals on different communities who are at a loss of what to do for basic make, so I thought "Hey! I can do this!" and decided to make a tutorial.
This tutorial was intended for gals who are new to the style, and thus the make isn't extraordinarily flashy. If it turns out to be helpful for some, I can do ones for more elaborate eye make and false lashes, etc.
I've included all the products I use and where to get (most of) them, though you can obviously do your own thing if it works for you.
Numbers on pictures indicate steps, numbers next to words (e.g. "use blush (3)") indicate products which are numbered in product pictures.
Basically, I'm compiling most of the noteworthy tips I've seen from the tutorials in Popteen. I chose a look that's closely based off of Tsubasa's make routine, which in turn is something I've made into my own. No false lashes here, (not even the individual ones!), even though I do use them day to day.
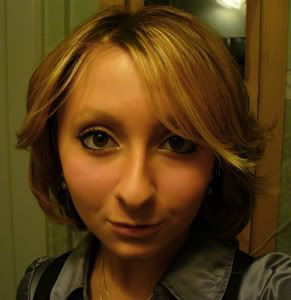
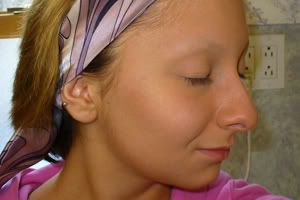
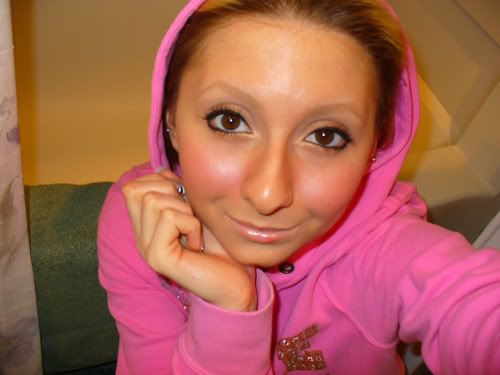
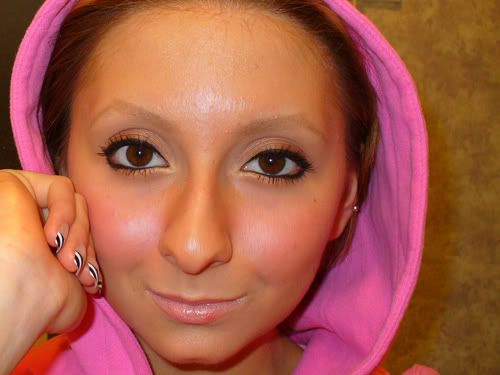
So. Hi, I'm masa, and on any good day, I'll probably look like this:
And on and day that I don't have makeup on I'll probably look like this:
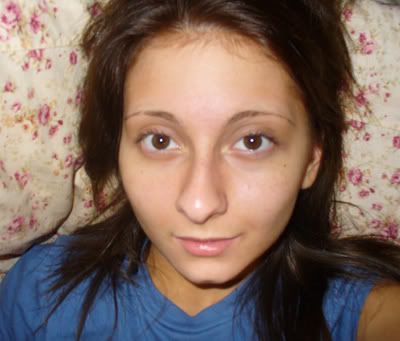
(old picture, if the brows and hair don't give it away)
Now on with the tutorial!
START!
Face:
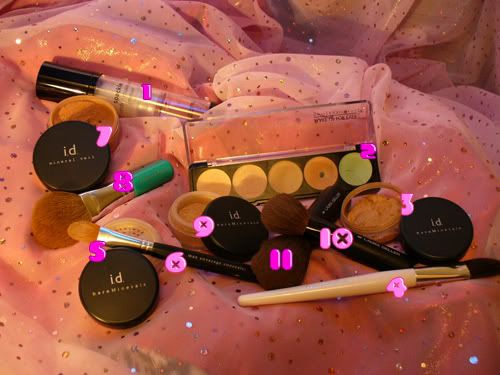
1. Laura Geller Spackle Cream Under Makeup Primer
2. Make Up For Ever 5 Camouflage Cream Palette - No. 1
3. Laura Geller Phenomenal Foundation in Medium*
4. Sonia Kashuk Foundation Brush
5. Bare Escentuals bareMinerals Multi-Tasking Face bisque/Well-Rested duo
6. Bare Escentuals Maximum Coverage Concealer Brush
7. Bare Escentuals bareMinerals Tinted Mineral Veil
8. Bare Escentuals Flawless Application Face Brush
9. Bare Escentuals bareMinerals SPF 15 Foundation in Medium
10. Laura Geller Contouring Brush
11. Laura Geller Powder Brush
* pictured in another container
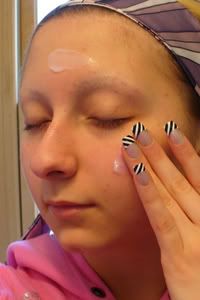
Primer(1): This goes over everything excluding the lips. Apply with fingers.
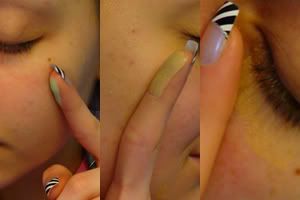
Concealer(2): Solid coverage over small blemishes. First, use the green shade to diffuse any redness, then cover with a shade from the palette that suits your skin tone. You will most likely need to use a different shade for different parts of your face (e.g. darker shade for eyes, lighter shade for face). Apply with fingers.
Liquid Foundation(3, 4): Used in the highlighted areas, and also used to cover clusters of blemishes. Applied with a foundation brush or fingers.
Powder Concealer (5, 6): Sets the liquid makeup and conceals. Used over the under-eyes, eye lid and any other small areas that need additional coverage. Applied with concealer brush (6).
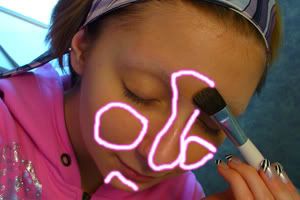
Mineral Veil(7,8): Prevents shine by soaking up oil and adds a tint to the skin. Starting with the forehead using swirling motions, move down to the side of the face to the cheeks, then cover nose, chin, and eyes.

»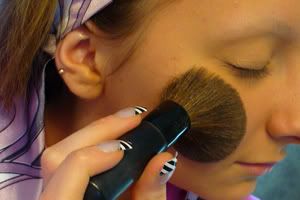
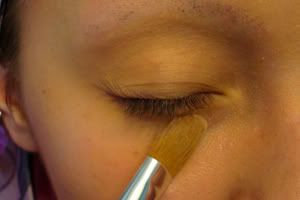
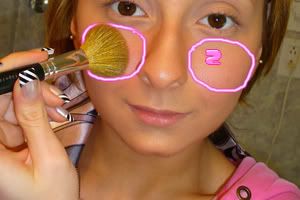
Powder Foundation(9, 10, 11): Used over the entire face; evens out skin tone, sets liquid makeup and perfects areas where concealer was not used. Starting with the smaller powder brush (10) using swirling motions, cover the eyes, nose, and mouth area. Using the larger brush (11), cover the rest of the face in a similar fashion to the application of the mineral veil.
Eyebrows:
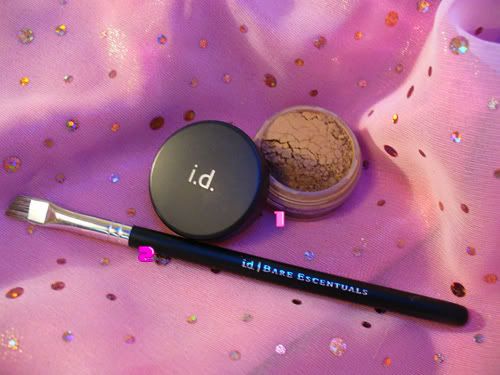
1. Bare Escentuals Essential Brow Color in Pale/Ash Blonde
2. Bare Escentuals Angled Brow Brush
»
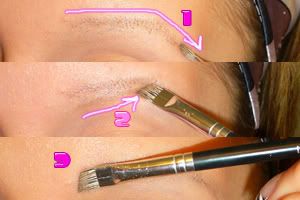
Eyebrow Powder: Taking a cool tip from mingmeijun, first draw an arch, and then another line under it to form the bottom of the brow. Fill the rest in, and slightly thicken the outer part of the brow. I use the angle of the brush as a guide for the the of the head of the brow, as seen in step 3.
Contouring and Cheeks:
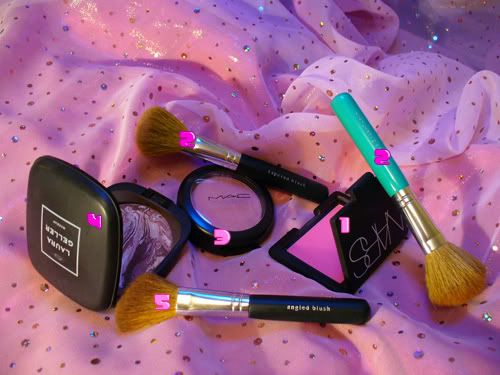
1. NARS Blush in Desire
2. Bare Escentuals Tapered Blush Brush
3. M•A•C Powder Blush in Well Dressed
4. Laura Geller Bronze N Brighten Baked Powder
5. Bare Escentuals Angled Face Brush
»
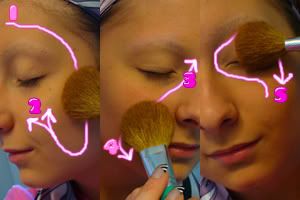
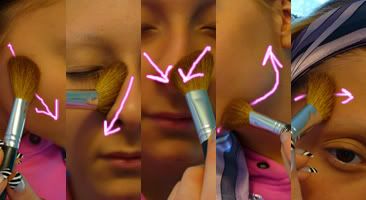
Bronzer(4): Used to highlight and downplay certain areas of the face, e.g. cheekbones, sides and tip of nose, jawline and sides of the forehead. Applied with angled brush (5).
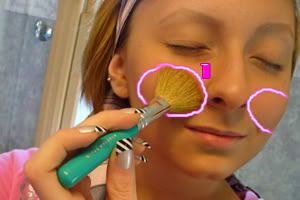
Blush: Start with the darker shade of blush (1) on the lower portion of the apples of your cheeks. Blend from the nose out. With the lighter shade of blush (3), apply to the higher portion of the cheeks, blending up almost to the undereyes.↓
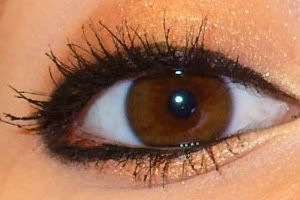
Eyes (Shadow):
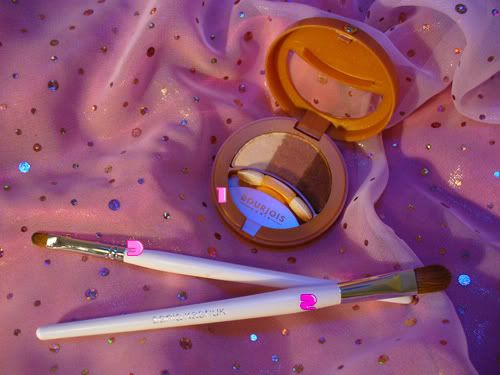
1. Bourjois Eyeshadow Trio in Les Bruns Cuivre 41
2. Sonia Kashuk Medium Shadow Brush
3. Sonia Kashuk Lip Brush
Color Guide:
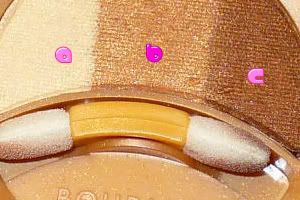
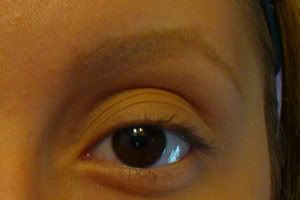
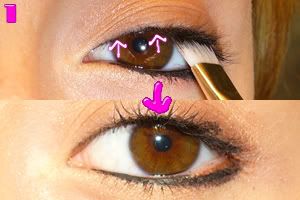
Eyeshadow: Starting with the upper lid, use the darkest shade (c) along the lash line from inner corner to outer, curving up in the middle of the lid using the medium shadow brush (2).Using the opposite side of the brush, wash the entire lid in the medium shade (b), keeping in mind to blend into the darkest shade.
For the lower lid, start with the outer corner of the eye and using the sponge applicator (included with eyeshadow), use the darkest shade (c) again along the outer corner of the eye, as seen in Step 1 starting from outside inwards. Blend the medium shadow (b) from where the dark shadow ends, to just before the inner corner of the eye, as seen in Step 2. For the inner corners, apply the lightest shade (a) with the Lip Brush (3) shown in Step 3. Blending in this shade is not necessary.
Eyes (Liner):
1. Smashbox Jet Set Waterproof Eye Liner in Midnight Black
2. Smashbox Arched Eyeliner Brush 21
3. Revlon ColorStay Liquid Liner in Blackest Black
4. Bare Escentuals Eyeliner Brush
5. Sephora Professionnel Angled Liner/Eyeliner Brush #15
6. Japonesque Flat Eyeliner Brush
7. Revlon Bedroom Eyes Powder Liner in Fishnet Black
8. Disposable Lipgloss Applicator
Gel Eyeliner(1): By pinching your eyelashes between your fingers and lifting the eyelid up, apply along the inner part of the upper lid.
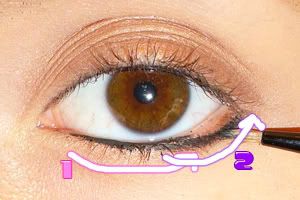
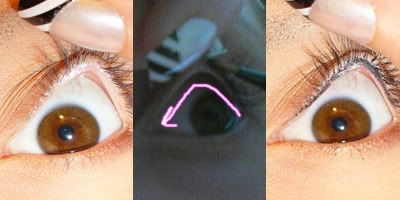
Liquid Liner: Using the same brush (2) or the smaller-tipped eyeliner brush (4), line the lower lid from the inner corner to 1/3 of the way to the end, curving to accentuate the shape of the eye (Step 1). The for the outer corner portion, bring the line down and up, leaving space the give the eyes a wider look (Step 2).
Liquid Liner (Continued; Upper Eye): The cover the hard to reach area of the actual lashline, using the flat eyeliner brush (6), nudge the brush into the lashes. Precision is not necessary, as this will be covered over.
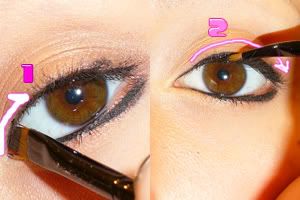
Liquid Liner (Continued; Upper Eye): Using the angled liner brush (5), line the inner corner of the eye, then line the rest of the upper lid with either the the angled brush or the arched liner brush (5 or 2). To get the arched tip on the line, slightly stretch the lid with your finger and release the pressure on the brush while curving up a bit.

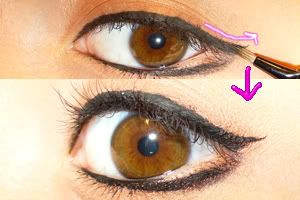
Liner Shadow(7, 8): Dipping a disposable lipgloss applicator into the liner shadow to prevent specks of it from falling onto your face, use this along the outer corner to connect the upper and lower liner lines. Can also be used along the lines themselves to refine and soften them.
Lash:

1. NYC Eyelash Curler
2. Bare Escentuals Brow Finishing Gel (Also Recommended: M·A·C Prep+Prime Lash)
3. Dior Diorshow Waterproof Mascara in Black 90
4. stila Multi-Effect Mascara in Black
5. (Not used here) Dr. Denese Lash Faker Mascara Duo
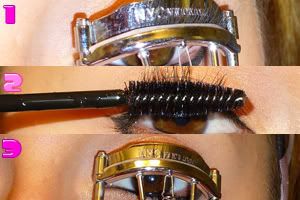
Curling and Priming(1,2): First, curl your lashes at the base of the lash, then brush primer (2) onto lashes. After the primer dries, curl lashes again.
Mascara: Apply by starting with the outer lash, by nudging the brush into the base of the lashes and wiggling the brush from side to side pulling up as you do, coating the lash from bottom to top.
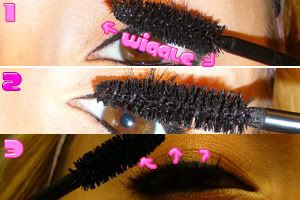
You can add extra length by closing the eyes and brushing the tips liberally with the brush.

Very lightly pressing the brush into the base of the lashes, wiggle the brush downwards. Use the other side of the brush to coat the tips of the lashes.
↓
Lips:
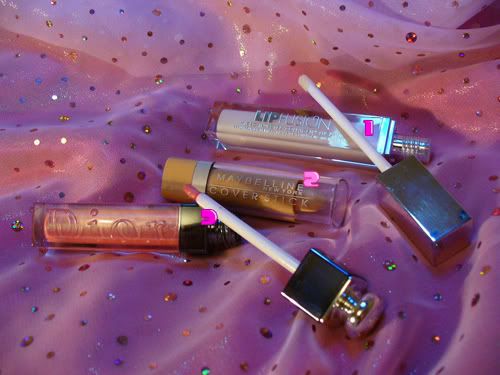
1. Fusion Beauty LipFusion Color Shine in Clear
2. Maybelline Cover Stick Corrector Concealer in Medium Beige (Also Recommended: M·A·C Lip Erase)
3. Dior DiorAddict Ultra Gloss Reflect in Jersey Pink (Also Recommended in Cotton Petal and Organza Pink)
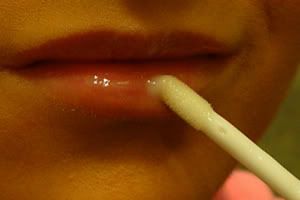
Gloss: Aplly clear gloss as an undercoat.

Nude Lip: Simply glide over the lips and blend with your fingers. The gloss undercoat keeps this from drying out the lips and settling into cracks.
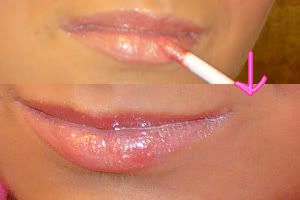
Gloss: Apply as a top coat. I recommend using a gloss with a pink tone, to gove a bit of color back to the lips after neutralizing them.
... Done!

Notes:
1. Brows: Because my hair is dyed lighter than my natural hair color, and my eyebrow hair is quite thick, I find it's easier to just draw my brows in. I leave a bit of stubble (kind of like a five o'clock shadow. xD) as a guide so I can... remember where my eyebrows are.
I used to trim my eyebrows off with tiny scissors, but I've started to shave (yes, shave) them off with a cheap mini electric razor like this. My Chinese auntie plucked hers out all her life, and now they don't grow at all. With shaving they actually will grow back, so it pretty much does the same thing as trimming, it's just... faster.
Though, don't use the kind of razor you'd use on your legs on your brows.
2. Disposable lipgloss applicators, like the one used in the eyeliner portion of the tutorial, can be found in the sample bin at any makeup counter. I always ~steal~ a few whenever I'm at Sephora and such and they're not just for lipwear! They're usually made pretty well, so you can reuse and wash them.
3. Clear Gloss: You can use any type of clear gloss, but since I've used LipFusion here this may need a bit of explaining. LipFusion is a lip plumper:
"Tiny, dehydrated, marine collagen micro spheres are instantly absorbed by the lips, and seek out the body's natural moisture. As soon as the spheres become rehydrated, they plump and hold onto the moisture they've collected, creating a mild "swelling" of the lip tissue. The result is fuller, smoother, perfectly plumped lips in seconds. Results can last for up to 48 hours."
48 hours is stretching it, but for me it lasts about 24 hours. Most lips plumpers plump by irritating the lips (Urban Decay's Big Fatty Lip Plumper burns the lips with cinnamon and chili to plump, causing the lips to also turn bright red from my experience), but with LipFusion, there is an odd feeling, but no pain or uncomfortable burning or cooling sensations. It also doesn't redden your lips, and the smell is light and pleasant (perfume and scented products affect me like nerve gas, and I don't have a problem with this scent). Good stuff.
I've been seeing several posts lately by some new gals on different communities who are at a loss of what to do for basic make, so I thought "Hey! I can do this!" and decided to make a tutorial.
This tutorial was intended for gals who are new to the style, and thus the make isn't extraordinarily flashy. If it turns out to be helpful for some, I can do ones for more elaborate eye make and false lashes, etc.
I've included all the products I use and where to get (most of) them, though you can obviously do your own thing if it works for you.
Numbers on pictures indicate steps, numbers next to words (e.g. "use blush (3)") indicate products which are numbered in product pictures.
Basically, I'm compiling most of the noteworthy tips I've seen from the tutorials in Popteen. I chose a look that's closely based off of Tsubasa's make routine, which in turn is something I've made into my own. No false lashes here, (not even the individual ones!), even though I do use them day to day.
So. Hi, I'm masa, and on any good day, I'll probably look like this:

And on and day that I don't have makeup on I'll probably look like this:

(old picture, if the brows and hair don't give it away)
Now on with the tutorial!
START!
Face:

1. Laura Geller Spackle Cream Under Makeup Primer
2. Make Up For Ever 5 Camouflage Cream Palette - No. 1
3. Laura Geller Phenomenal Foundation in Medium*
4. Sonia Kashuk Foundation Brush
5. Bare Escentuals bareMinerals Multi-Tasking Face bisque/Well-Rested duo
6. Bare Escentuals Maximum Coverage Concealer Brush
7. Bare Escentuals bareMinerals Tinted Mineral Veil
8. Bare Escentuals Flawless Application Face Brush
9. Bare Escentuals bareMinerals SPF 15 Foundation in Medium
10. Laura Geller Contouring Brush
11. Laura Geller Powder Brush
* pictured in another container

Primer(1): This goes over everything excluding the lips. Apply with fingers.

Concealer(2): Solid coverage over small blemishes. First, use the green shade to diffuse any redness, then cover with a shade from the palette that suits your skin tone. You will most likely need to use a different shade for different parts of your face (e.g. darker shade for eyes, lighter shade for face). Apply with fingers.

Liquid Foundation(3, 4): Used in the highlighted areas, and also used to cover clusters of blemishes. Applied with a foundation brush or fingers.

Powder Concealer (5, 6): Sets the liquid makeup and conceals. Used over the under-eyes, eye lid and any other small areas that need additional coverage. Applied with concealer brush (6).

Mineral Veil(7,8): Prevents shine by soaking up oil and adds a tint to the skin. Starting with the forehead using swirling motions, move down to the side of the face to the cheeks, then cover nose, chin, and eyes.

»

Powder Foundation(9, 10, 11): Used over the entire face; evens out skin tone, sets liquid makeup and perfects areas where concealer was not used. Starting with the smaller powder brush (10) using swirling motions, cover the eyes, nose, and mouth area. Using the larger brush (11), cover the rest of the face in a similar fashion to the application of the mineral veil.
Eyebrows:

1. Bare Escentuals Essential Brow Color in Pale/Ash Blonde
2. Bare Escentuals Angled Brow Brush

»

Eyebrow Powder: Taking a cool tip from mingmeijun, first draw an arch, and then another line under it to form the bottom of the brow. Fill the rest in, and slightly thicken the outer part of the brow. I use the angle of the brush as a guide for the the of the head of the brow, as seen in step 3.
Contouring and Cheeks:

1. NARS Blush in Desire
2. Bare Escentuals Tapered Blush Brush
3. M•A•C Powder Blush in Well Dressed
4. Laura Geller Bronze N Brighten Baked Powder
5. Bare Escentuals Angled Face Brush

»

Bronzer(4): Used to highlight and downplay certain areas of the face, e.g. cheekbones, sides and tip of nose, jawline and sides of the forehead. Applied with angled brush (5).


Blush: Start with the darker shade of blush (1) on the lower portion of the apples of your cheeks. Blend from the nose out. With the lighter shade of blush (3), apply to the higher portion of the cheeks, blending up almost to the undereyes.↓

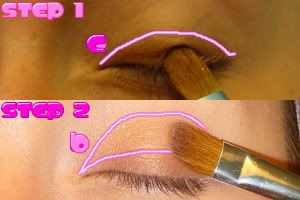
Eyes (Shadow):

1. Bourjois Eyeshadow Trio in Les Bruns Cuivre 41
2. Sonia Kashuk Medium Shadow Brush
3. Sonia Kashuk Lip Brush
Color Guide:


Eyeshadow: Starting with the upper lid, use the darkest shade (c) along the lash line from inner corner to outer, curving up in the middle of the lid using the medium shadow brush (2).Using the opposite side of the brush, wash the entire lid in the medium shade (b), keeping in mind to blend into the darkest shade.
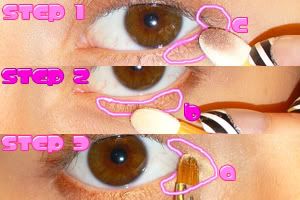
For the lower lid, start with the outer corner of the eye and using the sponge applicator (included with eyeshadow), use the darkest shade (c) again along the outer corner of the eye, as seen in Step 1 starting from outside inwards. Blend the medium shadow (b) from where the dark shadow ends, to just before the inner corner of the eye, as seen in Step 2. For the inner corners, apply the lightest shade (a) with the Lip Brush (3) shown in Step 3. Blending in this shade is not necessary.
Eyes (Liner):

1. Smashbox Jet Set Waterproof Eye Liner in Midnight Black
2. Smashbox Arched Eyeliner Brush 21
3. Revlon ColorStay Liquid Liner in Blackest Black
4. Bare Escentuals Eyeliner Brush
5. Sephora Professionnel Angled Liner/Eyeliner Brush #15
6. Japonesque Flat Eyeliner Brush
7. Revlon Bedroom Eyes Powder Liner in Fishnet Black
8. Disposable Lipgloss Applicator

Gel Eyeliner(1): By pinching your eyelashes between your fingers and lifting the eyelid up, apply along the inner part of the upper lid.

Liquid Liner: Using the same brush (2) or the smaller-tipped eyeliner brush (4), line the lower lid from the inner corner to 1/3 of the way to the end, curving to accentuate the shape of the eye (Step 1). The for the outer corner portion, bring the line down and up, leaving space the give the eyes a wider look (Step 2).

Liquid Liner (Continued; Upper Eye): The cover the hard to reach area of the actual lashline, using the flat eyeliner brush (6), nudge the brush into the lashes. Precision is not necessary, as this will be covered over.


Liquid Liner (Continued; Upper Eye): Using the angled liner brush (5), line the inner corner of the eye, then line the rest of the upper lid with either the the angled brush or the arched liner brush (5 or 2). To get the arched tip on the line, slightly stretch the lid with your finger and release the pressure on the brush while curving up a bit.

Liner Shadow(7, 8): Dipping a disposable lipgloss applicator into the liner shadow to prevent specks of it from falling onto your face, use this along the outer corner to connect the upper and lower liner lines. Can also be used along the lines themselves to refine and soften them.
Lash:

1. NYC Eyelash Curler
2. Bare Escentuals Brow Finishing Gel (Also Recommended: M·A·C Prep+Prime Lash)
3. Dior Diorshow Waterproof Mascara in Black 90
4. stila Multi-Effect Mascara in Black
5. (Not used here) Dr. Denese Lash Faker Mascara Duo

Curling and Priming(1,2): First, curl your lashes at the base of the lash, then brush primer (2) onto lashes. After the primer dries, curl lashes again.

Mascara: Apply by starting with the outer lash, by nudging the brush into the base of the lashes and wiggling the brush from side to side pulling up as you do, coating the lash from bottom to top.
You can add extra length by closing the eyes and brushing the tips liberally with the brush.

Very lightly pressing the brush into the base of the lashes, wiggle the brush downwards. Use the other side of the brush to coat the tips of the lashes.
↓

Lips:

1. Fusion Beauty LipFusion Color Shine in Clear
2. Maybelline Cover Stick Corrector Concealer in Medium Beige (Also Recommended: M·A·C Lip Erase)
3. Dior DiorAddict Ultra Gloss Reflect in Jersey Pink (Also Recommended in Cotton Petal and Organza Pink)

Gloss: Aplly clear gloss as an undercoat.

Nude Lip: Simply glide over the lips and blend with your fingers. The gloss undercoat keeps this from drying out the lips and settling into cracks.

Gloss: Apply as a top coat. I recommend using a gloss with a pink tone, to gove a bit of color back to the lips after neutralizing them.
... Done!


Notes:
1. Brows: Because my hair is dyed lighter than my natural hair color, and my eyebrow hair is quite thick, I find it's easier to just draw my brows in. I leave a bit of stubble (kind of like a five o'clock shadow. xD) as a guide so I can... remember where my eyebrows are.
I used to trim my eyebrows off with tiny scissors, but I've started to shave (yes, shave) them off with a cheap mini electric razor like this. My Chinese auntie plucked hers out all her life, and now they don't grow at all. With shaving they actually will grow back, so it pretty much does the same thing as trimming, it's just... faster.
Though, don't use the kind of razor you'd use on your legs on your brows.
2. Disposable lipgloss applicators, like the one used in the eyeliner portion of the tutorial, can be found in the sample bin at any makeup counter. I always ~steal~ a few whenever I'm at Sephora and such and they're not just for lipwear! They're usually made pretty well, so you can reuse and wash them.
3. Clear Gloss: You can use any type of clear gloss, but since I've used LipFusion here this may need a bit of explaining. LipFusion is a lip plumper:
"Tiny, dehydrated, marine collagen micro spheres are instantly absorbed by the lips, and seek out the body's natural moisture. As soon as the spheres become rehydrated, they plump and hold onto the moisture they've collected, creating a mild "swelling" of the lip tissue. The result is fuller, smoother, perfectly plumped lips in seconds. Results can last for up to 48 hours."
48 hours is stretching it, but for me it lasts about 24 hours. Most lips plumpers plump by irritating the lips (Urban Decay's Big Fatty Lip Plumper burns the lips with cinnamon and chili to plump, causing the lips to also turn bright red from my experience), but with LipFusion, there is an odd feeling, but no pain or uncomfortable burning or cooling sensations. It also doesn't redden your lips, and the smell is light and pleasant (perfume and scented products affect me like nerve gas, and I don't have a problem with this scent). Good stuff.