#35 - Alice Tutorial.
Going from:
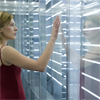
to
or
Involves selective color.
This tutorial was based off of this header I made, by the way.
1. Begin with base:

2. Duplicate your base and set the layer to SCREEN (feel free to change the opacity as needed):

3. Duplicate your base again, bring to the top and set the layer to SOFTLIGHT:

4. Go to Layer>New Adjustment Layer>COLOR BALANCE, enter in:
MIDTONES: -18, -10, 15
SHADOWS: 8, -9, -5
-NO HIGHLIGHTS-

5. Create a new layer filled with #a29c6c and set the layer to SOFTLIGHT:

>
6. Create a new layer filled with #c4c1ec and set the layer to COLOR BURN:

>
7. Go to Layer>New Adjustment Layer>HUE/SATURATION, enter in:
Master: 0, 40, 0
Set this layer to NORMAL 51%

8. Go to Layer>New Adjustment Layer>SELECTIVE COLOR, enter in:
REDS: -59, -11, -56, -13
YELLOWS: -45, 7, 14, -27
-NO GREENS-
CYANS: 100, -53, -100, 37
BLUES: 100, -21, 13, 32
MAGENTAS: -100, 32, -23, -11
WHITES: 0, 0, 0, -12
NEUTRALS: 26, 7, 10, -11
BLACKS: 0, 0, 0, 24

9. Now, DUPLICATE that SELECTIVE COLOR layer, but change:
REDS: -47, -11, -11, -13
CYANS: 100, -32, -18, 37
MAGENTAS: -100, 22, 100, -14

And the coloring is complete! Now, if you dare to continue...
10. First, Copy Merged & paste it on top of all the layers (ALT+CTRL+SHIFT+E). You can make this layer invisible (by clicking on the eye) for now.
11. Using a texture which came from this texture by abernathi, paste it on and set the layer to HARDLIGHT:
>
12. Now, using that MERGED COPY, drag it to the top (make it visible), and set the layer to DIFFERENCE (you'll see a difference, hohoho):
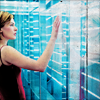
13. Using this texture made by me, paste it on and set the layer to SCREEN:

>
Really, for this texture though, all I did was get a black 100x100px layer and using the LASSO TOOL, selected an area. Using the PAINT BUCKET TOOL, I filled in the area with white. It's not very complicated :/.
14. Now, in 15pt Dymo font, I wrote "ALICE" in black (#000000), I also rotated it about 2 degrees counter-clockwise (using the FREE TRANSFORM (CTRL+T) on PS):

15. Now using this texture(?) by me, paste it on and set the layer to MULTIPLY 28%:
>
16. Now, remember that MERGED COPY? Well, DUPLICATE that layer and set it to SOFTLIGHT 71%:

17. Using this texture made by me, paste it on and set the layer to SCREEN:

>
And it is complete!!! Before you go, make sure to comment, question, and join!
Other examples:






.PSD file<<<<<<
-Kelsey

to

or

Involves selective color.
This tutorial was based off of this header I made, by the way.
1. Begin with base:

2. Duplicate your base and set the layer to SCREEN (feel free to change the opacity as needed):

3. Duplicate your base again, bring to the top and set the layer to SOFTLIGHT:

4. Go to Layer>New Adjustment Layer>COLOR BALANCE, enter in:
MIDTONES: -18, -10, 15
SHADOWS: 8, -9, -5
-NO HIGHLIGHTS-

5. Create a new layer filled with #a29c6c and set the layer to SOFTLIGHT:

>

6. Create a new layer filled with #c4c1ec and set the layer to COLOR BURN:

>

7. Go to Layer>New Adjustment Layer>HUE/SATURATION, enter in:
Master: 0, 40, 0
Set this layer to NORMAL 51%

8. Go to Layer>New Adjustment Layer>SELECTIVE COLOR, enter in:
REDS: -59, -11, -56, -13
YELLOWS: -45, 7, 14, -27
-NO GREENS-
CYANS: 100, -53, -100, 37
BLUES: 100, -21, 13, 32
MAGENTAS: -100, 32, -23, -11
WHITES: 0, 0, 0, -12
NEUTRALS: 26, 7, 10, -11
BLACKS: 0, 0, 0, 24

9. Now, DUPLICATE that SELECTIVE COLOR layer, but change:
REDS: -47, -11, -11, -13
CYANS: 100, -32, -18, 37
MAGENTAS: -100, 22, 100, -14

And the coloring is complete! Now, if you dare to continue...
10. First, Copy Merged & paste it on top of all the layers (ALT+CTRL+SHIFT+E). You can make this layer invisible (by clicking on the eye) for now.
11. Using a texture which came from this texture by abernathi, paste it on and set the layer to HARDLIGHT:

>

12. Now, using that MERGED COPY, drag it to the top (make it visible), and set the layer to DIFFERENCE (you'll see a difference, hohoho):

13. Using this texture made by me, paste it on and set the layer to SCREEN:

>

Really, for this texture though, all I did was get a black 100x100px layer and using the LASSO TOOL, selected an area. Using the PAINT BUCKET TOOL, I filled in the area with white. It's not very complicated :/.
14. Now, in 15pt Dymo font, I wrote "ALICE" in black (#000000), I also rotated it about 2 degrees counter-clockwise (using the FREE TRANSFORM (CTRL+T) on PS):

15. Now using this texture(?) by me, paste it on and set the layer to MULTIPLY 28%:

>

16. Now, remember that MERGED COPY? Well, DUPLICATE that layer and set it to SOFTLIGHT 71%:

17. Using this texture made by me, paste it on and set the layer to SCREEN:

>

And it is complete!!! Before you go, make sure to comment, question, and join!
Other examples:


.PSD file<<<<<<
-Kelsey