[re-post] set #39
TUTORIAL
A tutorial on how to make those diagonal scanlines you see on icons/graphics/layouts/etc.
Example:

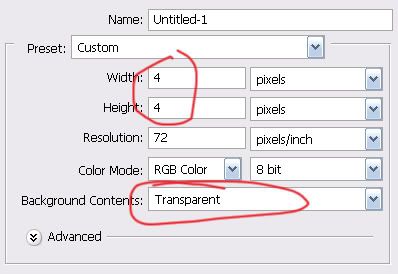
1. Open up a new file. File > New (4x4 px, transparent)
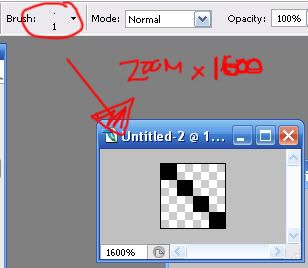
2. Zoom all the way in (x1600) so you can see the whole thing. Select the pencil tool (1px, black)

3. Then make 4 dots going diagonally.
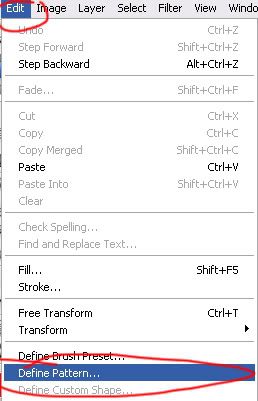
4. Go to Edit > Define Pattern... > Name it whatever you want and hit OK

You're done making the pattern. Now.. putting it on the image.
5. Open up the image you'd like. For this tut I'm going to use a texture made by gender

6. Go to Edit > Fill
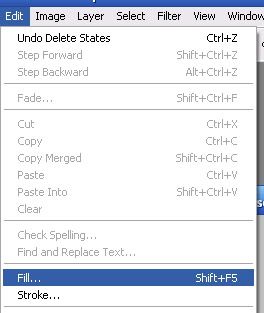
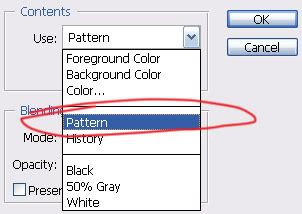
7. Use: Pattern
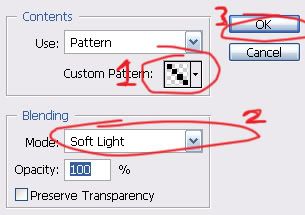
8. Click on the custom pattern image and select the pattern that you made a while ago. Set it to Soft Light. You can change the opacity if you'd like and hit OK.
9. And there you have it.

If you want the lines to go the other way just open up a file 4x4 px and make the lines the other way.

EXAMPLE

Other lines:
GRID

6x6 px, 1px pencil
EXAMPLE

SCANLINE

1x2 px, 1px pencil
EXAMPLE

DOT

3x3 px, 1px pencil
EXAMPLE

Hope that helped!! ^^
Comments are always love and so is credit.
A tutorial on how to make those diagonal scanlines you see on icons/graphics/layouts/etc.
Example:

1. Open up a new file. File > New (4x4 px, transparent)

2. Zoom all the way in (x1600) so you can see the whole thing. Select the pencil tool (1px, black)

3. Then make 4 dots going diagonally.

4. Go to Edit > Define Pattern... > Name it whatever you want and hit OK


You're done making the pattern. Now.. putting it on the image.
5. Open up the image you'd like. For this tut I'm going to use a texture made by gender

6. Go to Edit > Fill

7. Use: Pattern

8. Click on the custom pattern image and select the pattern that you made a while ago. Set it to Soft Light. You can change the opacity if you'd like and hit OK.

9. And there you have it.

If you want the lines to go the other way just open up a file 4x4 px and make the lines the other way.

EXAMPLE

Other lines:
GRID

6x6 px, 1px pencil
EXAMPLE

SCANLINE

1x2 px, 1px pencil
EXAMPLE

DOT

3x3 px, 1px pencil
EXAMPLE

Hope that helped!! ^^
Comments are always love and so is credit.