Tutorial #3
Go from 
to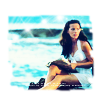
Created in Photoshop Elements 4.0
Image heavy!

2. Crop to 100 x 100.
3. Duplicate and set to Multiply 100% opacity.

4. Duplicate twice and set both to Screen 100% opacity.

5. Duplicate top Screen layer and set to Soft Light 100% opacity.

6. Fill layer with #0092E0 and set to Overlay 60% opacity.
Erase any blue colouring on Kate's face and body.

~~>
7. Fill layer with #090724 and set to Exclusion 100% opacity.

~~>
8. Fill layer with #F9DECA and set to Soft Light 50% opacity.

~~>
9. Duplicate base and drag to top. Completely desaturate and set to Soft Light 50% opacity.

10. Paste this light texture by colorfilter and set to Soft Light 100% opacity.
Rotate texture to the right 90 degrees and flip vertically. Erase anything lingering on Kate's face.

~~>
11. Paste this light texture by colorfilter and set to Screen 25% opacity. Flip texture horizontally.

~~>
12. Flatten image. Duplicate layer and set to Soft Light 100% opacity. Desaturate to -10.
13. Paste this mask by fangirls_inc and set to Screen 100% opacity.
Erase any dots on Kate's face & hair.

~~>
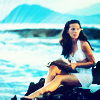
Voila, we're done!
The textures I added were subtle, but really came alive once I did step #12.
Play around with textures and colours until you like what you see. I experimented with a lot of textures and opacities before settling on these.
Hope you enjoyed the tut. Comments are ♥... thanx!
Cross-posted at elementheads & icon_tutorial
to
Created in Photoshop Elements 4.0
Image heavy!
- Tutorial #3 - Pearl Harbor

2. Crop to 100 x 100.
3. Duplicate and set to Multiply 100% opacity.
4. Duplicate twice and set both to Screen 100% opacity.
5. Duplicate top Screen layer and set to Soft Light 100% opacity.
6. Fill layer with #0092E0 and set to Overlay 60% opacity.
Erase any blue colouring on Kate's face and body.
~~>
7. Fill layer with #090724 and set to Exclusion 100% opacity.
~~>
8. Fill layer with #F9DECA and set to Soft Light 50% opacity.
~~>
9. Duplicate base and drag to top. Completely desaturate and set to Soft Light 50% opacity.
10. Paste this light texture by colorfilter and set to Soft Light 100% opacity.
Rotate texture to the right 90 degrees and flip vertically. Erase anything lingering on Kate's face.
~~>
11. Paste this light texture by colorfilter and set to Screen 25% opacity. Flip texture horizontally.
~~>
12. Flatten image. Duplicate layer and set to Soft Light 100% opacity. Desaturate to -10.
13. Paste this mask by fangirls_inc and set to Screen 100% opacity.
Erase any dots on Kate's face & hair.
~~>
Voila, we're done!
The textures I added were subtle, but really came alive once I did step #12.
Play around with textures and colours until you like what you see. I experimented with a lot of textures and opacities before settling on these.
Hope you enjoyed the tut. Comments are ♥... thanx!
Cross-posted at elementheads & icon_tutorial