Full animation tutorial.
I've been taking this post on and off, but then I saw that other animation tutorials are a bit too difficult, I decided to post this one anyone. I hope it'll help some of my readers.
We'll be making this icon:
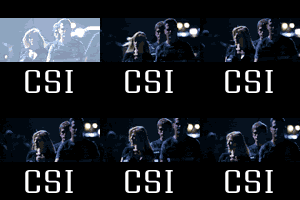
For making my icons I use Adobe Photoshop (7.0), Image Ready. And for capturing images I use VirtualDub-MPEG. It's no longer available anywhere, so I uploaded it for you - here (right-click with your mouse, select "save as...", save, unzip and run/install). I'd love to thank grey_hunter for pointing me in direction of this program to begin with! :)
This tutorial will be long, detailed and with a lot of pictures - so you won't have many additional questions :)
Part I - Capturing images
1. Create a new folder, name it (for example) "caps1".
2. Open VirtualDub. Open needed video file with it. Then choose needed bit of video with "Mark In" and "Mark Out" (fish-hook-looking thingies at the bottom, in the right part of it). Don't choose to much. I scroll my videos with keybord keys (arrows - to the left and to the right).
3. Now happens the most important stuff - you have to change some options. Go to Video->Frame Rate. At "frame rate convention" choose "process every 3d frame". We're finished here for now. But you still have to save those caps, don't you? So go to File->Save image sequence and in "Directory to hold images" show a path to that "caps1" folder that you created before. Press OK. The caps are ready. Yay!
4. As I'm very kind and lovely today, I uploaded my folder with already captured frames here (600 kb, zipped). Feel free to download it and use it for tutorial (or any other purposes :) ).
Part II - Getting prepared in Photoshop
1. Create a new image in photoshop (with transparent background). Create another layer and, using "Paint bucket", fill it with black color.
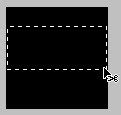
2. With "Rectangular Marquee tool" select middle part and delete it (pressing "delete" button on your keyboard). Like this:
-->
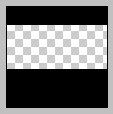
3. Then we'll add some text on it ("CSI" for example). I used "As seen on TV". I made spacing 120%, but it's just what I like to do :)
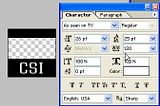
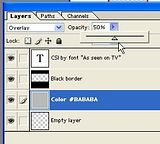
4. Now create another layer and fill it with color "#BABABA" :) And set it to "Overlay" with opacity 50% (it'll brighten up our pictures a bit). Now you panel with layers will look like this:
5. And finally, we're ready to jump to "Image Ready" - by pressing that button:

Part III - Finally woking with Image Ready
(don't get me wrong, but I want to hang myself at this point. it's a really tiresome tutorial. I reeeeeeeeeeeeeeeeally hope that you'll like it and that you'll find it useful. otherwise... *crying*)
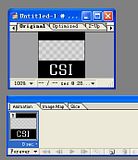
1. Just look around and don't be nervous. If you did everything right (and I'm sure you were great!) you'll see it:
2. Now - the most challenging stuff: getting all your caps together for the work in Image Ready. It's not as scary as it might sound. Just press "File"-->"Import"-->"Folder as frames...". You have to choose your "caps1" folder. But for the sake of my sanity we'll think that you're picking those caps that I offered earlier (to use them you have to unzip them, then save in a different folder - let's name it "caps from lidi", and while choosing a folder for this "Folder as frames..." thingy, choose "caps from lidi", ok?)
I'm crossing my fingers that you did it okay, and you'll have something like it:
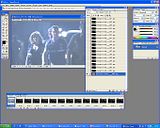
3. Next step is to link all layers with caps together. For that we have "link" thingy. Choose bottom layer of your caps, click on it and then just check every link box till the upper layer of your caps, so it'll look like this (and only like this!!! it's important).

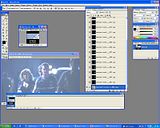
4. Now the fun starts. Find your window with future icon. Select first transparent layer (it's important, because after dragging other layers with caps, new ones (i.e. caps) will be placed above the last selected layer in the future icon. So we need all new layers (i.e. caps) to be placed above transparent layer. It's confusing, I know. But have a little faith :) )
Then find a window with all caps (with linked layers) and place your mouse over the picture, press left buttom, then drag picture into window with our future icon. And drop. Luckily you'll get this:
Part IV - Getting back to Photoshop
we're so close to the end!! oh my!! so be brave! :))
1. Get back to Photoshop (press the button "Jump to photoshop" at Tools).
2. While you're back there, make sure that you choose first layer of the linked caps (you know, in our banch it's the most white one). Then press Crtl+T (or "Edit"-->"Free transform") and make the picture smaller, so it would fit our icon. If you don't want to sqeeze caps or make them look weird, press "Shift" during transformation. It'll preserve aspect ratio.
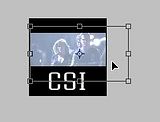
3. I always sharpen pictures, because after transormation they all look blurry. For that you can either sharpen them ("Filter"-->"Sharpen"-->"Sharpen") or do what I do - use Unsharp mask (Filter"-->"Sharpen"-->"Unsharp Mask"), because simple sharpening might be too much and too strong.
I use these settings:
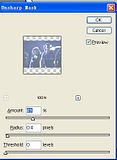
Once you sharpened one image, you can just choose other layers and press "Ctrl+F" (this way the layer will "get" the last used Filter - and in our case it's sharpening). It's much faster this way.
4. As I don't know any smart way to apply an effect to all linked layers, I do it layer by layer. Just make sure to make visible only first layer in the end (so that "eye" thingy will be only by the first, most bright layer). Here's the picture to illustrate my vague point of view:

Part V - Creating icon and setting it free!
Now it's only matter of minutes before you and me will be having so-well-earned-rest! :)
1. Get back to Image Ready. Do you see how on that piccy you got "0 sec" at the bottom of your icon animation? We've got to change it.

And we will be changing it to "0,2 sec". So your animation won't be too fast.
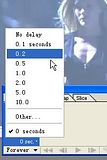
2. Now it's time for some real animation!! We've been preparing for it oh-so-long! :) Just press on that curved-paper-like-thingy which says "Duplicates current frame" (if you move mouse over it, you can read it :) ).

You should get this (yay! it's almost an animation :) )

3. Now you should press eye-thingy near second layer of caps. (this way on the second frame of animation will be different picture).

4. Now press curved-paper-like thingy to create another frame and press eye-thingy for third layer of caps. Then press curved-paper-like thingy once again and press eye-thingy for fouth layer of caps. Repeat till till you use all of your 18 layers of caps.
5. Now you have to "Optimize" you image. The less colors you use, the more frames you can put into your icon before it jumps over 40 kb :) That's why I choose 32 colors. Look, you'll see it here:

and, happy moment - our animated icon is ready and it's only 25 kb!!!
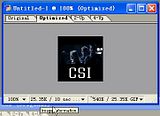
(you can preview it by pressing play button - it's a small triange to the left of curver-paper-like thingy. you have to press stop to do something to your icons. while it plays for you pleasure, you can't modify it).
6. Saving an icon. Just press "File"-->"Save optimized as..." and save it! :) That's all!!!

We have this beauty ready! Amazing, isn't it? :))

7. That's all :))) I'd love to congratulate you on completing this tutorial. I hope you did just fine and that you liked the result. And I wish you good luck with all your future animated icons. I'm sure now you'll be making them quick and lovely :)
You can check out my latest animated icons and see that you can make something like that too! :) Isn't it great? :)
UPDATE: If you're getting errors with VirtualDub about some missing VFW compatible codec, you might try downloading it from here - http://www.strangeprogress.com/node/24 But in that case it's easier to switch to BSPlayer (I think ;) ) and work with it instead.
P.S. If you like my tutorials, icons or videos feel free to friend me!
We'll be making this icon:

For making my icons I use Adobe Photoshop (7.0), Image Ready. And for capturing images I use VirtualDub-MPEG. It's no longer available anywhere, so I uploaded it for you - here (right-click with your mouse, select "save as...", save, unzip and run/install). I'd love to thank grey_hunter for pointing me in direction of this program to begin with! :)
This tutorial will be long, detailed and with a lot of pictures - so you won't have many additional questions :)
Part I - Capturing images
1. Create a new folder, name it (for example) "caps1".
2. Open VirtualDub. Open needed video file with it. Then choose needed bit of video with "Mark In" and "Mark Out" (fish-hook-looking thingies at the bottom, in the right part of it). Don't choose to much. I scroll my videos with keybord keys (arrows - to the left and to the right).
3. Now happens the most important stuff - you have to change some options. Go to Video->Frame Rate. At "frame rate convention" choose "process every 3d frame". We're finished here for now. But you still have to save those caps, don't you? So go to File->Save image sequence and in "Directory to hold images" show a path to that "caps1" folder that you created before. Press OK. The caps are ready. Yay!
4. As I'm very kind and lovely today, I uploaded my folder with already captured frames here (600 kb, zipped). Feel free to download it and use it for tutorial (or any other purposes :) ).
Part II - Getting prepared in Photoshop
1. Create a new image in photoshop (with transparent background). Create another layer and, using "Paint bucket", fill it with black color.
2. With "Rectangular Marquee tool" select middle part and delete it (pressing "delete" button on your keyboard). Like this:

-->

3. Then we'll add some text on it ("CSI" for example). I used "As seen on TV". I made spacing 120%, but it's just what I like to do :)

4. Now create another layer and fill it with color "#BABABA" :) And set it to "Overlay" with opacity 50% (it'll brighten up our pictures a bit). Now you panel with layers will look like this:

5. And finally, we're ready to jump to "Image Ready" - by pressing that button:

Part III - Finally woking with Image Ready
(don't get me wrong, but I want to hang myself at this point. it's a really tiresome tutorial. I reeeeeeeeeeeeeeeeally hope that you'll like it and that you'll find it useful. otherwise... *crying*)
1. Just look around and don't be nervous. If you did everything right (and I'm sure you were great!) you'll see it:

2. Now - the most challenging stuff: getting all your caps together for the work in Image Ready. It's not as scary as it might sound. Just press "File"-->"Import"-->"Folder as frames...". You have to choose your "caps1" folder. But for the sake of my sanity we'll think that you're picking those caps that I offered earlier (to use them you have to unzip them, then save in a different folder - let's name it "caps from lidi", and while choosing a folder for this "Folder as frames..." thingy, choose "caps from lidi", ok?)
I'm crossing my fingers that you did it okay, and you'll have something like it:

3. Next step is to link all layers with caps together. For that we have "link" thingy. Choose bottom layer of your caps, click on it and then just check every link box till the upper layer of your caps, so it'll look like this (and only like this!!! it's important).

4. Now the fun starts. Find your window with future icon. Select first transparent layer (it's important, because after dragging other layers with caps, new ones (i.e. caps) will be placed above the last selected layer in the future icon. So we need all new layers (i.e. caps) to be placed above transparent layer. It's confusing, I know. But have a little faith :) )
Then find a window with all caps (with linked layers) and place your mouse over the picture, press left buttom, then drag picture into window with our future icon. And drop. Luckily you'll get this:

Part IV - Getting back to Photoshop
we're so close to the end!! oh my!! so be brave! :))
1. Get back to Photoshop (press the button "Jump to photoshop" at Tools).
2. While you're back there, make sure that you choose first layer of the linked caps (you know, in our banch it's the most white one). Then press Crtl+T (or "Edit"-->"Free transform") and make the picture smaller, so it would fit our icon. If you don't want to sqeeze caps or make them look weird, press "Shift" during transformation. It'll preserve aspect ratio.

3. I always sharpen pictures, because after transormation they all look blurry. For that you can either sharpen them ("Filter"-->"Sharpen"-->"Sharpen") or do what I do - use Unsharp mask (Filter"-->"Sharpen"-->"Unsharp Mask"), because simple sharpening might be too much and too strong.
I use these settings:

Once you sharpened one image, you can just choose other layers and press "Ctrl+F" (this way the layer will "get" the last used Filter - and in our case it's sharpening). It's much faster this way.
4. As I don't know any smart way to apply an effect to all linked layers, I do it layer by layer. Just make sure to make visible only first layer in the end (so that "eye" thingy will be only by the first, most bright layer). Here's the picture to illustrate my vague point of view:

Part V - Creating icon and setting it free!
Now it's only matter of minutes before you and me will be having so-well-earned-rest! :)
1. Get back to Image Ready. Do you see how on that piccy you got "0 sec" at the bottom of your icon animation? We've got to change it.

And we will be changing it to "0,2 sec". So your animation won't be too fast.

2. Now it's time for some real animation!! We've been preparing for it oh-so-long! :) Just press on that curved-paper-like-thingy which says "Duplicates current frame" (if you move mouse over it, you can read it :) ).

You should get this (yay! it's almost an animation :) )

3. Now you should press eye-thingy near second layer of caps. (this way on the second frame of animation will be different picture).

4. Now press curved-paper-like thingy to create another frame and press eye-thingy for third layer of caps. Then press curved-paper-like thingy once again and press eye-thingy for fouth layer of caps. Repeat till till you use all of your 18 layers of caps.
5. Now you have to "Optimize" you image. The less colors you use, the more frames you can put into your icon before it jumps over 40 kb :) That's why I choose 32 colors. Look, you'll see it here:

and, happy moment - our animated icon is ready and it's only 25 kb!!!

(you can preview it by pressing play button - it's a small triange to the left of curver-paper-like thingy. you have to press stop to do something to your icons. while it plays for you pleasure, you can't modify it).
6. Saving an icon. Just press "File"-->"Save optimized as..." and save it! :) That's all!!!

We have this beauty ready! Amazing, isn't it? :))

7. That's all :))) I'd love to congratulate you on completing this tutorial. I hope you did just fine and that you liked the result. And I wish you good luck with all your future animated icons. I'm sure now you'll be making them quick and lovely :)
You can check out my latest animated icons and see that you can make something like that too! :) Isn't it great? :)
UPDATE: If you're getting errors with VirtualDub about some missing VFW compatible codec, you might try downloading it from here - http://www.strangeprogress.com/node/24 But in that case it's easier to switch to BSPlayer (I think ;) ) and work with it instead.
P.S. If you like my tutorials, icons or videos feel free to friend me!