tutorials #2 (emilie de ravin)
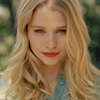
Going from this: 
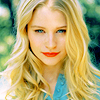
to this:
Translatable?: NO (Made with PS7)
Involves: Colour Balance, Selective Colouring, Hue/Saturation
PSD File: YES
Comments: Works best on bland images
NOTE: I borrowed steps 4 and 5 from this tutorial by cherrysunsets
1. Duplicate (Ctrl+J) base and set to Multiply at %100
2. Duplicate the Multiply layer, but set it to Screen at %100
3. Duplicate the Screen layer, leave it as a Screen layer, but this time at %50 (This step may not be necessary, depending on your base. If the image is too bright at the end result, go back and delete this layer or lower the opacity).
4. Hue/Saturation:
Master:
Hue: 0
Saturation: +25 (Will depend on image)
Lightness: 0
5. Selective Colouring:
Reds, -70, 0, +30, 0
Yellows, 0, 0, +100, 0
Cyans, +100, 0, -100, 0
Blues, +100, +40, -100, 0
Magentas, -100, +100, -100, 0
Whites, 100, 0, -100, 0
Neutrals, -10, +5, +10, 0
Blacks, 0, 0, 0, +40
6. Colour Balance:
Midtones, -48, -55, +100
7. Colour Balance:
Midtones, -100, +47, +28
8. Colour Balance:
Midtones, +50, +23, -55
Step 8 will depend greatly on how much blue you want in the image, I suggest adding more yellow and red if the image is too blue.
9. Selective Colouring:
Whites, -100, 0, 0, 0
Download PSD File.
More examples of this tutorial being used here. All the Emilie de Ravin icons were coloured using this tutorial, some were adjusted depending on the base image.
Don't hesitate to ask if you don't understand something, and tell me if I got something wrong. I don't think I did, but you never know *g*
Remember, you don't have to follow the tut exactly, mess around with the settings/opacities and number of screen levels.

to this:

Translatable?: NO (Made with PS7)
Involves: Colour Balance, Selective Colouring, Hue/Saturation
PSD File: YES
Comments: Works best on bland images
NOTE: I borrowed steps 4 and 5 from this tutorial by cherrysunsets
1. Duplicate (Ctrl+J) base and set to Multiply at %100
2. Duplicate the Multiply layer, but set it to Screen at %100
3. Duplicate the Screen layer, leave it as a Screen layer, but this time at %50 (This step may not be necessary, depending on your base. If the image is too bright at the end result, go back and delete this layer or lower the opacity).
4. Hue/Saturation:
Master:
Hue: 0
Saturation: +25 (Will depend on image)
Lightness: 0
5. Selective Colouring:
Reds, -70, 0, +30, 0
Yellows, 0, 0, +100, 0
Cyans, +100, 0, -100, 0
Blues, +100, +40, -100, 0
Magentas, -100, +100, -100, 0
Whites, 100, 0, -100, 0
Neutrals, -10, +5, +10, 0
Blacks, 0, 0, 0, +40
6. Colour Balance:
Midtones, -48, -55, +100
7. Colour Balance:
Midtones, -100, +47, +28
8. Colour Balance:
Midtones, +50, +23, -55
Step 8 will depend greatly on how much blue you want in the image, I suggest adding more yellow and red if the image is too blue.
9. Selective Colouring:
Whites, -100, 0, 0, 0
Download PSD File.
More examples of this tutorial being used here. All the Emilie de Ravin icons were coloured using this tutorial, some were adjusted depending on the base image.
Don't hesitate to ask if you don't understand something, and tell me if I got something wrong. I don't think I did, but you never know *g*
Remember, you don't have to follow the tut exactly, mess around with the settings/opacities and number of screen levels.