Tutorial
simple coloring tutorial using psp9.
Going from this to
Cap from csi-caps
Firstly open your program you'll be using. I'm using PSP9.
Open up you screen cap. I'll be using this photo of Catherine willows from CSI.

ADJUST >> ONE STEP PHOTOFIX
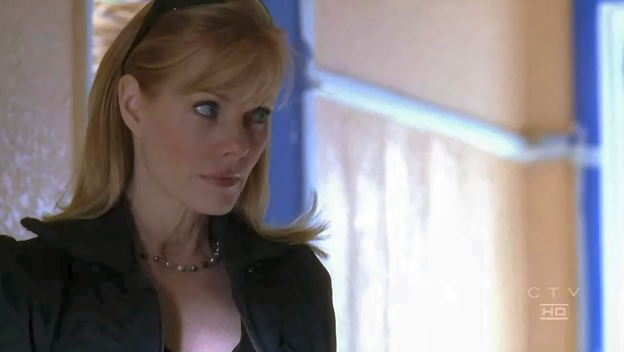
Duplicate your base.
ADJUST >> AUTOMATIC COLOR BALANCE
settings: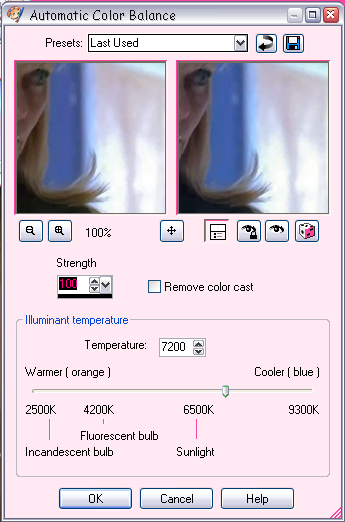
ADJUST >> AUTOMATIC CONTRAST ENHANCEMENT
settings: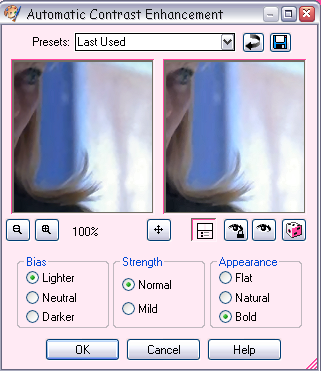
ADJUST >> AUTOMATIC SATURATION ENHANCEMENT
settings: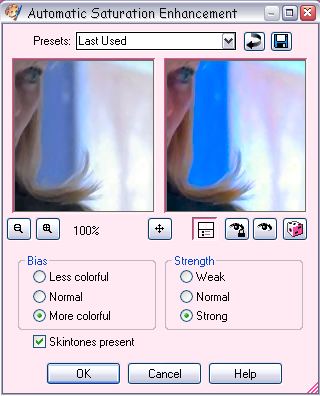
ADJUST >> BRIGHTNESS&CONTRAST >> CLARIFY
settings: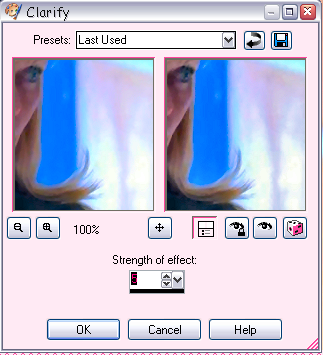
Set layer to SCREEN / OPACITY 100
You should now have:

You still with me? Good.
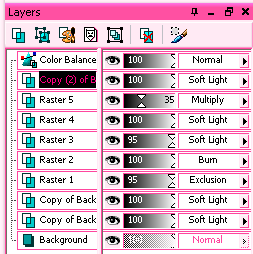
Duplicate your base twice set both to SOFT LIGHT / OPACITY 100. Desaturate the top layer (shift+h; drag the saturation bar down to -100).
Add a new EXCLUSION / OPACITY 95 layer. Fill with #113067
Add a new BURN / OPACITY 100 layer. Fill with #bce6f2
Add a new SOFT LIGHT / OPACITY 95 layer. Fill with #ffd991
Add a new SOFT LIGHT / OPACITY 100 layer. Fill with #fc9191
Add a new MULTIPLY / OPACITY 35 layer. Fill with #f8dc9e
Remember the desaturated base layer? Duplicate it drag it to the top.
Now go to LAYERS >> NEW ADJUSTMENT LAYER >> COLOR BALANCE
My Settings:
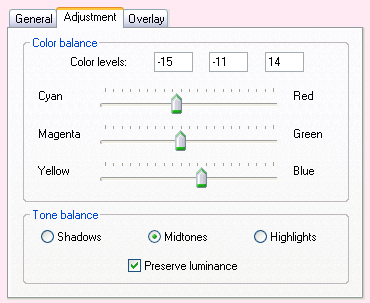
Make sure the PRESERVER LUMINANCE button is checked. First click SHADOWS type in the settings. DO NOT CLICK OK Click MIDTONES put the settings in. Again do not click OK. Then click highlights and put the settings in. You may now press OK.
Your layers should now look like this:
Merge all.
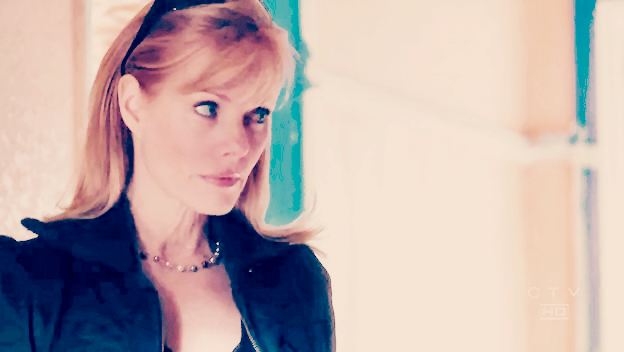
Now crop your base to your liking. Mine is 300x300.

Resize to 100x100. Sharpen.

Your done. =]
PLEASE DO NOT COPY EXACTLY LIKE THIS I DON'T WANT EVERYONE WITH THE SAME COLORING AS ME.
Other Examples:


Like what you see? Join the community.
Going from this to
Cap from csi-caps
Firstly open your program you'll be using. I'm using PSP9.
Open up you screen cap. I'll be using this photo of Catherine willows from CSI.
ADJUST >> ONE STEP PHOTOFIX
Duplicate your base.
ADJUST >> AUTOMATIC COLOR BALANCE
settings:
ADJUST >> AUTOMATIC CONTRAST ENHANCEMENT
settings:
ADJUST >> AUTOMATIC SATURATION ENHANCEMENT
settings:
ADJUST >> BRIGHTNESS&CONTRAST >> CLARIFY
settings:
Set layer to SCREEN / OPACITY 100
You should now have:
You still with me? Good.
Duplicate your base twice set both to SOFT LIGHT / OPACITY 100. Desaturate the top layer (shift+h; drag the saturation bar down to -100).
Add a new EXCLUSION / OPACITY 95 layer. Fill with #113067
Add a new BURN / OPACITY 100 layer. Fill with #bce6f2
Add a new SOFT LIGHT / OPACITY 95 layer. Fill with #ffd991
Add a new SOFT LIGHT / OPACITY 100 layer. Fill with #fc9191
Add a new MULTIPLY / OPACITY 35 layer. Fill with #f8dc9e
Remember the desaturated base layer? Duplicate it drag it to the top.
Now go to LAYERS >> NEW ADJUSTMENT LAYER >> COLOR BALANCE
My Settings:
Make sure the PRESERVER LUMINANCE button is checked. First click SHADOWS type in the settings. DO NOT CLICK OK Click MIDTONES put the settings in. Again do not click OK. Then click highlights and put the settings in. You may now press OK.
Your layers should now look like this:
Merge all.
Now crop your base to your liking. Mine is 300x300.
Resize to 100x100. Sharpen.
Your done. =]
PLEASE DO NOT COPY EXACTLY LIKE THIS I DON'T WANT EVERYONE WITH THE SAME COLORING AS ME.
Other Examples:
Like what you see? Join the community.