Icon Tutorial
So over at icon_talk I signed up and tor_na_do asked for a tutorial. I'll be explaining how I made this:

Just a FYI: I'm an idiot and didn't actually save the original so I made it again. They're basically identical. This is my first tutorial so bear with me.
Step 1:
I use AVS Video Converter. I paid for this but I'm sure there are free programmes out there that do the job.
I open the episode of Merlin in AVS and select the footage I want. It then converts the file from avi to mov. Once that is saved to a folder I open Photoshop CS4.
Step 2:
File> Import> Video Frames to Layers...
Select the mov. file and this box will appear:
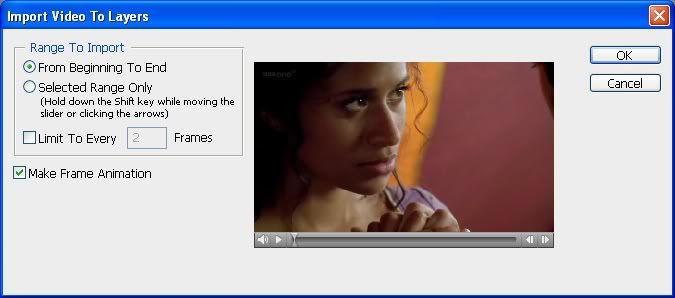
I always limit to every 4 or 5 frames, depending on the file size. In this case it was just a short clip so I limited it to every 3 frames. Press OK.
Step 3:
Windows > Animation. The animation frame palette will pop up. Looks like this now:
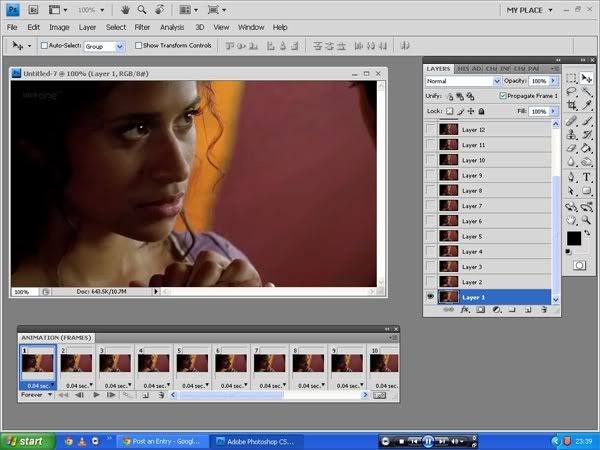
Next thing I do is crop it. I usually go for a 100x50 px crop but because this doesn't have too many frames I went for 100x60 px.
Then I change the speed of the gif. Holding down the Shift key I press on the first frame in the pallet and then the very last. Now all of them are highlighted. Right click and set the speed. I decided to go with 0.17 seconds.
Step 4:
Now for the colouring.
Click on the top frame in the layers palette. Click on the black and white circle at the bottom and select Levels. Sometimes I use this for colouring but this time I just went to Blend Mode and selected Screen. Like so:
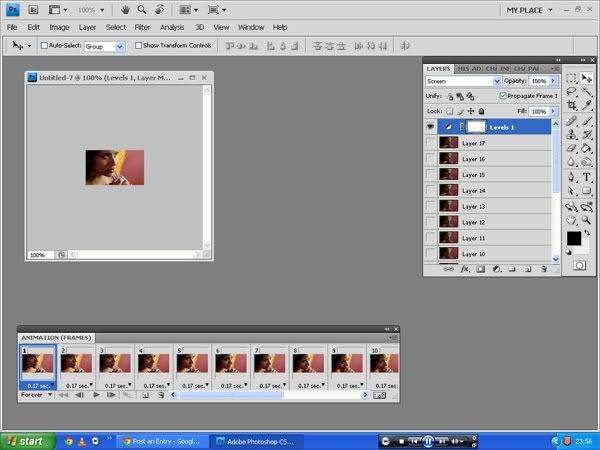
Then a Brightness/Contrast layer:
Brightness: 0
Contrast: 76.
I like a lot of contrast in my icons. Keeps the file size down.
Next I selected a Colour Balance Layer. Merlin caps tend to be either very yellow or very blue. So up the reds and add the blue in this case.
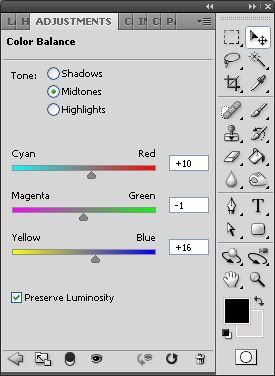
The next three layers is something that I add to all my icons.
Gradient Map set to Exclusion. It's a black to dark brown gradient. #00000 to #331701. Set to 70% opacity.
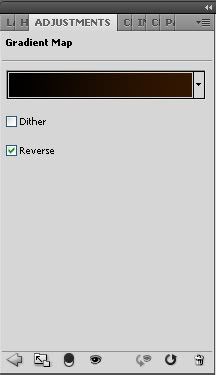
I like using this because it makes the whites in an image a pale soft blue.
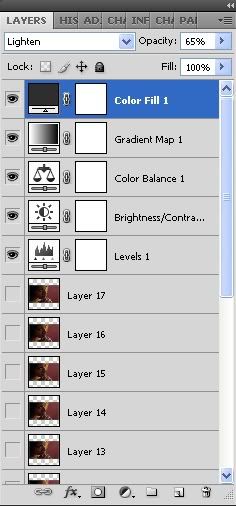
Next is a Colour Fill layer set to Lighten. It's #2e2e2e. It's set to 65% opacity. I use this because it softens the image and really helps to decrease the file size if you've got a dark gif.
This is what the layers palate should look like now:
Step 5:
Next is the canvas size and frame. Press Ctrl+Alt+C and this will appear:
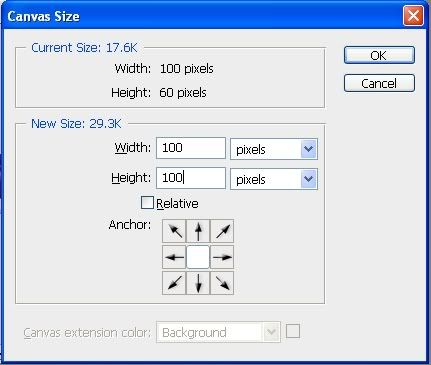
In the drop down box select pixels and make the width and hight 100. Now you have your 100x100 icon.
Now scroll down to the last frame in the layers pallet and make a new fill layer in black. Make sure it's at the very bottom, below all the other layers:
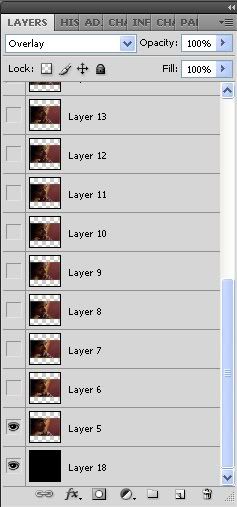
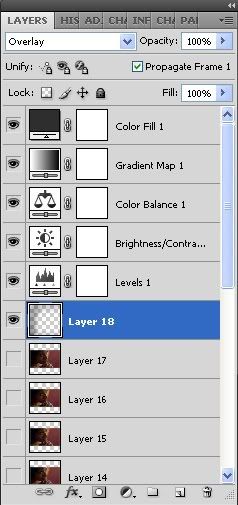
The last thing I did was to create a new layer and with a soft round brush paint over the dark areas of the gif. In this case it was to the left of Gwen's face and over the black bars. I set this layer to Overlay at 100%. See below:
Final Step:
File > Save for Web & Devices...
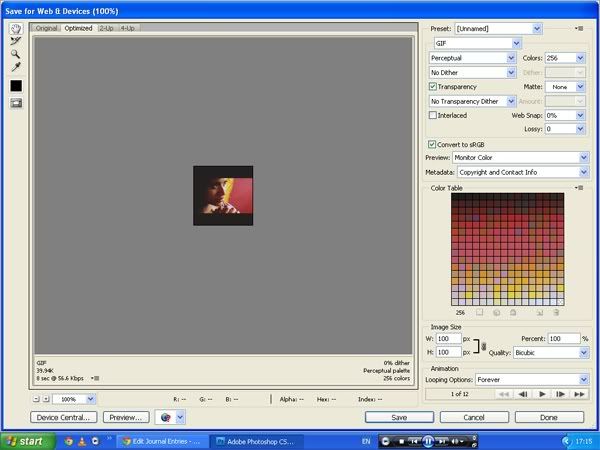
I like to attain 256 colours if I can. I do this by either deleting frames or making the gif smaller. This gif originally had 17 frames but I got it down to 12. Now the gif is 39kb and has 256 colours.
Press Save :)

I hope this was informative. Any question? Please ask. My "Ask the Maker" thread is here

Just a FYI: I'm an idiot and didn't actually save the original so I made it again. They're basically identical. This is my first tutorial so bear with me.
Step 1:
I use AVS Video Converter. I paid for this but I'm sure there are free programmes out there that do the job.
I open the episode of Merlin in AVS and select the footage I want. It then converts the file from avi to mov. Once that is saved to a folder I open Photoshop CS4.
Step 2:
File> Import> Video Frames to Layers...
Select the mov. file and this box will appear:

I always limit to every 4 or 5 frames, depending on the file size. In this case it was just a short clip so I limited it to every 3 frames. Press OK.
Step 3:
Windows > Animation. The animation frame palette will pop up. Looks like this now:

Next thing I do is crop it. I usually go for a 100x50 px crop but because this doesn't have too many frames I went for 100x60 px.
Then I change the speed of the gif. Holding down the Shift key I press on the first frame in the pallet and then the very last. Now all of them are highlighted. Right click and set the speed. I decided to go with 0.17 seconds.
Step 4:
Now for the colouring.
Click on the top frame in the layers palette. Click on the black and white circle at the bottom and select Levels. Sometimes I use this for colouring but this time I just went to Blend Mode and selected Screen. Like so:

Then a Brightness/Contrast layer:
Brightness: 0
Contrast: 76.
I like a lot of contrast in my icons. Keeps the file size down.
Next I selected a Colour Balance Layer. Merlin caps tend to be either very yellow or very blue. So up the reds and add the blue in this case.

The next three layers is something that I add to all my icons.
Gradient Map set to Exclusion. It's a black to dark brown gradient. #00000 to #331701. Set to 70% opacity.

I like using this because it makes the whites in an image a pale soft blue.
Next is a Colour Fill layer set to Lighten. It's #2e2e2e. It's set to 65% opacity. I use this because it softens the image and really helps to decrease the file size if you've got a dark gif.
This is what the layers palate should look like now:

Step 5:
Next is the canvas size and frame. Press Ctrl+Alt+C and this will appear:

In the drop down box select pixels and make the width and hight 100. Now you have your 100x100 icon.
Now scroll down to the last frame in the layers pallet and make a new fill layer in black. Make sure it's at the very bottom, below all the other layers:

The last thing I did was to create a new layer and with a soft round brush paint over the dark areas of the gif. In this case it was to the left of Gwen's face and over the black bars. I set this layer to Overlay at 100%. See below:

Final Step:
File > Save for Web & Devices...

I like to attain 256 colours if I can. I do this by either deleting frames or making the gif smaller. This gif originally had 17 frames but I got it down to 12. Now the gif is 39kb and has 256 colours.
Press Save :)

I hope this was informative. Any question? Please ask. My "Ask the Maker" thread is here