Tutorial #9
from this to 
Created using Adobe Photoshop CS3
requested by unsureone
I took this cap of mine and resized it to 200px height
result:
Go to Image > Adjustments > Variations; choose More Red, More Yellow
result:
Duplicate Base, Sharpen (Filter > Sharpen > Sharpen), Set to Screen 100%
result:
Duplicate this Layer, Set to Soft Light 52%
result:
Duplicate this Layer, Set to Color Burn 19%
result:
Merge all layers, hit STRG+A to select the image, STRG+C to copy
Open up a new 100x100px canvas and hit STRG+V to paste your image as a new layer
Move the layer around in order to find an interesting crop. For this icon I rotated the layer a bit:
Go to Image > Transform > Rotate (my settings: X: 84,8px Y: 27,8)
After rotating I sharpened the layer again. Filter > Sharpen > Sharpen. Since it was too sharp now, I went to Edit > Fade Sharpen and set it to 23%
result: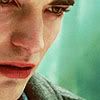
Next I tried to soften the colors a bit, so I went to Layer > New Fill Layer > Gradient
Style: Linear
Angle: 149,74
Scale: 136%
Colors used: #f1e6e2 at Location 0%
Colors used: #faf9f9 at Location 100%
Note: In case this is too confusing. I've uploaded the gradient here.
Set this Gradient layer to Normal 24%
result:
I wanted the icon to look a bit brighter, so next up go to Layer > New Adjustment Layer > Levels
Settings: 0; 1,08; 245
Merge all layers and you're done!
final result:

Created using Adobe Photoshop CS3
requested by unsureone
I took this cap of mine and resized it to 200px height
result:

Go to Image > Adjustments > Variations; choose More Red, More Yellow
result:

Duplicate Base, Sharpen (Filter > Sharpen > Sharpen), Set to Screen 100%
result:

Duplicate this Layer, Set to Soft Light 52%
result:

Duplicate this Layer, Set to Color Burn 19%
result:

Merge all layers, hit STRG+A to select the image, STRG+C to copy
Open up a new 100x100px canvas and hit STRG+V to paste your image as a new layer
Move the layer around in order to find an interesting crop. For this icon I rotated the layer a bit:
Go to Image > Transform > Rotate (my settings: X: 84,8px Y: 27,8)
After rotating I sharpened the layer again. Filter > Sharpen > Sharpen. Since it was too sharp now, I went to Edit > Fade Sharpen and set it to 23%
result:

Next I tried to soften the colors a bit, so I went to Layer > New Fill Layer > Gradient
Style: Linear
Angle: 149,74
Scale: 136%
Colors used: #f1e6e2 at Location 0%
Colors used: #faf9f9 at Location 100%
Note: In case this is too confusing. I've uploaded the gradient here.
Set this Gradient layer to Normal 24%
result:

I wanted the icon to look a bit brighter, so next up go to Layer > New Adjustment Layer > Levels
Settings: 0; 1,08; 245
Merge all layers and you're done!
final result:
