Requested Tutorial
Requested by qomt
Done in PS CS2..should translate fairly easily to lower versions and other programs.
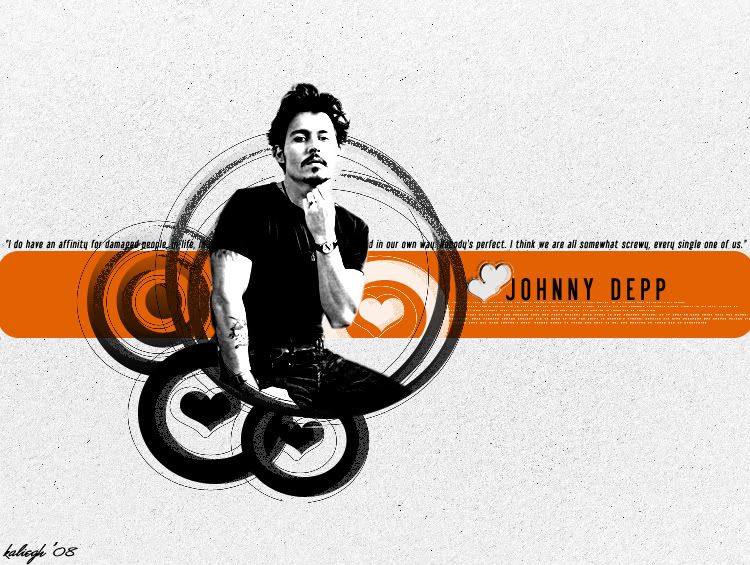
Make a graphic like this:

Okay, I started out with this texture from...?? Please let me know if you recognize it so I can credit. Thanks :)

Having a general idea of what I wanted to do, I then made a new layer and selected the rounded rectangle tool.

Before making your shape, make sure that you have the first pen/shape option selected up at the top.

Also make sure that you have the color that you want your shape to be filled with selected as your foreground color. I chose an orange color, but you could do any color your want...I think you can do gradients or patterns as well.
Then click and drag on your canvas until you have the size of rectangle that you want. When you're happy with how it looks go to layer>>rasterize>>shape to finish it off.

I wanted to add a brush next that will contain my picture so I made another new layer. I added this brush from Saruna.net...in fact all of the brushes except for one I used on this one are from there.


Next, after cutting the picture that I wanted to use, I pasted it on a new layer below the brush layer that I just added so that it would look like that he was inside the circles at the bottom, but outside them at the top. Some of my picture was poking outside of the brush so I added a layer mask to the picture by clicking on the symbol at the bottom of the layers palette that looks like a square with a circle inside of it. Since I wanted to 'erase' some of the picture I used black as my foreground color and used a round default brush.
Then I also added a layer mask on the brush layer because some of the brush was going over Johnny's head and that is just not acceptable :D
Now, I wanted to make the picture of Johnny black and white so with that layer selected I went to layer>>new adjustment layer>>gradient map. Gradient map do a much nice job than just plain old desaturating. I made sure to click on the box to clip the two layers together because I only want to add the B&W effect to the picture. Then I also added a brightness/contrast adjustment layer to make the B&W pop. I again made sure to clip it to the previous layer. My settings were brightness +29 and Contrast +62, but most likely you are going to have to adjust that according to the picture that you are using.

Next I added my text using the Libel Suit font. I did Johnny's name and then a quite from him. I also added a tiny text brush from ownthesunshine

Then I finished it off by just adding a few more brushes from Saruna.net in black and white colors.
And that's it...very easy :) Any ??'s, let me know :)

Done in PS CS2..should translate fairly easily to lower versions and other programs.
Make a graphic like this:

Okay, I started out with this texture from...?? Please let me know if you recognize it so I can credit. Thanks :)

Having a general idea of what I wanted to do, I then made a new layer and selected the rounded rectangle tool.

Before making your shape, make sure that you have the first pen/shape option selected up at the top.

Also make sure that you have the color that you want your shape to be filled with selected as your foreground color. I chose an orange color, but you could do any color your want...I think you can do gradients or patterns as well.
Then click and drag on your canvas until you have the size of rectangle that you want. When you're happy with how it looks go to layer>>rasterize>>shape to finish it off.

I wanted to add a brush next that will contain my picture so I made another new layer. I added this brush from Saruna.net...in fact all of the brushes except for one I used on this one are from there.


Next, after cutting the picture that I wanted to use, I pasted it on a new layer below the brush layer that I just added so that it would look like that he was inside the circles at the bottom, but outside them at the top. Some of my picture was poking outside of the brush so I added a layer mask to the picture by clicking on the symbol at the bottom of the layers palette that looks like a square with a circle inside of it. Since I wanted to 'erase' some of the picture I used black as my foreground color and used a round default brush.
Then I also added a layer mask on the brush layer because some of the brush was going over Johnny's head and that is just not acceptable :D
Now, I wanted to make the picture of Johnny black and white so with that layer selected I went to layer>>new adjustment layer>>gradient map. Gradient map do a much nice job than just plain old desaturating. I made sure to click on the box to clip the two layers together because I only want to add the B&W effect to the picture. Then I also added a brightness/contrast adjustment layer to make the B&W pop. I again made sure to clip it to the previous layer. My settings were brightness +29 and Contrast +62, but most likely you are going to have to adjust that according to the picture that you are using.

Next I added my text using the Libel Suit font. I did Johnny's name and then a quite from him. I also added a tiny text brush from ownthesunshine

Then I finished it off by just adding a few more brushes from Saruna.net in black and white colors.
And that's it...very easy :) Any ??'s, let me know :)
