tutorial #5
This was made in Adobe Photoshop 7.0. It uses selective coloring and curves.

>>
1. Take your base and duplicate it three times. Set the first two to SCREEN 100% and the third to SOFT LIGHT 66%.

2. Go to Layer >> New Adjustment Layer >> Selective Color and input these values at 100%.
REDS
Cyan: +15
Magenta: 0
Yellow: +44
Black: 0
YELLOWS
Cyan: 0
Magenta: +18
Yellow: +37
Black: 0
WHITES
Cyan: +100
Magenta: +2
Yellow: -29
Black: 0

3. Go to Layer >> New Adjustment Layer >> Selective Color and input these values at 75%.
REDS
Cyan: -100
Magenta: +16
Yellow: +100
Black: 0
YELLOWS
Cyan: -47
Magenta: 0
Yellow: -31
Black: -22
NEUTRALS
Cyan: +17
Magenta: -11
Yellow: -18
Black: -17

4. Go to Layer >> New Adjustment Layer >> Selective Color and input these values at 100%.
REDS
Cyan: +51
Magenta: +17
Yellow: +9
Black: 0
YELLOWS
Cyan: -19
Magenta: +8
Yellow: -10
Black: 0
BLUES
Cyan: +90
Magenta: +26
Yellow: +13
Black: 0
NEUTRALS
Cyan: +7
Magenta: 0
Yellow: +3
Black: +3

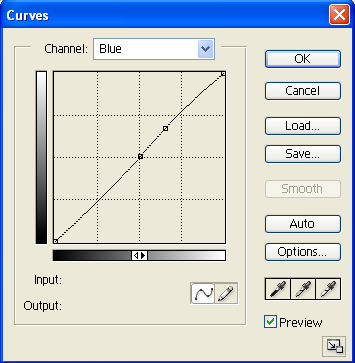
5. Go to Layer >> New Adjustment Layer >> Curves and make it look something like this at 100%. It's just a small adjustment, but it adds a little brightness.


And you're done! :)
>>
1. Take your base and duplicate it three times. Set the first two to SCREEN 100% and the third to SOFT LIGHT 66%.
2. Go to Layer >> New Adjustment Layer >> Selective Color and input these values at 100%.
REDS
Cyan: +15
Magenta: 0
Yellow: +44
Black: 0
YELLOWS
Cyan: 0
Magenta: +18
Yellow: +37
Black: 0
WHITES
Cyan: +100
Magenta: +2
Yellow: -29
Black: 0
3. Go to Layer >> New Adjustment Layer >> Selective Color and input these values at 75%.
REDS
Cyan: -100
Magenta: +16
Yellow: +100
Black: 0
YELLOWS
Cyan: -47
Magenta: 0
Yellow: -31
Black: -22
NEUTRALS
Cyan: +17
Magenta: -11
Yellow: -18
Black: -17
4. Go to Layer >> New Adjustment Layer >> Selective Color and input these values at 100%.
REDS
Cyan: +51
Magenta: +17
Yellow: +9
Black: 0
YELLOWS
Cyan: -19
Magenta: +8
Yellow: -10
Black: 0
BLUES
Cyan: +90
Magenta: +26
Yellow: +13
Black: 0
NEUTRALS
Cyan: +7
Magenta: 0
Yellow: +3
Black: +3
5. Go to Layer >> New Adjustment Layer >> Curves and make it look something like this at 100%. It's just a small adjustment, but it adds a little brightness.
And you're done! :)