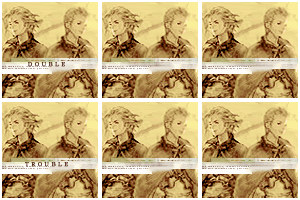
FFXII Icon Tutorial
Go from this to 
.
Made in PS7 and Image Ready.
I started with this image, from Final Fantasy XII.
First, I Duplicated the layer and set it to Screen, then Duplicated the Screened layer.
Next I used the Lasso tool to select the man on the left. Making a new layer, I chose Copy Merged and Pasted, then Nudged the man over until the two guys were back to back.
Then I cropped it down to 100x100, Flattened, Sharpened, and we have our base!
Okay, using the shiny new base... well it isn't that shiny, is it? I Duplicated the layer and set it to Soft Light: Opacity 63%.
Now make a new Layer and Flood Fill with #87CD6D, setting it to Saturation 100%.
Then I took this texture by immoral, Inverted it and selected the white parts. Copy that and paste onto your base in a new Layer, at the top. (This step is not necessary if you have another brush effect in mind, if so, go for it!)
I didn't like the hard edge in the middle there, so I took a rounded brush in white and on a new Layer, gave a stroke to soften things up.
Make another Layer, this time writing "DOUBLE" in Times New Roman, 6pt, with the tracking set to 400, in #410F00, color-dropped from one of the dark colors of the base. Duplicate this twice.
With the first Duplication of that, I chose Motion Blur set to 15 pixels. With the second Duplication, do the same with Morion Blur set to 30 pixels.
Do the same for the word "TROUBLE".
Turn off all the text layers except the first DOUBLE layer, and jump to Image Ready.
Duplicate that Frame in the Animation toolbar, closing the DOUBLE layer on your Layers pallete and open the blurred 15px copy. Duplicate that frame and close the 15px copy, and open the 30px copy.
Duplicate the frame and follow the same steps with the TROUBLE layer. When you finish, you should have 6 frames.
Set the first and third frames to 1 second, leave the rest at 0.
Save, and you're done!

I think I've explained everything well enough if you have a basic idea of PS7 and Image Ready. If you still have any questions, I'll try to answer them. Please don't copy this tutorial exactly to create the same icon and call it your own. Experiment! I'd love to see your results.
Note: This icon was made by request, so please do not use it without aorin107's permission.
.
Made in PS7 and Image Ready.
I started with this image, from Final Fantasy XII.
First, I Duplicated the layer and set it to Screen, then Duplicated the Screened layer.
Next I used the Lasso tool to select the man on the left. Making a new layer, I chose Copy Merged and Pasted, then Nudged the man over until the two guys were back to back.
Then I cropped it down to 100x100, Flattened, Sharpened, and we have our base!
Okay, using the shiny new base... well it isn't that shiny, is it? I Duplicated the layer and set it to Soft Light: Opacity 63%.
Now make a new Layer and Flood Fill with #87CD6D, setting it to Saturation 100%.
Then I took this texture by immoral, Inverted it and selected the white parts. Copy that and paste onto your base in a new Layer, at the top. (This step is not necessary if you have another brush effect in mind, if so, go for it!)
I didn't like the hard edge in the middle there, so I took a rounded brush in white and on a new Layer, gave a stroke to soften things up.
Make another Layer, this time writing "DOUBLE" in Times New Roman, 6pt, with the tracking set to 400, in #410F00, color-dropped from one of the dark colors of the base. Duplicate this twice.
With the first Duplication of that, I chose Motion Blur set to 15 pixels. With the second Duplication, do the same with Morion Blur set to 30 pixels.
Do the same for the word "TROUBLE".
Turn off all the text layers except the first DOUBLE layer, and jump to Image Ready.
Duplicate that Frame in the Animation toolbar, closing the DOUBLE layer on your Layers pallete and open the blurred 15px copy. Duplicate that frame and close the 15px copy, and open the 30px copy.
Duplicate the frame and follow the same steps with the TROUBLE layer. When you finish, you should have 6 frames.
Set the first and third frames to 1 second, leave the rest at 0.
Save, and you're done!
I think I've explained everything well enough if you have a basic idea of PS7 and Image Ready. If you still have any questions, I'll try to answer them. Please don't copy this tutorial exactly to create the same icon and call it your own. Experiment! I'd love to see your results.
Note: This icon was made by request, so please do not use it without aorin107's permission.