icon tutorial #1
i really like how this icon turned out, and for once i actually remembered how i did it! so i'm going to share how i did it, hopefully it is easy to understand. i'm horrible at explaining things but...here it goes.

we are going to be making this icon:

step 1
start by cropping your image. i went with the dimensions 80x72. it needs to be smaller than 100x100 so when you make the big white border you don't cut off anything important:

step 2
after cropping, go to layer>new fill layer>solid color>17065D or something dark dark blue. set the layer to exclusion:

step 3
after filling the exclusion layer, it's time to add another layer. i used a a gradient by crumbilingwalls. go to layer>new fill layer>gradient using this color:

set it to screen, you will get this:
step 4
now you should open a new project, 100x100 pixels. it should be a white background. using the pic you just made, copy it and paste it into the new 100x100 project:
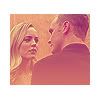
step 5
after adding the white background, we're going to add 2 textures. both are by the talented dorky_duck. first we are going to use this one:
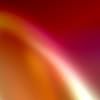
set it to lighten, you will get this:
step 6
then we use this texture:

set it to hard light, you will get this:
step 7
after that, because it's too bright, take a round eraser, setting the opacity to 29%. just brush over the whole icon and you will get this:

step 8
once you have finished erasing, go to layer>new fill layer>solid color and use the color 0B0321. it isn't black it's a dark purple so don't let that confuse you. the color looks like this:

set it to exclusion, you will get this: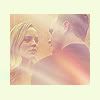
step 9
merge all the layers together. next i added the "ink & coffee" brushes from icons_with_love. adding to the top, then adding my text.
all done! finishing it up, you will get this:
hope the tutorial works for you. let me know if you like it, and if you found it useful. maybe i'll just make another one some time. if i can remember how i make something again...*cough*

we are going to be making this icon:

step 1
start by cropping your image. i went with the dimensions 80x72. it needs to be smaller than 100x100 so when you make the big white border you don't cut off anything important:

step 2
after cropping, go to layer>new fill layer>solid color>17065D or something dark dark blue. set the layer to exclusion:

step 3
after filling the exclusion layer, it's time to add another layer. i used a a gradient by crumbilingwalls. go to layer>new fill layer>gradient using this color:

set it to screen, you will get this:

step 4
now you should open a new project, 100x100 pixels. it should be a white background. using the pic you just made, copy it and paste it into the new 100x100 project:

step 5
after adding the white background, we're going to add 2 textures. both are by the talented dorky_duck. first we are going to use this one:

set it to lighten, you will get this:

step 6
then we use this texture:

set it to hard light, you will get this:

step 7
after that, because it's too bright, take a round eraser, setting the opacity to 29%. just brush over the whole icon and you will get this:

step 8
once you have finished erasing, go to layer>new fill layer>solid color and use the color 0B0321. it isn't black it's a dark purple so don't let that confuse you. the color looks like this:

set it to exclusion, you will get this:

step 9
merge all the layers together. next i added the "ink & coffee" brushes from icons_with_love. adding to the top, then adding my text.
all done! finishing it up, you will get this:

hope the tutorial works for you. let me know if you like it, and if you found it useful. maybe i'll just make another one some time. if i can remember how i make something again...*cough*