Tutorial
Yesterday my dear friend Tahra asked me to make her a tutorial! So I made it and I have to say ...Dude, making tutorial sucks LOL It's difficult *NODS*..Nah, I am kidding but it does take pretty long time! But I will do everything for Tahra ;) She asked me to show her how I made this art
So here we go :)
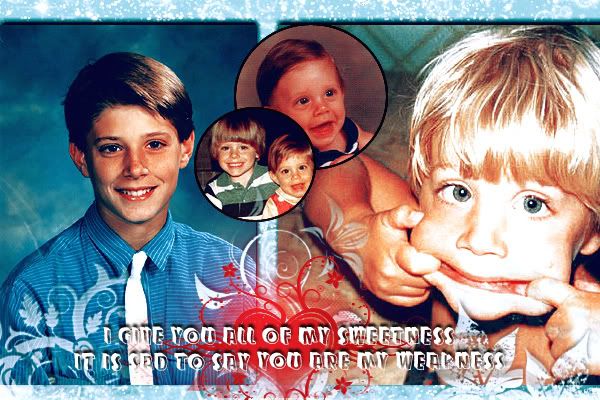
We are going to make this art
Step 1. The image size is 600x400 but you can change if you want :) make a new layer and fill it with #a5cdcf
Step 2. Put the two big photos! I didn't change their size but if you are going to change the image's size you may want to change the photos' size, too :)
Step 3. Put the two small photos. I re-sized the bigger one to 159x225 and the other one to 157x225
Step 4. By using Ellipse Tool put the small photos into different circles.
Now we are going to do the coloring :)
Step 5. Selective Color:
Red:
Cyan -100
Magenta 0
Yellow +100
Black +100
Yellow:
Cyan -23
Magenta -4
Yellow -22
Black 0
Green:
Cyan 0
Magenta 0
Yellow 0
Black -100
Neutrals:
Cyan +74
Yellow -73
Black +100
Black:
Cyan 0
Magenta 0
Yellow 0
Black +100
Step 6. Another Selective Color layer
Red:
Cyan -100
Magenta 0
Yellow +100
Black +100
Yellow:
Cyan 0
Magenta 0
Yellow -75
Black 0
Whites:
Cyan +50
Magenta 0
Yellow -100
Black -46
Neutrals:
Cyan 0
Magenta 0
Yellow 0
Black 30
Black:
Cyan 0
Magenta 0
Yellow 0
Black +100
Step 7. Color Balance
Midtones: +17; -29; -25
Shadows: -49; -23; -5
Highlights: -10; 0; 0
Step 8. Brightness/Contrast
Brightness +3
Contrast -1
We are done with coloring :)
Now we are going to use some brushes!
I picked them from papersweets.fan-arts.net
Step 9. On the layer with the background color ( step 1 ) put some brushes, in white color. It's good if they are like starts of something like that :)
Step 10. Make a new layer under the Selective Colors' ones! Put some brushes whatever you like. I put brushes like flowers :)
Step 11. Click with the right button on the layer with the brushes ( step 10 ) and choose Blending Options:
Drop Shadow:
Blend mode: Normal 50%
Angle: -111
Distance 3px
Size 5px
We have to put shadows on the two big photos!
Step 12. Right click with the mouse on the layer with one of the two big photos: Choose Blending options:
Drop Shadow:
Blend Mode: Normal 100%
Angle: -111
Distance: 3px
Size: 6px
DO the SAME with the other big photo but DO NOT do it with the two small photos ( the ones in the circles ) We are going to make the "stroke" effect with them
Step 13. Right click with the mouse on the layer with one of the small photos
Blending Options:
Stroke: Choose black color; Size 2px
DO the same with the other small photo :D
Step 14. Make a new layer. Choose some kind of red color. I picked #ed1c24. Put a brush with a heart between the two big photos. Drag this layer above all the other layers.
Step 15. Make a new layer above the one with the heart! Choose Soft Round Brush - 200px. You may change the px if you want :). Put the Soft Round Brush near the heart of above it. Use the same color #ed1c24. Modify this layer to Lighten
We are done with the brushes
The final step is the Text!
I have used Zupagargonizer T font. You can download it from dafont.com. Drop shadow on the text and you are done!
ETA: This is the PSD file if anybody wanted it:)
http://www.sendspace.com/file/jjewwu
So here we go :)
We are going to make this art

Step 1. The image size is 600x400 but you can change if you want :) make a new layer and fill it with #a5cdcf
Step 2. Put the two big photos! I didn't change their size but if you are going to change the image's size you may want to change the photos' size, too :)
Step 3. Put the two small photos. I re-sized the bigger one to 159x225 and the other one to 157x225
Step 4. By using Ellipse Tool put the small photos into different circles.
Now we are going to do the coloring :)
Step 5. Selective Color:
Red:
Cyan -100
Magenta 0
Yellow +100
Black +100
Yellow:
Cyan -23
Magenta -4
Yellow -22
Black 0
Green:
Cyan 0
Magenta 0
Yellow 0
Black -100
Neutrals:
Cyan +74
Yellow -73
Black +100
Black:
Cyan 0
Magenta 0
Yellow 0
Black +100
Step 6. Another Selective Color layer
Red:
Cyan -100
Magenta 0
Yellow +100
Black +100
Yellow:
Cyan 0
Magenta 0
Yellow -75
Black 0
Whites:
Cyan +50
Magenta 0
Yellow -100
Black -46
Neutrals:
Cyan 0
Magenta 0
Yellow 0
Black 30
Black:
Cyan 0
Magenta 0
Yellow 0
Black +100
Step 7. Color Balance
Midtones: +17; -29; -25
Shadows: -49; -23; -5
Highlights: -10; 0; 0
Step 8. Brightness/Contrast
Brightness +3
Contrast -1
We are done with coloring :)
Now we are going to use some brushes!
I picked them from papersweets.fan-arts.net
Step 9. On the layer with the background color ( step 1 ) put some brushes, in white color. It's good if they are like starts of something like that :)
Step 10. Make a new layer under the Selective Colors' ones! Put some brushes whatever you like. I put brushes like flowers :)
Step 11. Click with the right button on the layer with the brushes ( step 10 ) and choose Blending Options:
Drop Shadow:
Blend mode: Normal 50%
Angle: -111
Distance 3px
Size 5px
We have to put shadows on the two big photos!
Step 12. Right click with the mouse on the layer with one of the two big photos: Choose Blending options:
Drop Shadow:
Blend Mode: Normal 100%
Angle: -111
Distance: 3px
Size: 6px
DO the SAME with the other big photo but DO NOT do it with the two small photos ( the ones in the circles ) We are going to make the "stroke" effect with them
Step 13. Right click with the mouse on the layer with one of the small photos
Blending Options:
Stroke: Choose black color; Size 2px
DO the same with the other small photo :D
Step 14. Make a new layer. Choose some kind of red color. I picked #ed1c24. Put a brush with a heart between the two big photos. Drag this layer above all the other layers.
Step 15. Make a new layer above the one with the heart! Choose Soft Round Brush - 200px. You may change the px if you want :). Put the Soft Round Brush near the heart of above it. Use the same color #ed1c24. Modify this layer to Lighten
We are done with the brushes
The final step is the Text!
I have used Zupagargonizer T font. You can download it from dafont.com. Drop shadow on the text and you are done!
ETA: This is the PSD file if anybody wanted it:)
http://www.sendspace.com/file/jjewwu