Tut 03: 2 Fading Tutorials
TUTORIAL: 2 Easy Fading Tutorials by iwannabe_gackt
PROGRAM: Paint Shop Pro 8 & Animation Shop 3. Can be translated, not by me though.
WARNING: Image Heavy
bare with me, i try my best to explain. Image Heavy. if there's any questions, please ASK. i'll try my best to help
Making: this & this to this & this

&

Fading Tutorial oo1.
Step oo1.
Open to the image you want to use the technique on. Before starting the tutorial, make the adjustments you want on it. I suggest copy & pasting a double of that image, just in case you make a mistake.
Step oo2.
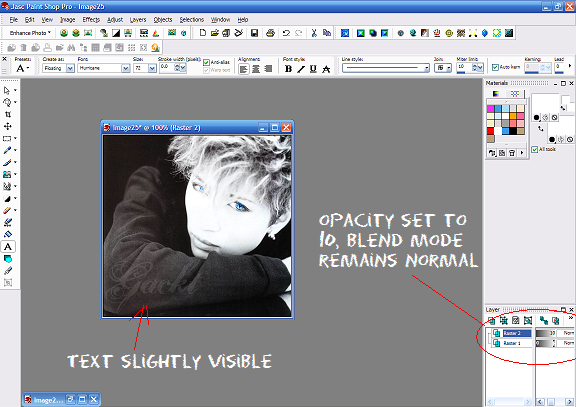
Create a new layer over the image by going to the top navigaton: Layers > New Raster Layer > Ok & keep it to a Normal blend.
Step oo3.
Choose a font & color you want to use for the text. I'm going to fade the text "Gackt" on. Just simply write it on.
What I used:
Font: #FFFFFF
Size: 72
Font: Hurricane

Step oo4.
We're going to make the text fade from the picture, so bring the opacity of the top layer down to 0. Copy & paste the text-less frame into your animation program.
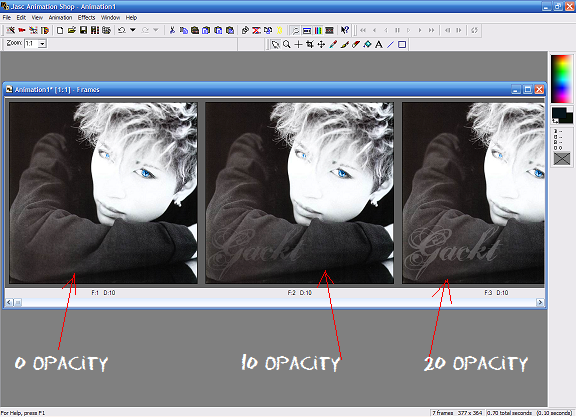
After you pasted the 1st frame, go back to PSP & bring the opacity back up a bit. I brought my opacity up to 10. The image below shows the opacity 10 frame that looks barely visible. Copy that frame after the last frame in animation shop.
Step oo5.
For the next frames, keep repeating step oo4. Raise the opacity a bit more for each frame, then copy & paste it after the last frame in your animation program.
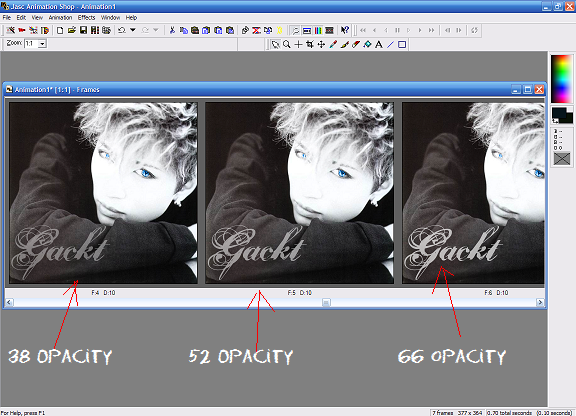
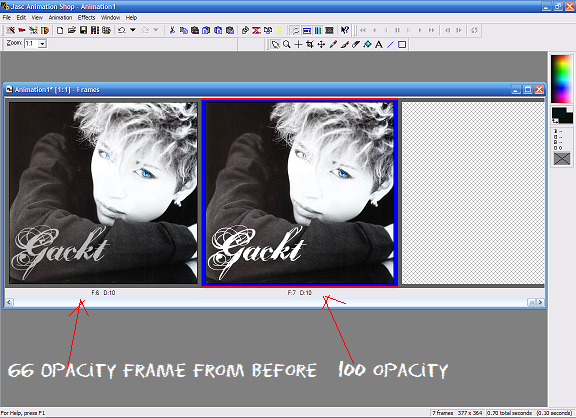
After my 10 opacity frame, I brought it up to 20, then pasted into animation shop. Brought opacity up to 38, then pasted. 52 opacity, pasted. 66 opacity, pasted. For my last frame, i set the opacity back to 100. The images below will show you the difference of the opacity in each frame.
Step oo6.
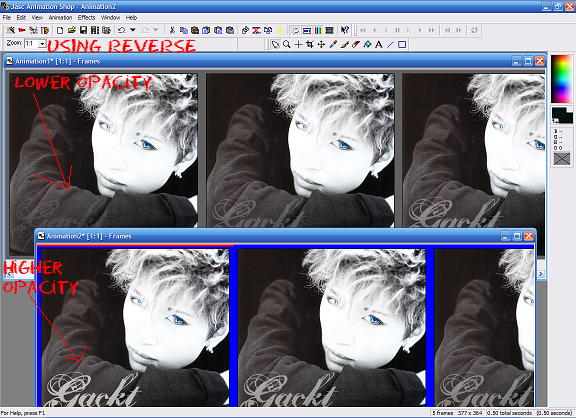
Now that we have the text fading out from the text, we'll start making the text fade back in. In your animation shop, select all the fading frames, which would be frame 2 to frame 6. You can select them by hitting the 2nd frame with your finger on the shift key, then hitting the 6th frame. Selected frame will have a thick, blue border around them.
Step oo7.
Copy the selected frames by going to the top navigation: Edit > Copy. Then go back to the naviagtion & go to Edit > Paste > As New Animation. Select all the frames from the new animation & go to Animation > Reverse Frames. This will make the frames with the higher opacity reverse to the lower opacity frames.
Step oo8.
Copy & paste the reversed frames after the last frame on the first animation. Now you should have a total of 12 frames. Go to the first frame, which is the text-less frame. We're going to change the frame properties, so right click & a long box will appear. Go to Frame Properties & set the speed to 120. We're also going to do the same for the frame that has the 100 opacity (which would be frame 7).
Step 009.
COMPLETE! This is what the outcome should look like:

Fading Tutorial oo2.
Step oo1.
Follow step one on the first tutorial above. This fading technique is a bit different. Instead of fading the whole word, one letter will be fading each time.
Step oo2.
Follow step two on the first tutorial above.
Step oo3.
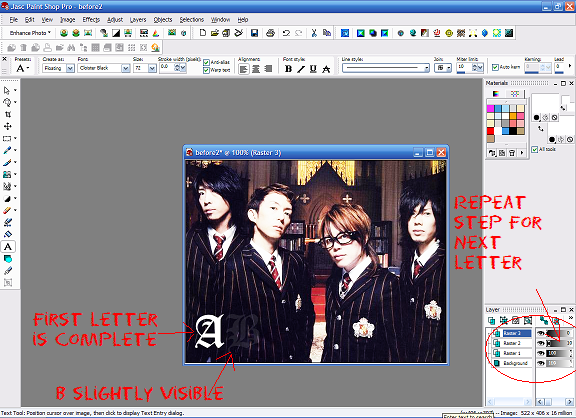
For the text, each letter is going to have it's own layer. I will be writing "ABS". Create a raster layer (see tut 1 to get raster) & write the first letter on it. Then create another layer & write the next layer on it. Depending on how many letters your word has, create a new layer for each.
What I used:
Font: #FFFFFF
Size: 72
Font: Cloister Black

Step oo4.
Like in the first tut, bring the opacity of each layer down to 0 & copy & paste it into your animation program. We're going to start with the letter A, which is the bottom layer. Bring the opacity of that layer up to 10, like in the first tutorial. After, paste the 'A' 10 opacity frame after the last frame in animation shop.

Step 005.
See step oo5. in the first tutorial. use this ONLY for the first letter.
Step oo6.
Now that the first letter is done, we're going to go over to the next one. Each letter will be on the SAME canvas, so for the second letter, do the same steps for what you have done for the first letter. Repeat this for each letter in the word you are using.
Step oo7.
Because we are fading each letter instead of the whole word, you will have a lot more frames than the first tutorial. I used the same opacities for each letter as i did for the word in the first tutorial, so i ended up with 19 frames.
Step oo8.
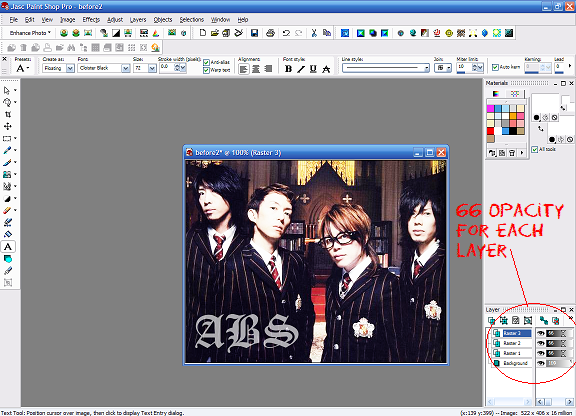
Instead of fading out each letter again, instead, we'll fade out the word. Go back to PSP where each letter is to 100 opacity. Lower each layer to the same opacity. Lower the opacity backwards. In other words, if you did each frame opacity Fr (frame): 10, Fr: 20, Fr: 38, Fr: 52, Fr: 66, reverse that & lower the opacity to 66, paste in animation, 52, paste, etc.
Step oo9.
Now it's time to change the frame properties of the first frame & each frame with the 100 opacity letter. See step 008. in the first tutorial to find out how to change each frame. I changed each of the 100 opacity letter frames to 110 so that the letters appear faster, & i set the 1st frame to 180.
Step o1o.
COMPLETE! This is what the outcome should look like:

Other Examples:

crossposted: icon_tutorial
hope the tutorials worked :) feel free to ask questions
PROGRAM: Paint Shop Pro 8 & Animation Shop 3. Can be translated, not by me though.
WARNING: Image Heavy
bare with me, i try my best to explain. Image Heavy. if there's any questions, please ASK. i'll try my best to help
Making: this & this to this & this
&
Fading Tutorial oo1.
Step oo1.
Open to the image you want to use the technique on. Before starting the tutorial, make the adjustments you want on it. I suggest copy & pasting a double of that image, just in case you make a mistake.
Step oo2.
Create a new layer over the image by going to the top navigaton: Layers > New Raster Layer > Ok & keep it to a Normal blend.
Step oo3.
Choose a font & color you want to use for the text. I'm going to fade the text "Gackt" on. Just simply write it on.
What I used:
Font: #FFFFFF
Size: 72
Font: Hurricane
Step oo4.
We're going to make the text fade from the picture, so bring the opacity of the top layer down to 0. Copy & paste the text-less frame into your animation program.
After you pasted the 1st frame, go back to PSP & bring the opacity back up a bit. I brought my opacity up to 10. The image below shows the opacity 10 frame that looks barely visible. Copy that frame after the last frame in animation shop.
Step oo5.
For the next frames, keep repeating step oo4. Raise the opacity a bit more for each frame, then copy & paste it after the last frame in your animation program.
After my 10 opacity frame, I brought it up to 20, then pasted into animation shop. Brought opacity up to 38, then pasted. 52 opacity, pasted. 66 opacity, pasted. For my last frame, i set the opacity back to 100. The images below will show you the difference of the opacity in each frame.
Step oo6.
Now that we have the text fading out from the text, we'll start making the text fade back in. In your animation shop, select all the fading frames, which would be frame 2 to frame 6. You can select them by hitting the 2nd frame with your finger on the shift key, then hitting the 6th frame. Selected frame will have a thick, blue border around them.
Step oo7.
Copy the selected frames by going to the top navigation: Edit > Copy. Then go back to the naviagtion & go to Edit > Paste > As New Animation. Select all the frames from the new animation & go to Animation > Reverse Frames. This will make the frames with the higher opacity reverse to the lower opacity frames.
Step oo8.
Copy & paste the reversed frames after the last frame on the first animation. Now you should have a total of 12 frames. Go to the first frame, which is the text-less frame. We're going to change the frame properties, so right click & a long box will appear. Go to Frame Properties & set the speed to 120. We're also going to do the same for the frame that has the 100 opacity (which would be frame 7).
Step 009.
COMPLETE! This is what the outcome should look like:
Fading Tutorial oo2.
Step oo1.
Follow step one on the first tutorial above. This fading technique is a bit different. Instead of fading the whole word, one letter will be fading each time.
Step oo2.
Follow step two on the first tutorial above.
Step oo3.
For the text, each letter is going to have it's own layer. I will be writing "ABS". Create a raster layer (see tut 1 to get raster) & write the first letter on it. Then create another layer & write the next layer on it. Depending on how many letters your word has, create a new layer for each.
What I used:
Font: #FFFFFF
Size: 72
Font: Cloister Black
Step oo4.
Like in the first tut, bring the opacity of each layer down to 0 & copy & paste it into your animation program. We're going to start with the letter A, which is the bottom layer. Bring the opacity of that layer up to 10, like in the first tutorial. After, paste the 'A' 10 opacity frame after the last frame in animation shop.
Step 005.
See step oo5. in the first tutorial. use this ONLY for the first letter.
Step oo6.
Now that the first letter is done, we're going to go over to the next one. Each letter will be on the SAME canvas, so for the second letter, do the same steps for what you have done for the first letter. Repeat this for each letter in the word you are using.
Step oo7.
Because we are fading each letter instead of the whole word, you will have a lot more frames than the first tutorial. I used the same opacities for each letter as i did for the word in the first tutorial, so i ended up with 19 frames.
Step oo8.
Instead of fading out each letter again, instead, we'll fade out the word. Go back to PSP where each letter is to 100 opacity. Lower each layer to the same opacity. Lower the opacity backwards. In other words, if you did each frame opacity Fr (frame): 10, Fr: 20, Fr: 38, Fr: 52, Fr: 66, reverse that & lower the opacity to 66, paste in animation, 52, paste, etc.
Step oo9.
Now it's time to change the frame properties of the first frame & each frame with the 100 opacity letter. See step 008. in the first tutorial to find out how to change each frame. I changed each of the 100 opacity letter frames to 110 so that the letters appear faster, & i set the 1st frame to 180.
Step o1o.
COMPLETE! This is what the outcome should look like:
Other Examples:
crossposted: icon_tutorial
hope the tutorials worked :) feel free to ask questions