Oh My Sweetness Tutorial
Yay! Another tutorial by me. =D
This one is quick and simple. I was making icons and I really liked how this went. =)
Go from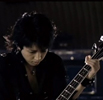
to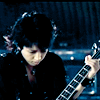
.
MADE IN PHOTOSHOP CS3!
NONTRANSLATABLE!
1. Open your image. Crop, resize or sharpen, etc.
2. Make a COLOR BALANCE LAYER;
Midtones: 11, 0, -7
Shadows: -8, 0, 28
Highlights: 0, 0, 0
3. Create a BRIGHTNESS/CONTRAST LAYER;
Contrast: 13
4. Create a SELECTIVE COLORING LAYER;
Reds: -59, 13, 0, -29
Cyans: 100, -100, -100, 100
Blues: 100, -100, -100, 0
Neutrals: 19, -5, -12, 0
Just go back to the original image and duplicate it and set it to color burn/screen and adjust the opacity depending on your image. I made mine Screen 100%. =D
Enjoy! Show me your results.
Other images made with this tutorial:
With a screen on the duplicated layer:

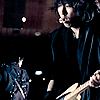
With a colour burn on the duplicated layer.


This one is quick and simple. I was making icons and I really liked how this went. =)
Go from

to

.
MADE IN PHOTOSHOP CS3!
NONTRANSLATABLE!
1. Open your image. Crop, resize or sharpen, etc.
2. Make a COLOR BALANCE LAYER;
Midtones: 11, 0, -7
Shadows: -8, 0, 28
Highlights: 0, 0, 0
3. Create a BRIGHTNESS/CONTRAST LAYER;
Contrast: 13
4. Create a SELECTIVE COLORING LAYER;
Reds: -59, 13, 0, -29
Cyans: 100, -100, -100, 100
Blues: 100, -100, -100, 0
Neutrals: 19, -5, -12, 0
Just go back to the original image and duplicate it and set it to color burn/screen and adjust the opacity depending on your image. I made mine Screen 100%. =D
Enjoy! Show me your results.
Other images made with this tutorial:
With a screen on the duplicated layer:


With a colour burn on the duplicated layer.
