2 TUTORIALS - FIXING DARK SCREENCAPS III and IV
2 WAYS TO GOT "ALMOST" THE SAME RESULT! :D
1 - TUTORIAL 1: VARIATIONS + SCREEN LAYERS - From

to

2 - TUTORIAL 2: COLOR BALANCE + SCREEN LAYERS - From
to

SUPER EASY!! BUT I DON´T KNOW IF IT´S TRANSLATABLE! :(
FOR PS USERS!
Choose your favorite tecnique and enjoy!!
RULES:
- DO NOT HOTLINK!
- Wanna use my icons? Credit
papyds
- Comment if you want! But please let me know if you liked the tutorial! *constructive criticism, please!*
- Textless avvys aren´t bases! Don´t edit them!
- Feel free to friend me!
- Dont share the avvys/tutorial as yours. It´s MY WORK, huh?
TUTORIAL 1
From
to
1 - Open your cap and crop 100x100 >>
2 - Duplicate the base and set it to screen >>
>>

3 - Duplicate the screen layer how many times you need. I did it 5 times
1º

>> 2º

>> 3º

>> 4º

>> 5º

4 - Now flatten all layers. That´s your new base! >>
5 - Go to Image > Adjustments > Variations. I worked with this settings:
Midtones: lighter > more cyan > more red > more cyan
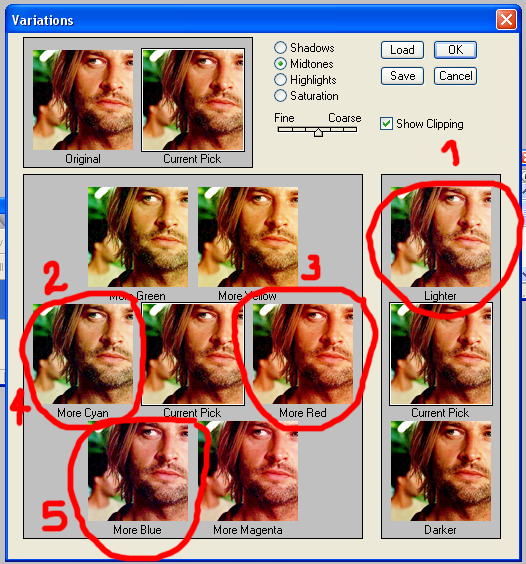
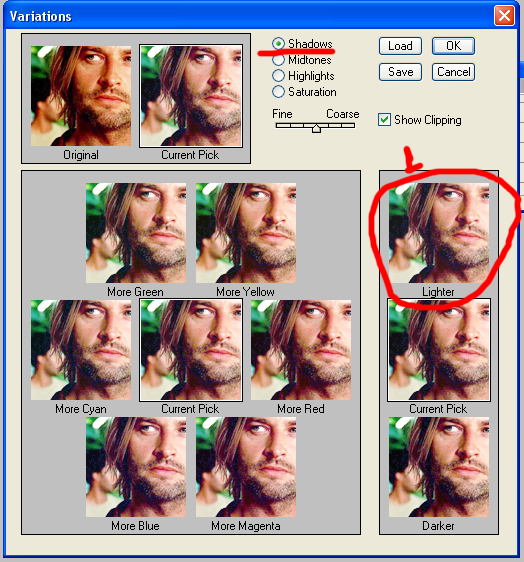
change to Shadows:
- lighter
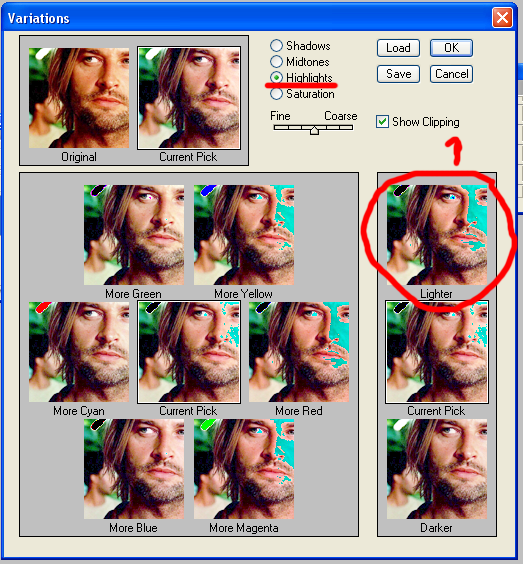
change to highlights:
- lighter
6 - After that, you can click "OK" and you´ll have this result >>

7 - To let you result softer, you can duplicate your base and set it to Softh light, opacity 100% >>
>>

8 - Go to Filters > Blue > Gaussian Blur (Radius: 1,4) >>
>>

And done!!
Now you add your brush or text!
Wanna learn another way to do almost the same stuff???
TUTORIAL 2
1 - Open your cap and crop 100x100 >>
2 - Duplicate the base and set it to screen >>
>>
3 - Duplicate the screen layer how many times you need. I did it 5 times
1º
>> 2º
>> 3º
>> 4º
>> 5º
4 - Now flatten all layers. That´s your new base! >>
NOW WE´LL USE ANOTHER TECNIQUE!
5 - Add a color balance Layer! go to layer > new adjustment layer > color balance
MIDTONES: -22 / +13 / +30
SHADOWS: 10 / 12 / 22
HIGHLIGHTS: 7 / 14 / 46
Your result >>>
>>

6 - Duplicate your base and set to screen, opacity 50% >
>>

7 - Go to Filters > Blue > Gaussian Blur (Radius: 1,4) >>
>>
8 - Flatten all the layers and it´s done!!
TUTORIAL 1 > TUTORIAL 2
>>
You can note the difference??
REMEMBER: YOU´LL HAVE TO PLAY WITH THE SETTINGS!! THIS TUT DON´T WORK WITH ALL PICS.I HOPE YOU LIKE THEM! FEEL FREE TO SHOW ME YOUR RESULT!
I´M TAKING REQUESTS!
YOU CAN FOUND OTHER TUTOS FOR DARK SCREENCAPS HERE AND HERE
TUTORIAL INDEX AND RESOURCES
MY TUTORIAL LIST
FULL ICON TUTORIAL
AWARD LIST
SCREENCAPS BY LOST-MEDIA.COM