DOMINO´S TUTORIAL
With PS CS2
Rules:
- DON´T HOTLINK!!
- Credit ME
- Comment, please!!
- Don´t edit the avvys. You can put your text
- Dont share the avvys as yours.
- Don´t share the tutorial as yours
----------------------------------
Regras
- NÃO COPIE NOSSOS AVATARES. SALVE-OS EM SEU COMPUTADOR!
- Dê créditos
- Comente, por favor!
- Não edite os avatares. Coloque texto se quiser
- Não diga espalhe os avatares como se fossem seus.
- Não espalhe o tutorial como se fosse seu
From
to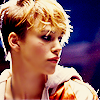
or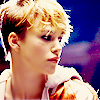
1. Crop 100X100
2. Duplicate the base, set it to screen, 100% (I did it 3 times, but it´s opitional)
3. Duplicate the layer again, set it to mutiply 50%
4. Merge all layers visible
*optional*
Blur only the skin with a rounded brush, strengh 50%
5. Curves:
RGB: 113, 141
Red: 104, 142
Green: 115, 142
Blue: 95, 146
6. Create a new layer, fill with # d8dcde, set it to color burn 100%
7. Create a new layer, fill with # fbd4f6, set it to color burn 100%
8. Create a new layer, fill with # 0b1842, set it to exclusion 40%
9. Merge all again
*optional*
Duplicate the base, drag to the top, set it to softlight 100*, the Filter > Blur> Gaussian blur, radius: 1,0
10. Selective color:
Reds:
- Cian: -33
- Magenta: -2
- Yellow: -7
- Black: 25
Yellow:
- Cian: 58
- Yellow: 37
Done!

If you want, you can add one more screen layer, or use a gradient. I use this:
( I don´t know who did it, sorry! If you know, please, tell me!), set it to softligth 100% and you´ll have this result:

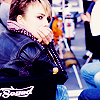
Other icon with the same technique:
PLEASE TELL ME IF YOU LIKE!! AND FEEL FREE TO FRIEND ME!! :)
Rules:
- DON´T HOTLINK!!
- Credit ME
- Comment, please!!
- Don´t edit the avvys. You can put your text
- Dont share the avvys as yours.
- Don´t share the tutorial as yours
----------------------------------
Regras
- NÃO COPIE NOSSOS AVATARES. SALVE-OS EM SEU COMPUTADOR!
- Dê créditos
- Comente, por favor!
- Não edite os avatares. Coloque texto se quiser
- Não diga espalhe os avatares como se fossem seus.
- Não espalhe o tutorial como se fosse seu
From
to
or
1. Crop 100X100
2. Duplicate the base, set it to screen, 100% (I did it 3 times, but it´s opitional)
3. Duplicate the layer again, set it to mutiply 50%
4. Merge all layers visible
*optional*
Blur only the skin with a rounded brush, strengh 50%
5. Curves:
RGB: 113, 141
Red: 104, 142
Green: 115, 142
Blue: 95, 146
6. Create a new layer, fill with # d8dcde, set it to color burn 100%
7. Create a new layer, fill with # fbd4f6, set it to color burn 100%
8. Create a new layer, fill with # 0b1842, set it to exclusion 40%
9. Merge all again
*optional*
Duplicate the base, drag to the top, set it to softlight 100*, the Filter > Blur> Gaussian blur, radius: 1,0
10. Selective color:
Reds:
- Cian: -33
- Magenta: -2
- Yellow: -7
- Black: 25
Yellow:
- Cian: 58
- Yellow: 37
Done!
If you want, you can add one more screen layer, or use a gradient. I use this:
( I don´t know who did it, sorry! If you know, please, tell me!), set it to softligth 100% and you´ll have this result:
Other icon with the same technique:
PLEASE TELL ME IF YOU LIKE!! AND FEEL FREE TO FRIEND ME!! :)