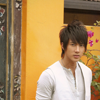
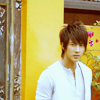
tutorial 02;

to

Made in PSCS2, not translatable. Includes curves, selective color, and color balance layers. .PSD file not included.
01. Open your base.
02. Layer > New Adjustment Layer > Curves.
RGB: input 114, output 135
03. Color fill. #ffcfcf. Color Burn, 48%.
04. Color fill. #ffac5b. Multiply, 22%.
05. Layer > New Adjustment Layer > Color Balance.
Midtones: 0, +15, -7
Highlights: -27, +11, +61
06. Color fill. #170000. Exclusion, 100%.
07. Layer > New Adjustment Layer > Selective Color.
Reds: +23, 0, +100, 0
Yellows: -12, 0, +13, 0
Whites: +9, -11, -100, 0
Neutrals: 0, -9, -20, +10
08. Color fill. #d2bba8. Soft Light, 100%.
09. Layer > New Adjustment Layer > Curves.
Don't put any settings in, hit OK.
Set on Soft Light, 15%.
10. Layer > New Adjustment Layer > Brightness/Contrast
Brightness: -16
Contrast: +9
11. Layer > New Adjustment Layer > Curves.
Don't put any settings in, hit OK.
Set on Soft Light, 23%.
Et voilaaaa. Don't forget to play around with the settings and stuff, because this obviously won't work on every icon. If you're having any trouble feel free to ask me about anything on here, and of course, I'd love to see what you've come up with! (: