Beach Bungalow Tutorial
This is a tutorial for the "Beach Bungalow" icon that I made. gabez_iconz asked about it over at icon_tutorial. So this tutorial is for her and of course anyone else who wants to try it. :)
The icon was made was made using Photoshop CS2, with two adjustment layers...Color Balance and Selective Color. I also used some fill colors I got from another tutorial which I don't have the link to right now because I haven't transferred all my bookmarked tutorials over here to my new computer yet. So I don't remember who the tutorial was by. Sorry.
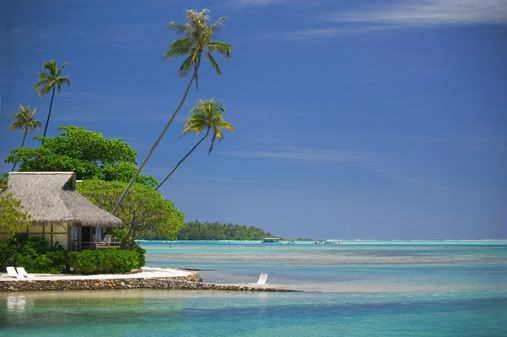
We are going from this picture of a little bungalow on the beach to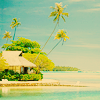
.
First crop your picture however you want. I cropped mine like this.
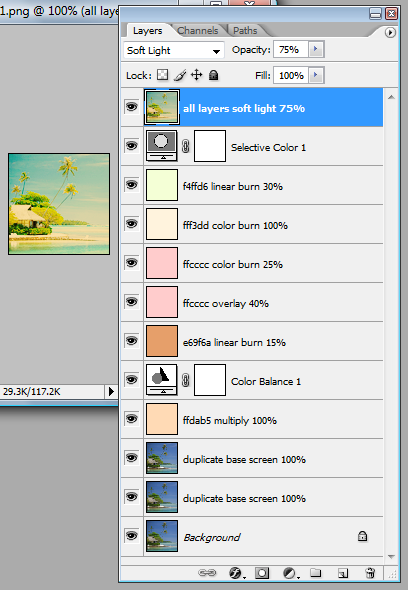
Really it's pretty straight forward and simple, so I'm just going to list the layers and what I did in each one. There is also a link to a graphic of the layers at the end.
Duplicate the base twice and set both layers to screen at 100% opacity.
New Layer, #ffdab5, set to multiply at 100% opacity
Next is an Adjustment Layer>Color Balance
Midtones -23, -13, -28
Set to normal at 100% opacity
New layer, #e69f6a, linear burn, 15% opacity
New layer, #ffcccc, overlay, 40% opacity
New layer, #ffcccc, color burn, 25% opacity
New layer. #fff3dd, color burn, 100% opacity
New layer, #f4ffd6, linear burn, 30% opacity
New Adjustment Layer>Selective Color
Greens - cyan +2, magenta -79, yellow +73
Cyans - cyan -100, magenta +100, yellow -1, black +12
Neutrals - cyan +100, magenta -8, yellow -19
set to normal at 100% opacity
Make a new layer, then Alt + Ctrl + Shift + E...in that order, it will make a copy of all the previous layers.
Set this layer to Soft Light, 75% opacity
And you're done.
You might want to play around with the colors or even leave some out. You know, just experiment.
Link to graphic of layers
Please let me know if this tutorial was helpful. Also if there is something that is not clear or hard to understand please let me know.
Icon from this batch.
Thanks for stopping by. :)
The icon was made was made using Photoshop CS2, with two adjustment layers...Color Balance and Selective Color. I also used some fill colors I got from another tutorial which I don't have the link to right now because I haven't transferred all my bookmarked tutorials over here to my new computer yet. So I don't remember who the tutorial was by. Sorry.
We are going from this picture of a little bungalow on the beach to
.
First crop your picture however you want. I cropped mine like this.
Really it's pretty straight forward and simple, so I'm just going to list the layers and what I did in each one. There is also a link to a graphic of the layers at the end.
Duplicate the base twice and set both layers to screen at 100% opacity.
New Layer, #ffdab5, set to multiply at 100% opacity
Next is an Adjustment Layer>Color Balance
Midtones -23, -13, -28
Set to normal at 100% opacity
New layer, #e69f6a, linear burn, 15% opacity
New layer, #ffcccc, overlay, 40% opacity
New layer, #ffcccc, color burn, 25% opacity
New layer. #fff3dd, color burn, 100% opacity
New layer, #f4ffd6, linear burn, 30% opacity
New Adjustment Layer>Selective Color
Greens - cyan +2, magenta -79, yellow +73
Cyans - cyan -100, magenta +100, yellow -1, black +12
Neutrals - cyan +100, magenta -8, yellow -19
set to normal at 100% opacity
Make a new layer, then Alt + Ctrl + Shift + E...in that order, it will make a copy of all the previous layers.
Set this layer to Soft Light, 75% opacity
And you're done.
You might want to play around with the colors or even leave some out. You know, just experiment.
Link to graphic of layers
Please let me know if this tutorial was helpful. Also if there is something that is not clear or hard to understand please let me know.
Icon from this batch.
Thanks for stopping by. :)