Selective color basic theory tut
A tutorial on the basic theory behind the Selective color tool in Photoshop.
So, basic color theory. Red, Blue, yellow - primary colors. Mixed together to make secondary colors - green, violet, orange. And then further mixed to make more colors etc etc.
Now, to the color theory (the way Photoshop reads colors) of Photoshop. I shall be talking about RGB and CMYK here. Go through this image -
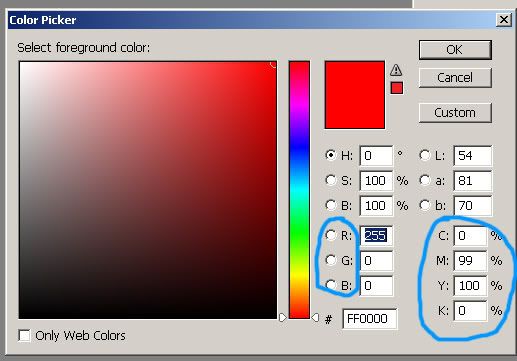
See red selected as the color. The FF0000 after the # is just the hex code. Lets forget that now.
See the circled stuff there - RGB which stands for Red, Green, Blue. As I have selected pure RED, the G and B values are zero.
Now look at the other circled part called CMYK. CMYK stands for Cyan, Magenta, Yellow, Black. You see C and K as zero while Y and M have some values. Lets remember this.
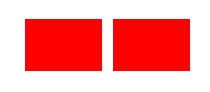
Now I make a red shape and duplicate the layer for our reference.
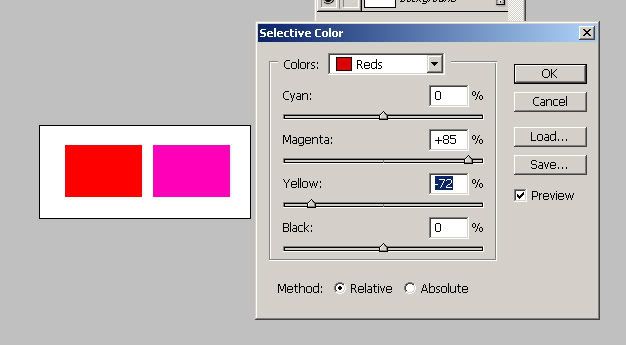
Select the duplicated layer and go to image - adjustments - selective color. Red should be selected by default. Change the Cyan value by moving the arrow. Nothing happens. Remember, red has no C value in CMYK. Now change the Magenta and Yellow and you will see the color changing. Moving the arrow in the Black value will definitely make some changes. That is because black here refers to the intensity/contrast of the color.
Now change the RED from the drop down menu to something else, for eg. Cyan, Blue, White, anything. You will notice that no matter what you do, the color won’t change with any permutation or combination. That is because to begin with, there was no color except Red in the shape.
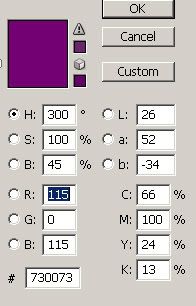
Now we choose some other color. Notice that all CMYK have values for this color. In the RGB section, green still has no value.
Lets experiment with selective color now.
You will notice that no matter what changes you make in the Green section, nothing will happen to the shape’s color. That is because there is NO green in the color that we chose.
Now, in case you haven’t read it yet, this can be found in the Photoshop help.
Selective color correction is a technique used by high-end scanners and separation programs to increase and decrease the amount of process colors in each of the additive(RGB) and subtractive(CMYK) primary color components in an image. Even though Selective Color uses CMYK colors to correct an image, you can use it on RGB images as well as on images that will be printed.
Selective color correction is based on a table that shows the amount of each process ink used to create each primary color. By increasing and decreasing the amount of a process ink in relation to the other process inks, you can modify the amount of a process color in any primary color selectively--without affecting the other primary colors. For example, you can use selective color correction to dramatically decrease the cyan in the green component of an image while leaving the cyan in the blue component unaltered.
So basically what you’re doing when you do something like this -
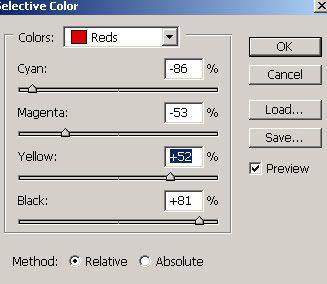
Decreasing the Cyan and the Magenta and increasing the Yellow in the REDs that the image contains.
Explaining CMYK now -
When someone says that you’re decreasing the CYAN, it actually means that you’re adding more red/magenta. So, basically you’re adding it’s opposite. Opposites of all the options are -
Cyan - Red/Magenta
Magenta - Green
Yellow - Blue (or cyan if you must)
I hope that makes the basics clear.
Now that you have got the basics clear, you now how to make the lips red without making the skin horribly orange.
- Comment if this was helpful
- Friend us for more tuts
- Any question, ask.
So, basic color theory. Red, Blue, yellow - primary colors. Mixed together to make secondary colors - green, violet, orange. And then further mixed to make more colors etc etc.
Now, to the color theory (the way Photoshop reads colors) of Photoshop. I shall be talking about RGB and CMYK here. Go through this image -
See red selected as the color. The FF0000 after the # is just the hex code. Lets forget that now.
See the circled stuff there - RGB which stands for Red, Green, Blue. As I have selected pure RED, the G and B values are zero.
Now look at the other circled part called CMYK. CMYK stands for Cyan, Magenta, Yellow, Black. You see C and K as zero while Y and M have some values. Lets remember this.
Now I make a red shape and duplicate the layer for our reference.
Select the duplicated layer and go to image - adjustments - selective color. Red should be selected by default. Change the Cyan value by moving the arrow. Nothing happens. Remember, red has no C value in CMYK. Now change the Magenta and Yellow and you will see the color changing. Moving the arrow in the Black value will definitely make some changes. That is because black here refers to the intensity/contrast of the color.
Now change the RED from the drop down menu to something else, for eg. Cyan, Blue, White, anything. You will notice that no matter what you do, the color won’t change with any permutation or combination. That is because to begin with, there was no color except Red in the shape.
Now we choose some other color. Notice that all CMYK have values for this color. In the RGB section, green still has no value.
Lets experiment with selective color now.
You will notice that no matter what changes you make in the Green section, nothing will happen to the shape’s color. That is because there is NO green in the color that we chose.
Now, in case you haven’t read it yet, this can be found in the Photoshop help.
Selective color correction is a technique used by high-end scanners and separation programs to increase and decrease the amount of process colors in each of the additive(RGB) and subtractive(CMYK) primary color components in an image. Even though Selective Color uses CMYK colors to correct an image, you can use it on RGB images as well as on images that will be printed.
Selective color correction is based on a table that shows the amount of each process ink used to create each primary color. By increasing and decreasing the amount of a process ink in relation to the other process inks, you can modify the amount of a process color in any primary color selectively--without affecting the other primary colors. For example, you can use selective color correction to dramatically decrease the cyan in the green component of an image while leaving the cyan in the blue component unaltered.
So basically what you’re doing when you do something like this -
Decreasing the Cyan and the Magenta and increasing the Yellow in the REDs that the image contains.
Explaining CMYK now -
When someone says that you’re decreasing the CYAN, it actually means that you’re adding more red/magenta. So, basically you’re adding it’s opposite. Opposites of all the options are -
Cyan - Red/Magenta
Magenta - Green
Yellow - Blue (or cyan if you must)
I hope that makes the basics clear.
Now that you have got the basics clear, you now how to make the lips red without making the skin horribly orange.
- Comment if this was helpful
- Friend us for more tuts
- Any question, ask.