Tutorial: Sherlock
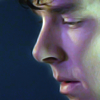
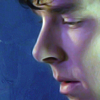
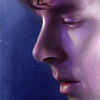
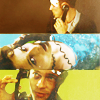
We're going from: 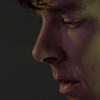
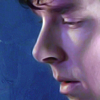
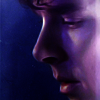
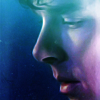
to: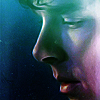
Requested by karinmcr ♥
STEP ONE
>
This step? Pure genius, let me tell you. I bet you've never heard of something quite like it.
... just kidding. I created a Curves layer and clicked on Auto. Boring.
STEP TWO
>
Select > All, Edit > Copy Merged, Edit > Paste.
Here comes an interesting PS feature I've recently discovered: it's called Reduce Noise and you can find it under Filter > Noise. I've been totally abusing it lately, because it produces something quite similar to Topaz filter if you use the following settings:
Basic: checked
Settings: Default
Strenght: 7
Preserve Details: 1%
Reduce Color Noise: 0%
Sharpen Details: 35%
Remove JPEG Artifact: unchecked
Sadly, I think it's available only for PS CS5. Perhaps also for PS CS4, but I'm not sure of it. Maybe you can try fiddling with Surface Blur settings for similar results. I use Reduce Noise to blur the picture a little and even out the pixelly/grainy areas, basically. Sometimes you also need to lower the opacity of the layer, if you don't want your icon to become too blurry.
In this case, I set the layer to Normal, 100% opacity.
STEP THREE
>
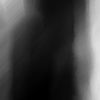
I didn't like the color of the the background, so I created a new layer and painted over it with a dark blue:

I set it to Soft Light, 100% opacity.
STEP FOUR
>
I was pretty happy with the color of the background at this point, but I wanted it more texturized. So I picked a texture of mine, I edited it a bit and then I pasted it over the previous layer:
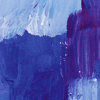
>
I right-clicked on this layer and created a Clipping Mask, so that it would affect only the dark blue layer.
>
I set it to Screen, 100% opacity.
STEP FIVE
>
I created a new layer and painted over the dark zones of Sherlock's face with a soft brush:

I set this layer to Multiply, 31% opacity.
STEP SIX
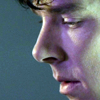
>
I didn't like the green-ish shade of the bright areas, so I painted over them with a pale violet:

And I set this layer to Color, 100% opacity.
STEP SEVEN
>
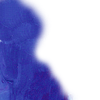
I added this texture by deny1984:
I set it to Screen, 48% opacity. I think I wanted to add some puple tones to the shadows, but it's just a guess. No clue why I would have wanted to brighten a picture that was already lacking contrast.
STEP EIGHT
>
I added this texture of mine:
I set it to Soft Light, 100% opacity, and I masked the bright bit on the right, because I didn't want to brighten the already bright areas of his face.
STEP NINE
>
I added this texture by lumsx:

I set it to Soft Light, 100% opacity. I honestly don't know what I was trying to achive because at this point the icon was so dark I can't think of one good reason why I didn't lower the opacity of this texture.
STEP TEN
>
I added this texture by deny1984:

I set it to Screen and lowered the opacity to 85%. I think I wanted to add some cyan, because the coloring was pretty dull.
STEP ELEVEN
>
At this point the contrast was terrible, so I clicked on the little eye of the previous four layers to turn all the textures invisible. I copy-pasted the merged layers (aka, partial result of step six) and set it to Soft Light, 100% opacity.
STEP TWELVE
>
Last step! Select > All, Edit > Copy Merged, Edit > Paste again. First of all I used Variations on this layer and it's hard to figure out what I did because I usually play a lot with Shadows, Midtones, Saturation and the Fine-Coarse slider. However, I think I added some green/yellow to Midtones and darkened the picture a bit.
Finally, I went to Filter > Artistic > Paint Daubs to sharpen the icon (Size: 1, Contrast: 1).
DOWNLOAD PSD @BOX.NET
- No Vibrance Involved
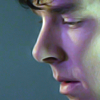
NEXT
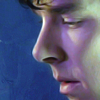
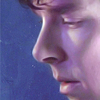
to:
Requested by karinmcr ♥
STEP ONE
>
This step? Pure genius, let me tell you. I bet you've never heard of something quite like it.
... just kidding. I created a Curves layer and clicked on Auto. Boring.
STEP TWO
>
Select > All, Edit > Copy Merged, Edit > Paste.
Here comes an interesting PS feature I've recently discovered: it's called Reduce Noise and you can find it under Filter > Noise. I've been totally abusing it lately, because it produces something quite similar to Topaz filter if you use the following settings:
Basic: checked
Settings: Default
Strenght: 7
Preserve Details: 1%
Reduce Color Noise: 0%
Sharpen Details: 35%
Remove JPEG Artifact: unchecked
Sadly, I think it's available only for PS CS5. Perhaps also for PS CS4, but I'm not sure of it. Maybe you can try fiddling with Surface Blur settings for similar results. I use Reduce Noise to blur the picture a little and even out the pixelly/grainy areas, basically. Sometimes you also need to lower the opacity of the layer, if you don't want your icon to become too blurry.
In this case, I set the layer to Normal, 100% opacity.
STEP THREE
>
I didn't like the color of the the background, so I created a new layer and painted over it with a dark blue:
I set it to Soft Light, 100% opacity.
STEP FOUR
>
I was pretty happy with the color of the background at this point, but I wanted it more texturized. So I picked a texture of mine, I edited it a bit and then I pasted it over the previous layer:
>
I right-clicked on this layer and created a Clipping Mask, so that it would affect only the dark blue layer.
>
I set it to Screen, 100% opacity.
STEP FIVE
>
I created a new layer and painted over the dark zones of Sherlock's face with a soft brush:
I set this layer to Multiply, 31% opacity.
STEP SIX
>
I didn't like the green-ish shade of the bright areas, so I painted over them with a pale violet:
And I set this layer to Color, 100% opacity.
STEP SEVEN
>
I added this texture by deny1984:
I set it to Screen, 48% opacity. I think I wanted to add some puple tones to the shadows, but it's just a guess. No clue why I would have wanted to brighten a picture that was already lacking contrast.
STEP EIGHT
>
I added this texture of mine:
I set it to Soft Light, 100% opacity, and I masked the bright bit on the right, because I didn't want to brighten the already bright areas of his face.
STEP NINE
>
I added this texture by lumsx:
I set it to Soft Light, 100% opacity. I honestly don't know what I was trying to achive because at this point the icon was so dark I can't think of one good reason why I didn't lower the opacity of this texture.
STEP TEN
>
I added this texture by deny1984:
I set it to Screen and lowered the opacity to 85%. I think I wanted to add some cyan, because the coloring was pretty dull.
STEP ELEVEN
>
At this point the contrast was terrible, so I clicked on the little eye of the previous four layers to turn all the textures invisible. I copy-pasted the merged layers (aka, partial result of step six) and set it to Soft Light, 100% opacity.
STEP TWELVE
>
Last step! Select > All, Edit > Copy Merged, Edit > Paste again. First of all I used Variations on this layer and it's hard to figure out what I did because I usually play a lot with Shadows, Midtones, Saturation and the Fine-Coarse slider. However, I think I added some green/yellow to Midtones and darkened the picture a bit.
Finally, I went to Filter > Artistic > Paint Daubs to sharpen the icon (Size: 1, Contrast: 1).
DOWNLOAD PSD @BOX.NET
- No Vibrance Involved
NEXT