photoshop basics tutorial: hand colouring 1
part 1: hand colouring an existing black and white image
(please do not resize image and use for icons, layouts, banners, love slaves, etc.)
one of my most favourite effects in digital graphic work is hand colouring. it's a technique which was used on black and white photographs for many years before colour film became the norm. on a photograph, it's a messy business, like watercolours, only with the possibility of messing up your photo forevermore. on the computer, it's sinfully easy.
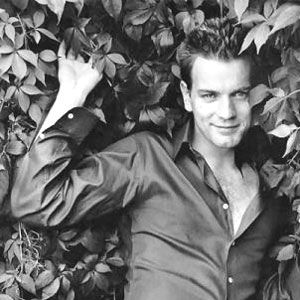
we start with this, which has already been cropped and slightly brightened from the original:
now here come the crayons.
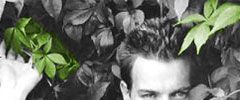
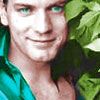
the first thing i'm going to colour are the little pointy leaves around ewan's face. i'm going to pick up my paintbrush, switch it from Normal to Overlay at 100% opacity, and select a default round brush in a size 3. my colour is #71A134.
the reason i'm going to focus on these little pointies first is that i don't want to smear greenness on ewan's face with my big brush later. every time you make a pass with the brush, you're laying down more colour. the beauty of Overlay, though, is that it doesn't lay down any colour over black or white, only (in this case) grey tones. so, basically, i'm going to colour as much of the leaves around his face and hand as i need to in order to minimize overlap later with the brushes.
like so:
now i'm going to select a bigger brush, a size 13 round. i use round brushes almost exclusively with hand colouring. the feathered brushes are too patchy and the square brushes are too... rigid.
our challenge here is to be as precise as possible. if this was an icon, i wouldn't fuss too much about the edges. this is big enough, though, that your eyes will be drawn to mistakes, so i'm going to be extremely careful about not getting any green on ewan.

the next step is to add eye colour. i do this now because the eye colour i choose is going to impact on the way the fleshtones look later. i happen to know that ewan has blue-green eyes and i'm going to choose a colour in that part of the spectrum, but any colour will do here and some of the best eye colour effects come with browns. because we're not seeing much of his eyes in this picture, i'm also going to choose a brighter colour than i might otherwise, #2E8F6E. i'm using a size 2 brush, still on overlay:
we'll do his shirt in two layers of colour. the first layer is #0AC8E2. i'm using a size 13 round brush for the bulk of the shirt, with a zoom and a size 3 on the edge of the sleeve cuff that peeks out from behind his wrist:
the second layer is #535E46. it's very important that this second layer be quite a dark shade. on the overlay setting, dark shades are going to colour up your shadows without effecting your light areas very much. light shades will lighten up your shadows and make your light areas much more vivid. regardless of lightness or darkness, however, overlay is going to leave your whites white and your blacks black.
here's what our dark green over our bright aqua blue gives us:

skin tone is tricky. on overlay, the colour you think you're looking for is totally wrong. for this picture, i used #9A5B51

the trick is to find the right balance of red and orange, the right level of saturation (you don't want a very saturated colour), and the right light/dark ratio.
and with this muddy pink we get:
not bad.
next is hair, #9A5A33. do not overlap the flesh and the hair. i like to zoom pretty close for a precise operation like this. you're better off having a pixel width of gray than to overlap here.
here he is with brown hair:
now, for icon size, the hair would be done. however, at this size, it looks like mr. mcgregor is wearing a crap wig, so i'm going to pick up my smudge tool at 25%, a size 3 round, and i'm going to brush back and forth along his hairline in a zig-zag pattern that follows the direction of natural hair growth. i'm going to do this all on one mouse click so it looks like this:
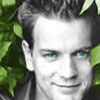
BEFORE
AFTER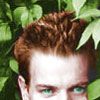
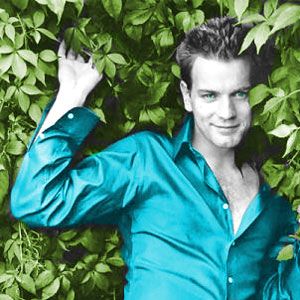
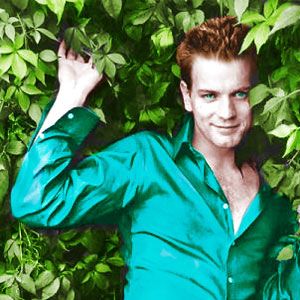
we can quit here OR we can dab on some more layers of green in the leafy areas. i sort of picked shades of green at random and touched up the leaves: light greens for the ones closest to the camera and dark greens for the ones furthest or in ewan's shadow. this gives the whole piece a more three dimensional and vibrant look. i also did a light burn over his eyes with a 5 round brush on Shadows, 10%:
(please do not resize image and use for icons, layouts, banners, love slaves, etc.)
one of my most favourite effects in digital graphic work is hand colouring. it's a technique which was used on black and white photographs for many years before colour film became the norm. on a photograph, it's a messy business, like watercolours, only with the possibility of messing up your photo forevermore. on the computer, it's sinfully easy.
we start with this, which has already been cropped and slightly brightened from the original:
now here come the crayons.
the first thing i'm going to colour are the little pointy leaves around ewan's face. i'm going to pick up my paintbrush, switch it from Normal to Overlay at 100% opacity, and select a default round brush in a size 3. my colour is #71A134.
the reason i'm going to focus on these little pointies first is that i don't want to smear greenness on ewan's face with my big brush later. every time you make a pass with the brush, you're laying down more colour. the beauty of Overlay, though, is that it doesn't lay down any colour over black or white, only (in this case) grey tones. so, basically, i'm going to colour as much of the leaves around his face and hand as i need to in order to minimize overlap later with the brushes.
like so:
now i'm going to select a bigger brush, a size 13 round. i use round brushes almost exclusively with hand colouring. the feathered brushes are too patchy and the square brushes are too... rigid.
our challenge here is to be as precise as possible. if this was an icon, i wouldn't fuss too much about the edges. this is big enough, though, that your eyes will be drawn to mistakes, so i'm going to be extremely careful about not getting any green on ewan.
the next step is to add eye colour. i do this now because the eye colour i choose is going to impact on the way the fleshtones look later. i happen to know that ewan has blue-green eyes and i'm going to choose a colour in that part of the spectrum, but any colour will do here and some of the best eye colour effects come with browns. because we're not seeing much of his eyes in this picture, i'm also going to choose a brighter colour than i might otherwise, #2E8F6E. i'm using a size 2 brush, still on overlay:
we'll do his shirt in two layers of colour. the first layer is #0AC8E2. i'm using a size 13 round brush for the bulk of the shirt, with a zoom and a size 3 on the edge of the sleeve cuff that peeks out from behind his wrist:
the second layer is #535E46. it's very important that this second layer be quite a dark shade. on the overlay setting, dark shades are going to colour up your shadows without effecting your light areas very much. light shades will lighten up your shadows and make your light areas much more vivid. regardless of lightness or darkness, however, overlay is going to leave your whites white and your blacks black.
here's what our dark green over our bright aqua blue gives us:
skin tone is tricky. on overlay, the colour you think you're looking for is totally wrong. for this picture, i used #9A5B51
the trick is to find the right balance of red and orange, the right level of saturation (you don't want a very saturated colour), and the right light/dark ratio.
and with this muddy pink we get:
not bad.
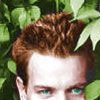
next is hair, #9A5A33. do not overlap the flesh and the hair. i like to zoom pretty close for a precise operation like this. you're better off having a pixel width of gray than to overlap here.
here he is with brown hair:
now, for icon size, the hair would be done. however, at this size, it looks like mr. mcgregor is wearing a crap wig, so i'm going to pick up my smudge tool at 25%, a size 3 round, and i'm going to brush back and forth along his hairline in a zig-zag pattern that follows the direction of natural hair growth. i'm going to do this all on one mouse click so it looks like this:
BEFORE
AFTER
we can quit here OR we can dab on some more layers of green in the leafy areas. i sort of picked shades of green at random and touched up the leaves: light greens for the ones closest to the camera and dark greens for the ones furthest or in ewan's shadow. this gives the whole piece a more three dimensional and vibrant look. i also did a light burn over his eyes with a 5 round brush on Shadows, 10%: