Team 1: Vidya
This is the first post for the Henrys, John, Roger, and Eileen.
If you are on one of the other teams, please do not read this post until the game is over! The information contained herein could give some things away!
Subway notes
Your characters begin in the location "Dark Tunnel," which reaches the map in the location marked "A." Reaching location "S" allows you to enter the other world available to your party. Your movements and movement speed are up to you. All of the location contents are described here. Hilite the text to read them. We recommend that you only check the contents of a location as you enter it; it is far more fun that way.
There are only two preset monster encounters. The rest are "wandering monsters." You may choose to encounter any of them anywhere at any time with any frequency. The monsters found in the subway are described at the end of this post.
Ghosts do not appear until after you've visited and interacted with the location marked "C."
The environment in Walter's world is different from what any of your characters are used to (exception: Henries, duh). In addition to the overwhelming and nauseating omnipresent thick smell of rot and decay, the air is heavy and a bit like a fear drug. Even those who are usually calm will be afraid, find it difficult to keep a straight head, be clumsier than usual, etc. This is not a "fear gas sends everyone to huddling in the corner" situation, though for characters not used to threat, it may do that. Instead, call to mind the sensation of being ill, or of not having eaten for 24 hours. Everything seems more daunting, confusing, and claustrophobic. Your reflexes may be impaired, leading to slowed reactions, or your nerves may be shot, leading to overreactions. The particular effect on your character is your call.
None of the light switches work, and aside from a lamp here or there that flickers disorientingly, most of the lights throughout the subway are off. The lack of a light source will make any combat that you engage in more difficult.
Map key:
Black rectangles indicate doors that can open. Some of them may be sticky or heavy or otherwise difficult to open, at your discretion, but they can be opened.
A red x indicates a door whose lock is jammed and it cannot be opened.
A blue square indicates a door that connects to another level of the structure, via stairs or a ladder. The ladder next to location J goes down to location K; the escalator M goes up to location N; and the escalator S goes to the next world.
The location descriptions should make it clear what you're looking at, but some of advance explanation of the map on the right ("Lynch Street Line"), since it's a bit confusing. It shows a subway platform; the two long lines of green rooms down the center of the map are two subway trains, each with 3 passenger cars, a control car, and an observation deck car. The different subway cars are separated by doors, and also have some sliding side doors or open windows that give access to the boarding platforms or to the island in between the trains. Double-lines indicate the boundaries between subway cars. Some cars are also collapsed or blocked with debris, such as at location "F," and these effective walls are indicated by single lines.
If you get confused at any point about where your characters are and what they're looking at, don't hesitate to ask!
The map is for the convenience of you, the players. Because we love you. Unless otherwise noted, your characters do not have this map.
Subway Map
Dark Tunnel
When you pass through the hole formed by Henry Townshend's "key," everything is pitch dark, dark beyond the ability of even the most enhanced eyesight to penetrate, dark beyond the ability of any fire or light to dispel. The steps of your comrades fade, as does the sensation of their presence nearby. Before you have a chance to reach out or try to pursue them, though, you realize that there is a slightly metallic taste in your mouth, followed by the realization that it stings to have your eyes open.
Followed quickly by the realization that you feel suddenly very heavy.
Followed by the realization that you can't feel the ground beneath your feet.
The realization that your movements are slowed.
The realization that you can't breathe.
All within the space of a few seconds, realization that you are underwater, caught in a current, and are about to drown.
If you're carrying weapons, ammunition, or armor, it's likely you'll have to drop some or even all in order to keep from sinking. Exactly what they lose is your discretion, but we recommend that you drop enough equipment so that your character is likely to be and feel threatened by what is to come.
But there's a saving grace here. The current pulls you into shallower water, and your head breaks the surface just in time to catch a life-saving breath, and you and your (now much reduced) team will be carried here each just seconds apart, in the order that you passed through the hole into this place. You've been washed "ashore" in a dark underground tunnel of some kind.
Whether because they're waterlogged or because of interference from this world, your flashlight and walkie-talkie, and any other electrical or technological implements, will not work. Henry Sherman-Townshend's walkie-talkie is the exception, and from here on out, it behaves peculiarly. When there is a monster or ghost nearby, within about fifteen feet, it emits a strange static. The noise grows louder and louder the closer the monster gets to you. You can tell from the volume of the radio static approximately how close the creature is, but not what it is or what direction it's in. All monsters in the subway are hostile to you, but some of them may draw near then withdraw, producing a radio static response but never being seen.
The tunnel starts out accommodating two people walking abreast, but expands after a couple of blocks to the point where it can accommodate three. The walls, ceiling, and floor underfoot are a mixture of packed dirt, splashes of concrete, and an oddly-placed linoleum tile every here and there. It's quite damp, though the sound of rushing water fades away after long, replaced with the hum of unseen electrical lines. The tunnel ends at a rust-splotched metal door, marked "A" on the map.
Lynch Street Line
A
Upon opening the door, you find yourself in a dark subway station. The walls, floor, and ceiling are all slightly grimy, plain grey concrete. Some shards of glass and bits of trash are littered about, and the whole place is dusty, as though it's been ten years since anyone has set foot here.
There's an overhead light flickering above a bench (see "B") and a bit of light coming from one of the subway cars ("F"). A red neon arrow on the wall not far ahead of you points up what are probably stairs ("C"). It's about two blocks from one end of the track to the other, but it's too dark to see beyond point C.
B
The light above this bench flickers on and off disorientingly. The bench itself is covered with things, a shabby sleeping bag and a brown coat, a couple plastic garbage bags filled with someone's belongings; cans of soup, a couple ID cards with Walter Sullivan's name and face on them, a very used toothbrush, worn out shoes and clothes, a religious text with damp pages, and other assorted odds and ends one would expect to see in the possession of someone who had been sleeping here regularly. Written on the wall around the bench in what looks like red and black crayon are the words "I HATE YUO," "I CaN SEE YOU CAn YOU SEE ME," "YOU'LL BE SORRY," and "KILL me." A closer look would find that the sleeping bag is pulled up under over the eyes of a small shabby doll with brown yarn hair, blue dress and black button eyes hidden.
C
A closer look finds that these are indeed stairs leading up, placards reading "Ticketing" and "Lynch Street" faintly legible in the bit of red light available. There are a couple of large broken vending machines blocking the way, but enough strength could move one or both of them. The stairs are blocked off at the bottom with two large steel gates, but one of them is bent and cracked. There's a good handhold, and the gate could be pulled away, but it will take more strength than one flatline human has to do it. Anyone in the party can give it a try, but only Roger will be able to succeed. If Roger pulls the gate away and the group starts up the stairs...
...towards the top of the stairs, you'll find that the area has collapsed, almost like a cave-in. Huge concrete blocks bar any further progress. Consider the location marked "C" to have a red X on it on the map. Upon reaching the blockage, you'll hear an unearthly groaning sound and will be suddenly stricken with a terrible headache and blurred red vision. One of the dark blocks of rubble will move, proving not to be part of the collapsed wall at all, but Victim-16 (see below). Victim-16 will pursue you relentlessly until further notice, and other Victim spirits can now appear whenever you wish.
D
There is a wall here, thick and impassable, made of some kind of sheer black material that does not fit with the rest of the surroundings at all. It wraps around the subway car to the east like it had been poured on. Spraypainted on the wall, in red, are the words: "You make me happy."
E
The subway cars are all a mess, filled with trash and broken glass and torn moldy upholstery. The cars are narrow, the aisles wide enough for two people to walk side-by-side if they squeeze. A couple of usable items are noticeable on the passenger seats, if you stop to pick them up. In the northwest car, at point "E," a golf club. In the southwest car, a 9mm magazine. In the southeast car, another 9mm magazine. In the east middle car, a third 9mm magazine.
There is a bit of light shining from this car.
F
The light source is a pocket flashlight lying on one passenger seat.
This car, as well as the northeast car and the two south cars, have collapsed or have thick bars installed halfway through.
G
On the east boarding platform, there are a couple clumps of long black hair strewn across the floor.
H
The large metal door at the south end of the boarding platform is locked, and a note is stuck to it with an old bit of chewing gum. "I am the Lord, I am the Master, I have the keys to set the wheels of progress in motion. I change the world.
You are on the wrong side."
Check with a GM as you search a location to be told if you find the key.
I
The control car for the west subway train. If you have the key, inserting it into the control panel and turning it on will cause a two small buttons one on top of the other to light up red. Pressing the button on top causes the train to move a short ways northward. Pressing the button on bottom causes the train to move that same distance south. The distance that the train moves, be it north or south, is indicated by the two parallel vertical lines numbered "1."
J
There's a light on in this service closet, deep red in color. The walls, floor, and ceiling are completely covered in rust. There's a ladder going down through a square hole in the floor. It connects to the King Street Line level at the blue square in location "K."
King Street Line
K
The ladder goes down just one floor, to a truly bizarre looking hallway. It's partly under construction, wooden planks and metal grading and scaffolding littered around. But more to the point, the walls, floor, and ceiling seem to be made of red, sweating meat. It's very hot and humid in here, and in the beam of the flashlight, you see the walls quiver out of the corner of your eye.
L
This is another subway line, but in a much worse state than the Lynch Street Line was, and there is a distinct air of foreboding about it. The floor is splashed here and there with rust, mildew, and gore. The one subway car there is crushed and collapsed. Bits of flesh dangle from metal grating cutting through the area at the west end, and what look like a couple desiccated corpses are speared atop the fence. In the middle of the boarding platform, there is an escalator heading up to the next floor, which you can access from the west. Be warned, though, that rushing up the escalator would be most unwise...
M
Two escalators run side-by-side, the one on the right going up, and the one on the left coming down. All along both escalators, though, are protuberances from the wall that look like stone men. The come out from the wall at the waist, and their arms seem to hang limp. There's a chain wrapped around each one's neck, which stretches taut for about a foot between neck and wall. Although they look, and are, stone or clay or plaster or some similarly solid substance, they're "carved" in such a way that it looks like they're bound and hanging from the wall by the chains around their necks. These are the Wall Men described in the bestiary below. But note that they will not move or act until you draw near it, at which point it will seem to come to life, a mix of flesh and plaster, lashing out at you and breaking the chain. Until a Wall Man "comes to life," it cannot be damaged or harmed by any means. Reaching the top of the escalator alive takes you to the Ticketing Level, the blue square at location "N."
Ticketing Level
N
And here, the flesh and gore are gone, and it's back to the drab gray from the Lynch Street Line. The Ticketing Level is as hellish as the King Street Line below, rust- and blood-coated, suffocating, strange noises sounding behind the walls from time to time. There's a murder scene at the top of the escalator, a woman's purse contents scattered on the floor amidst splatters of blood, make-up compacts and cel-phone marked off with chalk and a numbered placard. There's a great deal more blood splashed against the windows of the ticketing booth (location "O"), and the door to the booth is slightly ajar. You can see that, inside the booth, a piece of paper was taped to the inside of one of the teller's windows. The paper is clean; it must have been put up after the blood was spilt and dried.
O
It's a mess inside the subway ticket vendor's booth. There's blood everywhere, and there was obviously a struggle here at some point, desk contents scattered. A blood-splattered Saint Medallion lies on the floor. The piece of paper taped to the inside of the window reads:
"1. In every woman's body
beneath her heart it rests
But hers is shriveled, dry, a tomb
to tear it out is best.
2. The world her sight has clouded
from dark to milky blind
pluck out the erring vision
the truth that she may find.
3. The coward hides from judgment
defends her precious sin
She'll raise defense, wound through the skin
in blood healing begins
4. But still her path is murky
she walks toward hellish flame
Cut off her steps; in stumbling
she'll find the greater gain.
5. From breath to flesh she bore him
a mother's love she gave
but from this world she took him
from breath to flesh to grave.
6. Whispered words of promise
and sugar spun from lies
From candied lips sweet venom drips
Strike true, heed not her cries.
7. When she was just a child
all sugar spice and sweat
sweet heat still lived within her
her sins brought no regret
To you, oh weary traveler
it falls to teach her grace
carve deep the sacred symbols
beneath the lustful place."
P
Dead ends all around down here. What looks like a giant worm or leech, large enough for a grown man to walk through were it hollow, emerges from the wall at one point and reenters the wall further down the hallway. It smells terrible, and sets off radio static, but does nothing other than pulsate. It it's damaged, it will shudder and ooze pus, but otherwise won't react.
Q
The men's room. It's unremarkable. There's a first aid kit taped up under one sink, which has a couple bandages and some hydrogen peroxide. One of the toilets is in disrepair, pipes disconnected from the wall. One of the pipes could probably be wrenched away and used as a blunt weapon if you cared to.
R
The hallway reaches a dead end here, but set into the wall is an image that looks very much like a typical Madonna and Child portrait, a seated mother in a large flowing robe gently cradling a child, porcelain perfection. The image is made of 21 square tiles, three columns and seven rows, each of which can be flipped.
The reverse side of each tile that same image, same part of the body, but altered. Were all the tiles flipped over, you'd see the woman and child in the same position, but they are battered and degraded, streaked with blood and grime, peace and purity turned to violence and sex. The flipside of each tile is described below. (The tiles are numbered here purely for reference and convenience; no such numbers appear on the tiles themselves.)
1 2 3
4 5 6
7 8 9
10 11 12
13 14 15
16 17 18
19 20 21
1: Her mascara is smeared and her eye is swollen shut, the flesh around it purple and black.
2: A rusty nail has been driven into the middle of the woman's forehead.
3: Her eye looks askew, somehow, and it's bulging and cloudy, gas forced up under the cornea by some powerful blow to the head.
4: Her cheek is reddened in the shape of a handprint.
5: Her lips are painted a garish red. Her teeth are red, as well, but not from the lipstick. There's blood in her mouth, and her upper lip is split and swollen.
6: This cheek is smeared with lipstick, and her earlobe is torn where an earring was ripped out.
7: What was white light behind the woman on the front side of the tile, here the empty space above her shoulder is dark.
8: Black-blue bruises stripe her throat from where fingers wrapped around it and squeezed.
9: What was white light behind the woman on the front side of the tile, here the empty space above her shoulder is dark.
10: The baby, where it rests against her breast, is dead and decaying. Her arm supports its corpse against her, and her hand is wrapped around its throat.
11: There is an open hole in her chest, cracked ribs visible. Within is only darkness; her heart is gone.
12: On the front side, this arm and hand were raised in a gesture of blessing. Here, her hand is splayed open rather than holding two fingers up. Her hand and forearm are slashed and bruised.
13: The baby's lower half isn't wrapped in a blanket here. Its dead legs hang limp, and an umbilical cord dangles from its belly.
14: There's an open gash low on her stomach, skin held back by safety pins. Where there should be a uterus, there's nothing.
15: Her robe is blood- and pus-stained over her hip.
16: The woman's skirt no longer completely covers her legs. It's hitched up high on her thigh, and the dead baby's umbilical cord ends in tatters.
17: A thick patch of blood stains her skirt where her legs meet.
18: Her skirt is hiked up, and etched into her inner thigh are the numbers "08121"
19: Her shin is bruised and streaked with welts, and instead of the demure sandal she wears on the front side of the tile, on the back side, she wears a spike-heeled shoe.
20: What was white light behind the woman on the front side of the tile, here the empty space between her lower legs is dark.
21: Her shin is bruised and streaked with welts, and her foot has been cut off at the ankle.
Check with a GM when you've flipped tiles and think you've solved the puzzle. If you're correct, once the last correct tile is in place, the image seems to melt, the tiles flowing black to the floor. Behind them is now a crack in the wall, wide and tall enough for even Roger to get through.
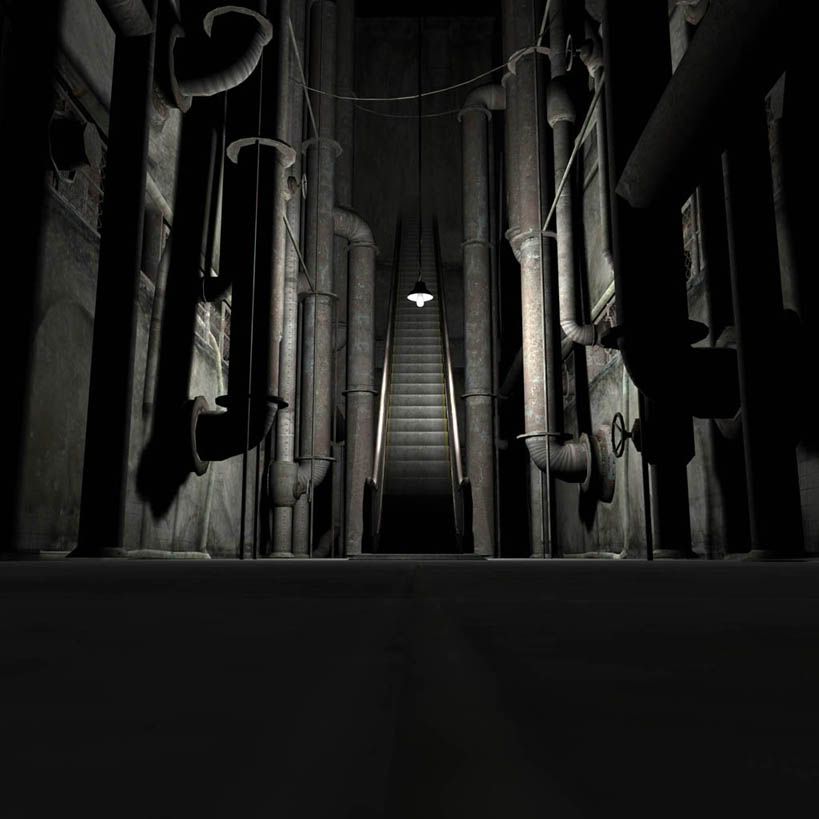
S
An escalator, this one without Wall Men, stretches up several stories, into darkness. http://img.photobucket.com/albums/v32/icaruscrucified/silenthill4_screen020.jpg
When you reach the top, inform the GMs and proceed to the second world.
Monsters
All monsters can be killed. If you want to go for extra atmosphere, monsters may get back up again after being knocked down unless you stomp them good. ;-)
Gumhead (Grey or Red)
Appearance: It stands about 5'5'' and looks and sounds apelike. Its flesh seems to be rotting, and some of them have a second face apparently trying to emerge from its neck. Some of them carry long blunt weapons, lead pipes or branches or golf clubs or the like. Often appear in groups of 2-4.
Movement: They walk on two legs like a human, awkward-looking but surprisingly nimble on their feet. You can outrun them, but they're pretty good at dodging hits.
Attacks: Attacks with its blunt weapon, or just trying to pummel you with its hands. They're quiet adept at stealing a melee weapon from your hands and turning it against you.
Defenses: Tough to get solid hits on in melee, and because of its jerky movements, it's hard to shoot consistently. It takes a fair beating to take one down.
Probable Location: Anywhere.
Patient
Appearance: Looks and smells like the mutilated corpse of a tall woman. Her face is half-stripped of flesh and her scalp doesn't sit quite right on her head. Her shirt is torn to bare her breasts, and there's a large hole low in her abdomen where her uterus was removed. She cries out like a human would when struck.
Movement: She only walks, and is easy to outrun.
Attacks: Most likely, she wields a small axe in one hand. She may have a scalpel instead.
Defenses: It'll take a little more damage to kill her than it would a real person in her place.
Probable Location: Ticketing Level.
Sniffer Dog
Appearance: Patches of it have fur, but the rest looks as though it's had its skin carefully stripped away. Its long tongue drags along the ground, and it's often found feeding on the corpses of dead Sniffers. Tend to appear in packs of 2-3.
Movement: Just like normal dogs. Very difficult to outrun.
Attacks: Mostly biting, sometimes clawing as well.
Defenses: A couple of blows are enough to take it down.
Probable Location: Large open areas.
Wall Man
Appearance: One minute, a space of wall is just a space of wall, and the next minute, it's the form of a man half in the wall, half out from the torso. Seems to be covered with a yellowish skin-type substance and has two claw hands. Makes strangle growling-like noises when it emerges from the wall, and when it swipes at you.
Movement: The creature is unable to move from the wall but can somewhat pivot from its torso, and also go back in the wall.
Attacks: Swipes with its clawed hands.
Defenses: The equivalent of a few axe blows are enough to fell it and cause it to retract back into the wall.
Location: Only appears in one place in the subway. Noted in that location's description.
Ghosts
Although appearance, speed, and power vary by Victim, all ghosts behave essentially alike. Ghosts only appear in the subway after you've interacted with location C!
Appearance: Ghosts make low strange moaning noises from time to time, but are otherwise silent.
Movement: Ghosts float, sometimes just above ground, sometimes well above it. They can pass through walls, but it's a difficult process. They must struggle to pull themselves through, leaving trails behind them of what looks like molasses (see linked image). For this reason, most ghosts will not bother to pursue you if you go to another location.
Attacks: -An "aura of damage" surrounds all ghosts. If you are within about ten feet of the ghost, it begins to affect you, growing stronger the closer to the ghost that you are. Your life begins to literally leave you. This manifests as a feeling of weakness, red and blurred vision, a buzzing or ringing in your ears, and a headache so powerful that it can effectively paralyze you at close range to the ghost. Any open wounds that you have may begin to bleed badly, and you feel cold. A healthy person exposed to this effect uninterrupted for about three minutes, dies. If you are wearing a Saint Medallion, however, the effect on you is completely negated.
-The voluntary attack that ghosts use is to reach into your chest cavity and constrict your heart, paralyzing you and causing more and more harm the longer the contact is maintained. Sometimes this attack causes blood to appear over the entry point, but it does not actually cause a wound. Ghosts are reluctant to touch you if you're wearing a Saint Medallion.
Defenses: Ghosts cannot die. Dealing a sufficient amount of melee damage will cause them to fall to the ground and be inactive for about 15 seconds. Usually, this takes the equivalent of several axe blows, or a full clip of regular ammunition. Shooting a ghost with a single silver bullet causes them to the ground and writhe, gasping and making a strange sucking noise, for about 30 seconds.
Victim 01
Appearance: A tall bald man, dripping and decaying, in tattered black clothes.
Attacks: His "aura" and physical attack are the weakest of the ghosts, and he's not very fast, either.
Probable Location: Anywhere.
Victim 12
Appearance: A teenage boy in a brown beanie hat, his head slowly wobbles from side-to-side in an unnatural way.
Attacks: His attacks deal moderate damage, but he's not very aggressive.
Probable Location: Anywhere.
Victim 16
Appearance: A young woman in a short skirt and a red blouse with a plunging neckline. She's covered in gashes, and the numbers "16121" are cut into the upper slope of her left breast. Her long black hair hangs down in front of her face. Sometimes, instead of floating, she crawls on all fours. In addition to the moans heard from all ghosts, she also sometimes makes a noise that sounds like crying and whimpering in reverse.
Attacks: She's fairly slow, and her heart-constricting grab attack isn't terribly powerful, but her aura is very damaging and it takes more damage than usual to take her down. Those fighting her at close range can also sometimes find a hand or foot entangled in her hair.
Probable Location: Victim 16 will persistently pursue you throughout Subway World, once you've met her. However, she cannot enter the rooms marked "J" and "Q," and will be reluctant to follow you as far as the locations marked "R" and "S."
If you are on one of the other teams, please do not read this post until the game is over! The information contained herein could give some things away!
Subway notes
Your characters begin in the location "Dark Tunnel," which reaches the map in the location marked "A." Reaching location "S" allows you to enter the other world available to your party. Your movements and movement speed are up to you. All of the location contents are described here. Hilite the text to read them. We recommend that you only check the contents of a location as you enter it; it is far more fun that way.
There are only two preset monster encounters. The rest are "wandering monsters." You may choose to encounter any of them anywhere at any time with any frequency. The monsters found in the subway are described at the end of this post.
Ghosts do not appear until after you've visited and interacted with the location marked "C."
The environment in Walter's world is different from what any of your characters are used to (exception: Henries, duh). In addition to the overwhelming and nauseating omnipresent thick smell of rot and decay, the air is heavy and a bit like a fear drug. Even those who are usually calm will be afraid, find it difficult to keep a straight head, be clumsier than usual, etc. This is not a "fear gas sends everyone to huddling in the corner" situation, though for characters not used to threat, it may do that. Instead, call to mind the sensation of being ill, or of not having eaten for 24 hours. Everything seems more daunting, confusing, and claustrophobic. Your reflexes may be impaired, leading to slowed reactions, or your nerves may be shot, leading to overreactions. The particular effect on your character is your call.
None of the light switches work, and aside from a lamp here or there that flickers disorientingly, most of the lights throughout the subway are off. The lack of a light source will make any combat that you engage in more difficult.
Map key:
Black rectangles indicate doors that can open. Some of them may be sticky or heavy or otherwise difficult to open, at your discretion, but they can be opened.
A red x indicates a door whose lock is jammed and it cannot be opened.
A blue square indicates a door that connects to another level of the structure, via stairs or a ladder. The ladder next to location J goes down to location K; the escalator M goes up to location N; and the escalator S goes to the next world.
The location descriptions should make it clear what you're looking at, but some of advance explanation of the map on the right ("Lynch Street Line"), since it's a bit confusing. It shows a subway platform; the two long lines of green rooms down the center of the map are two subway trains, each with 3 passenger cars, a control car, and an observation deck car. The different subway cars are separated by doors, and also have some sliding side doors or open windows that give access to the boarding platforms or to the island in between the trains. Double-lines indicate the boundaries between subway cars. Some cars are also collapsed or blocked with debris, such as at location "F," and these effective walls are indicated by single lines.
If you get confused at any point about where your characters are and what they're looking at, don't hesitate to ask!
The map is for the convenience of you, the players. Because we love you. Unless otherwise noted, your characters do not have this map.
Subway Map
Dark Tunnel
When you pass through the hole formed by Henry Townshend's "key," everything is pitch dark, dark beyond the ability of even the most enhanced eyesight to penetrate, dark beyond the ability of any fire or light to dispel. The steps of your comrades fade, as does the sensation of their presence nearby. Before you have a chance to reach out or try to pursue them, though, you realize that there is a slightly metallic taste in your mouth, followed by the realization that it stings to have your eyes open.
Followed quickly by the realization that you feel suddenly very heavy.
Followed by the realization that you can't feel the ground beneath your feet.
The realization that your movements are slowed.
The realization that you can't breathe.
All within the space of a few seconds, realization that you are underwater, caught in a current, and are about to drown.
If you're carrying weapons, ammunition, or armor, it's likely you'll have to drop some or even all in order to keep from sinking. Exactly what they lose is your discretion, but we recommend that you drop enough equipment so that your character is likely to be and feel threatened by what is to come.
But there's a saving grace here. The current pulls you into shallower water, and your head breaks the surface just in time to catch a life-saving breath, and you and your (now much reduced) team will be carried here each just seconds apart, in the order that you passed through the hole into this place. You've been washed "ashore" in a dark underground tunnel of some kind.
Whether because they're waterlogged or because of interference from this world, your flashlight and walkie-talkie, and any other electrical or technological implements, will not work. Henry Sherman-Townshend's walkie-talkie is the exception, and from here on out, it behaves peculiarly. When there is a monster or ghost nearby, within about fifteen feet, it emits a strange static. The noise grows louder and louder the closer the monster gets to you. You can tell from the volume of the radio static approximately how close the creature is, but not what it is or what direction it's in. All monsters in the subway are hostile to you, but some of them may draw near then withdraw, producing a radio static response but never being seen.
The tunnel starts out accommodating two people walking abreast, but expands after a couple of blocks to the point where it can accommodate three. The walls, ceiling, and floor underfoot are a mixture of packed dirt, splashes of concrete, and an oddly-placed linoleum tile every here and there. It's quite damp, though the sound of rushing water fades away after long, replaced with the hum of unseen electrical lines. The tunnel ends at a rust-splotched metal door, marked "A" on the map.
Lynch Street Line
A
Upon opening the door, you find yourself in a dark subway station. The walls, floor, and ceiling are all slightly grimy, plain grey concrete. Some shards of glass and bits of trash are littered about, and the whole place is dusty, as though it's been ten years since anyone has set foot here.
There's an overhead light flickering above a bench (see "B") and a bit of light coming from one of the subway cars ("F"). A red neon arrow on the wall not far ahead of you points up what are probably stairs ("C"). It's about two blocks from one end of the track to the other, but it's too dark to see beyond point C.
B
The light above this bench flickers on and off disorientingly. The bench itself is covered with things, a shabby sleeping bag and a brown coat, a couple plastic garbage bags filled with someone's belongings; cans of soup, a couple ID cards with Walter Sullivan's name and face on them, a very used toothbrush, worn out shoes and clothes, a religious text with damp pages, and other assorted odds and ends one would expect to see in the possession of someone who had been sleeping here regularly. Written on the wall around the bench in what looks like red and black crayon are the words "I HATE YUO," "I CaN SEE YOU CAn YOU SEE ME," "YOU'LL BE SORRY," and "KILL me." A closer look would find that the sleeping bag is pulled up under over the eyes of a small shabby doll with brown yarn hair, blue dress and black button eyes hidden.
C
A closer look finds that these are indeed stairs leading up, placards reading "Ticketing" and "Lynch Street" faintly legible in the bit of red light available. There are a couple of large broken vending machines blocking the way, but enough strength could move one or both of them. The stairs are blocked off at the bottom with two large steel gates, but one of them is bent and cracked. There's a good handhold, and the gate could be pulled away, but it will take more strength than one flatline human has to do it. Anyone in the party can give it a try, but only Roger will be able to succeed. If Roger pulls the gate away and the group starts up the stairs...
...towards the top of the stairs, you'll find that the area has collapsed, almost like a cave-in. Huge concrete blocks bar any further progress. Consider the location marked "C" to have a red X on it on the map. Upon reaching the blockage, you'll hear an unearthly groaning sound and will be suddenly stricken with a terrible headache and blurred red vision. One of the dark blocks of rubble will move, proving not to be part of the collapsed wall at all, but Victim-16 (see below). Victim-16 will pursue you relentlessly until further notice, and other Victim spirits can now appear whenever you wish.
D
There is a wall here, thick and impassable, made of some kind of sheer black material that does not fit with the rest of the surroundings at all. It wraps around the subway car to the east like it had been poured on. Spraypainted on the wall, in red, are the words: "You make me happy."
E
The subway cars are all a mess, filled with trash and broken glass and torn moldy upholstery. The cars are narrow, the aisles wide enough for two people to walk side-by-side if they squeeze. A couple of usable items are noticeable on the passenger seats, if you stop to pick them up. In the northwest car, at point "E," a golf club. In the southwest car, a 9mm magazine. In the southeast car, another 9mm magazine. In the east middle car, a third 9mm magazine.
There is a bit of light shining from this car.
F
The light source is a pocket flashlight lying on one passenger seat.
This car, as well as the northeast car and the two south cars, have collapsed or have thick bars installed halfway through.
G
On the east boarding platform, there are a couple clumps of long black hair strewn across the floor.
H
The large metal door at the south end of the boarding platform is locked, and a note is stuck to it with an old bit of chewing gum. "I am the Lord, I am the Master, I have the keys to set the wheels of progress in motion. I change the world.
You are on the wrong side."
Check with a GM as you search a location to be told if you find the key.
I
The control car for the west subway train. If you have the key, inserting it into the control panel and turning it on will cause a two small buttons one on top of the other to light up red. Pressing the button on top causes the train to move a short ways northward. Pressing the button on bottom causes the train to move that same distance south. The distance that the train moves, be it north or south, is indicated by the two parallel vertical lines numbered "1."
J
There's a light on in this service closet, deep red in color. The walls, floor, and ceiling are completely covered in rust. There's a ladder going down through a square hole in the floor. It connects to the King Street Line level at the blue square in location "K."
King Street Line
K
The ladder goes down just one floor, to a truly bizarre looking hallway. It's partly under construction, wooden planks and metal grading and scaffolding littered around. But more to the point, the walls, floor, and ceiling seem to be made of red, sweating meat. It's very hot and humid in here, and in the beam of the flashlight, you see the walls quiver out of the corner of your eye.
L
This is another subway line, but in a much worse state than the Lynch Street Line was, and there is a distinct air of foreboding about it. The floor is splashed here and there with rust, mildew, and gore. The one subway car there is crushed and collapsed. Bits of flesh dangle from metal grating cutting through the area at the west end, and what look like a couple desiccated corpses are speared atop the fence. In the middle of the boarding platform, there is an escalator heading up to the next floor, which you can access from the west. Be warned, though, that rushing up the escalator would be most unwise...
M
Two escalators run side-by-side, the one on the right going up, and the one on the left coming down. All along both escalators, though, are protuberances from the wall that look like stone men. The come out from the wall at the waist, and their arms seem to hang limp. There's a chain wrapped around each one's neck, which stretches taut for about a foot between neck and wall. Although they look, and are, stone or clay or plaster or some similarly solid substance, they're "carved" in such a way that it looks like they're bound and hanging from the wall by the chains around their necks. These are the Wall Men described in the bestiary below. But note that they will not move or act until you draw near it, at which point it will seem to come to life, a mix of flesh and plaster, lashing out at you and breaking the chain. Until a Wall Man "comes to life," it cannot be damaged or harmed by any means. Reaching the top of the escalator alive takes you to the Ticketing Level, the blue square at location "N."
Ticketing Level
N
And here, the flesh and gore are gone, and it's back to the drab gray from the Lynch Street Line. The Ticketing Level is as hellish as the King Street Line below, rust- and blood-coated, suffocating, strange noises sounding behind the walls from time to time. There's a murder scene at the top of the escalator, a woman's purse contents scattered on the floor amidst splatters of blood, make-up compacts and cel-phone marked off with chalk and a numbered placard. There's a great deal more blood splashed against the windows of the ticketing booth (location "O"), and the door to the booth is slightly ajar. You can see that, inside the booth, a piece of paper was taped to the inside of one of the teller's windows. The paper is clean; it must have been put up after the blood was spilt and dried.
O
It's a mess inside the subway ticket vendor's booth. There's blood everywhere, and there was obviously a struggle here at some point, desk contents scattered. A blood-splattered Saint Medallion lies on the floor. The piece of paper taped to the inside of the window reads:
"1. In every woman's body
beneath her heart it rests
But hers is shriveled, dry, a tomb
to tear it out is best.
2. The world her sight has clouded
from dark to milky blind
pluck out the erring vision
the truth that she may find.
3. The coward hides from judgment
defends her precious sin
She'll raise defense, wound through the skin
in blood healing begins
4. But still her path is murky
she walks toward hellish flame
Cut off her steps; in stumbling
she'll find the greater gain.
5. From breath to flesh she bore him
a mother's love she gave
but from this world she took him
from breath to flesh to grave.
6. Whispered words of promise
and sugar spun from lies
From candied lips sweet venom drips
Strike true, heed not her cries.
7. When she was just a child
all sugar spice and sweat
sweet heat still lived within her
her sins brought no regret
To you, oh weary traveler
it falls to teach her grace
carve deep the sacred symbols
beneath the lustful place."
P
Dead ends all around down here. What looks like a giant worm or leech, large enough for a grown man to walk through were it hollow, emerges from the wall at one point and reenters the wall further down the hallway. It smells terrible, and sets off radio static, but does nothing other than pulsate. It it's damaged, it will shudder and ooze pus, but otherwise won't react.
Q
The men's room. It's unremarkable. There's a first aid kit taped up under one sink, which has a couple bandages and some hydrogen peroxide. One of the toilets is in disrepair, pipes disconnected from the wall. One of the pipes could probably be wrenched away and used as a blunt weapon if you cared to.
R
The hallway reaches a dead end here, but set into the wall is an image that looks very much like a typical Madonna and Child portrait, a seated mother in a large flowing robe gently cradling a child, porcelain perfection. The image is made of 21 square tiles, three columns and seven rows, each of which can be flipped.
The reverse side of each tile that same image, same part of the body, but altered. Were all the tiles flipped over, you'd see the woman and child in the same position, but they are battered and degraded, streaked with blood and grime, peace and purity turned to violence and sex. The flipside of each tile is described below. (The tiles are numbered here purely for reference and convenience; no such numbers appear on the tiles themselves.)
1 2 3
4 5 6
7 8 9
10 11 12
13 14 15
16 17 18
19 20 21
1: Her mascara is smeared and her eye is swollen shut, the flesh around it purple and black.
2: A rusty nail has been driven into the middle of the woman's forehead.
3: Her eye looks askew, somehow, and it's bulging and cloudy, gas forced up under the cornea by some powerful blow to the head.
4: Her cheek is reddened in the shape of a handprint.
5: Her lips are painted a garish red. Her teeth are red, as well, but not from the lipstick. There's blood in her mouth, and her upper lip is split and swollen.
6: This cheek is smeared with lipstick, and her earlobe is torn where an earring was ripped out.
7: What was white light behind the woman on the front side of the tile, here the empty space above her shoulder is dark.
8: Black-blue bruises stripe her throat from where fingers wrapped around it and squeezed.
9: What was white light behind the woman on the front side of the tile, here the empty space above her shoulder is dark.
10: The baby, where it rests against her breast, is dead and decaying. Her arm supports its corpse against her, and her hand is wrapped around its throat.
11: There is an open hole in her chest, cracked ribs visible. Within is only darkness; her heart is gone.
12: On the front side, this arm and hand were raised in a gesture of blessing. Here, her hand is splayed open rather than holding two fingers up. Her hand and forearm are slashed and bruised.
13: The baby's lower half isn't wrapped in a blanket here. Its dead legs hang limp, and an umbilical cord dangles from its belly.
14: There's an open gash low on her stomach, skin held back by safety pins. Where there should be a uterus, there's nothing.
15: Her robe is blood- and pus-stained over her hip.
16: The woman's skirt no longer completely covers her legs. It's hitched up high on her thigh, and the dead baby's umbilical cord ends in tatters.
17: A thick patch of blood stains her skirt where her legs meet.
18: Her skirt is hiked up, and etched into her inner thigh are the numbers "08121"
19: Her shin is bruised and streaked with welts, and instead of the demure sandal she wears on the front side of the tile, on the back side, she wears a spike-heeled shoe.
20: What was white light behind the woman on the front side of the tile, here the empty space between her lower legs is dark.
21: Her shin is bruised and streaked with welts, and her foot has been cut off at the ankle.
Check with a GM when you've flipped tiles and think you've solved the puzzle. If you're correct, once the last correct tile is in place, the image seems to melt, the tiles flowing black to the floor. Behind them is now a crack in the wall, wide and tall enough for even Roger to get through.
S
An escalator, this one without Wall Men, stretches up several stories, into darkness. http://img.photobucket.com/albums/v32/icaruscrucified/silenthill4_screen020.jpg
When you reach the top, inform the GMs and proceed to the second world.
Monsters
All monsters can be killed. If you want to go for extra atmosphere, monsters may get back up again after being knocked down unless you stomp them good. ;-)
Gumhead (Grey or Red)
Appearance: It stands about 5'5'' and looks and sounds apelike. Its flesh seems to be rotting, and some of them have a second face apparently trying to emerge from its neck. Some of them carry long blunt weapons, lead pipes or branches or golf clubs or the like. Often appear in groups of 2-4.
Movement: They walk on two legs like a human, awkward-looking but surprisingly nimble on their feet. You can outrun them, but they're pretty good at dodging hits.
Attacks: Attacks with its blunt weapon, or just trying to pummel you with its hands. They're quiet adept at stealing a melee weapon from your hands and turning it against you.
Defenses: Tough to get solid hits on in melee, and because of its jerky movements, it's hard to shoot consistently. It takes a fair beating to take one down.
Probable Location: Anywhere.
Patient
Appearance: Looks and smells like the mutilated corpse of a tall woman. Her face is half-stripped of flesh and her scalp doesn't sit quite right on her head. Her shirt is torn to bare her breasts, and there's a large hole low in her abdomen where her uterus was removed. She cries out like a human would when struck.
Movement: She only walks, and is easy to outrun.
Attacks: Most likely, she wields a small axe in one hand. She may have a scalpel instead.
Defenses: It'll take a little more damage to kill her than it would a real person in her place.
Probable Location: Ticketing Level.
Sniffer Dog
Appearance: Patches of it have fur, but the rest looks as though it's had its skin carefully stripped away. Its long tongue drags along the ground, and it's often found feeding on the corpses of dead Sniffers. Tend to appear in packs of 2-3.
Movement: Just like normal dogs. Very difficult to outrun.
Attacks: Mostly biting, sometimes clawing as well.
Defenses: A couple of blows are enough to take it down.
Probable Location: Large open areas.
Wall Man
Appearance: One minute, a space of wall is just a space of wall, and the next minute, it's the form of a man half in the wall, half out from the torso. Seems to be covered with a yellowish skin-type substance and has two claw hands. Makes strangle growling-like noises when it emerges from the wall, and when it swipes at you.
Movement: The creature is unable to move from the wall but can somewhat pivot from its torso, and also go back in the wall.
Attacks: Swipes with its clawed hands.
Defenses: The equivalent of a few axe blows are enough to fell it and cause it to retract back into the wall.
Location: Only appears in one place in the subway. Noted in that location's description.
Ghosts
Although appearance, speed, and power vary by Victim, all ghosts behave essentially alike. Ghosts only appear in the subway after you've interacted with location C!
Appearance: Ghosts make low strange moaning noises from time to time, but are otherwise silent.
Movement: Ghosts float, sometimes just above ground, sometimes well above it. They can pass through walls, but it's a difficult process. They must struggle to pull themselves through, leaving trails behind them of what looks like molasses (see linked image). For this reason, most ghosts will not bother to pursue you if you go to another location.
Attacks: -An "aura of damage" surrounds all ghosts. If you are within about ten feet of the ghost, it begins to affect you, growing stronger the closer to the ghost that you are. Your life begins to literally leave you. This manifests as a feeling of weakness, red and blurred vision, a buzzing or ringing in your ears, and a headache so powerful that it can effectively paralyze you at close range to the ghost. Any open wounds that you have may begin to bleed badly, and you feel cold. A healthy person exposed to this effect uninterrupted for about three minutes, dies. If you are wearing a Saint Medallion, however, the effect on you is completely negated.
-The voluntary attack that ghosts use is to reach into your chest cavity and constrict your heart, paralyzing you and causing more and more harm the longer the contact is maintained. Sometimes this attack causes blood to appear over the entry point, but it does not actually cause a wound. Ghosts are reluctant to touch you if you're wearing a Saint Medallion.
Defenses: Ghosts cannot die. Dealing a sufficient amount of melee damage will cause them to fall to the ground and be inactive for about 15 seconds. Usually, this takes the equivalent of several axe blows, or a full clip of regular ammunition. Shooting a ghost with a single silver bullet causes them to the ground and writhe, gasping and making a strange sucking noise, for about 30 seconds.
Victim 01
Appearance: A tall bald man, dripping and decaying, in tattered black clothes.
Attacks: His "aura" and physical attack are the weakest of the ghosts, and he's not very fast, either.
Probable Location: Anywhere.
Victim 12
Appearance: A teenage boy in a brown beanie hat, his head slowly wobbles from side-to-side in an unnatural way.
Attacks: His attacks deal moderate damage, but he's not very aggressive.
Probable Location: Anywhere.
Victim 16
Appearance: A young woman in a short skirt and a red blouse with a plunging neckline. She's covered in gashes, and the numbers "16121" are cut into the upper slope of her left breast. Her long black hair hangs down in front of her face. Sometimes, instead of floating, she crawls on all fours. In addition to the moans heard from all ghosts, she also sometimes makes a noise that sounds like crying and whimpering in reverse.
Attacks: She's fairly slow, and her heart-constricting grab attack isn't terribly powerful, but her aura is very damaging and it takes more damage than usual to take her down. Those fighting her at close range can also sometimes find a hand or foot entangled in her hair.
Probable Location: Victim 16 will persistently pursue you throughout Subway World, once you've met her. However, she cannot enter the rooms marked "J" and "Q," and will be reluctant to follow you as far as the locations marked "R" and "S."