Tutorial. #001
Tutorials to make these two icons.
I don't have the original pictures left. If I've missed something or if I'm unclear just let me know and I'll try an dexplain it better. I'm on pretty strong pain killers right now after my visit to the ER last weekend. (Long story...)
Oh and if you know who the texture makers are, please let me know so I can credit them..
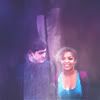
Tutorial for this icon
requested by daydreamshole
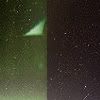
1. Start with a 100x100 canvas. Make the background layer black. Copy the picture you want into the canvas.
2. Now it's time to get rid of the background. I'm doing this by creating a new layer mask, Layers>Layer Mask>Reveal All. Now you start covering up the background with the paint brush, set the color to black.
3. Time to make the picture a little brighter, create a new Exposure layer, Layer>New Adjustment Layer>Exposure.
Settings: Exposure +1,33 - Offset +0,1314 - Gamma Corr 0,68.
If you've never used Exposure before, play with the settings so you learn how it works.
4. Now take this texture, put in on top, set it to Screen with opacity around 40%.
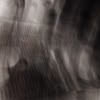
by:?
5. New Hue/Saturation layer, Layers>New Adjustment Layer>Hue/Saturation.
Settings: Hue:-14 - Saturation_+63 - Lightness:+16.
Again, play with the settings, every image is different.
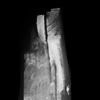
6. Now take this texture, set to Soft light with 100% opacity.

by: midnight_road
7. New Brightness/Contrast Layer, Layers>New Adjustment Layer>Brightness/Contrast.
Settings: Brightness:-24 - Contrast:+84.
8. Last texture, set it to Soft Light 100% opacity.
by:?
9. And final step, new exposure layer. Layer>New Adjustment Layer>Exposure.
Settings: Exposure:+0,50 - Offset:+0,0568 - Gamma Corr: 0,81.
That's it!
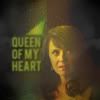
Tutorial to make this icon,
requested by wearestarrdust
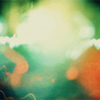
1. Start with a 100x100 canvas with this texture as your background.
by:?
2. Paste the picture you want to work with ontop of the texture. I chose on of Helen Magnus.
3. Creat new Layer mask. Layers>Layer Mask>Reveal All. Now you start covering up the background with the paint brush, set the color to black.
4. Now it's time for the second texture. Set to Multiply 100% opacity.

by:?
5. Brightness/Contrast layer.
Settings: Brightness: +20 - Contrast: +35
6. Time for the last texture. Set it to Luminosity at 20% opacity.
by:?
7. Now time for the text. I wrote "queen of my heart" with the font bebas. Go to Filter>Blur>Gaussian Blur. Set to somewhere around 0,3-0,6 you decide what you think looks the best.
Now it's ready.

My thread. Ask away.
I don't have the original pictures left. If I've missed something or if I'm unclear just let me know and I'll try an dexplain it better. I'm on pretty strong pain killers right now after my visit to the ER last weekend. (Long story...)
Oh and if you know who the texture makers are, please let me know so I can credit them..
Tutorial for this icon
requested by daydreamshole
1. Start with a 100x100 canvas. Make the background layer black. Copy the picture you want into the canvas.
2. Now it's time to get rid of the background. I'm doing this by creating a new layer mask, Layers>Layer Mask>Reveal All. Now you start covering up the background with the paint brush, set the color to black.
3. Time to make the picture a little brighter, create a new Exposure layer, Layer>New Adjustment Layer>Exposure.
Settings: Exposure +1,33 - Offset +0,1314 - Gamma Corr 0,68.
If you've never used Exposure before, play with the settings so you learn how it works.
4. Now take this texture, put in on top, set it to Screen with opacity around 40%.
by:?
5. New Hue/Saturation layer, Layers>New Adjustment Layer>Hue/Saturation.
Settings: Hue:-14 - Saturation_+63 - Lightness:+16.
Again, play with the settings, every image is different.
6. Now take this texture, set to Soft light with 100% opacity.
by: midnight_road
7. New Brightness/Contrast Layer, Layers>New Adjustment Layer>Brightness/Contrast.
Settings: Brightness:-24 - Contrast:+84.
8. Last texture, set it to Soft Light 100% opacity.
by:?
9. And final step, new exposure layer. Layer>New Adjustment Layer>Exposure.
Settings: Exposure:+0,50 - Offset:+0,0568 - Gamma Corr: 0,81.
That's it!
Tutorial to make this icon,
requested by wearestarrdust
1. Start with a 100x100 canvas with this texture as your background.
by:?
2. Paste the picture you want to work with ontop of the texture. I chose on of Helen Magnus.
3. Creat new Layer mask. Layers>Layer Mask>Reveal All. Now you start covering up the background with the paint brush, set the color to black.
4. Now it's time for the second texture. Set to Multiply 100% opacity.
by:?
5. Brightness/Contrast layer.
Settings: Brightness: +20 - Contrast: +35
6. Time for the last texture. Set it to Luminosity at 20% opacity.
by:?
7. Now time for the text. I wrote "queen of my heart" with the font bebas. Go to Filter>Blur>Gaussian Blur. Set to somewhere around 0,3-0,6 you decide what you think looks the best.
Now it's ready.
My thread. Ask away.