tutorial, .psd files, textures
- 1 icon tutorial + psd file
- 3 psd files
- 5 cloud textures
- 5 light textures

-->
Made in Photoshop CS; non-translatable.
the tutorial
01. Your base. We'll be working with this:

02. Create a Hue/Saturation layer, increasing the saturation to +20.
03. We're going to increase the 'redness' of Jack's bandana. It's not noticeable now, but it makes a difference in the end.
Create a Selective Colouring layer, with the following:
Reds: 0, 0, -20, 0
04. Now we're going to work on increasing the blues in the icon, starting with this:
Create a Curves layer, with the following points:
Red
I: 90, O: 90
I: 187, 173
Green
I: 80, O: 88
I: 170, O: 179
Blue
I: 158, O: 200
It should currently look like this:

05. Now we even out the tone of Jack's skin, by adding yellow.
Create a Colour Balance layer: 0, 0, -15
06. Another handy Hue/Saturation layer. Set the saturation to +15.
07. To brighten up the icon, create another Curves layer:
RGB
I; 175, O: 185
Red
I: 80, O: 93
I: 168, O: 181
Blue
I: 146, O: 141
Now it's looking like this:

08. To further intensify the blue, we again add a Selective Colouring layer:
Reds: -100, +7, +75, 0
Yellows: +100, -25, -45, 0
Blues: +70, -23, -58, 0
Neutrals: +17, -15, -36, -10
Becoming this:

09. Add another Hue/Saturation layer, setting saturation to +35
10. Finally, more blueness. Add another Selective Colouring layer:
Reds: -100, +60, +34, -26
Yellows: -100, -33, -41, 0
Neutrals: +23, 0, -10, -6
So it looks like this:

11. Now for the background. I used a texture by gender, changed the colour balance, cropped, set to multiply and brightened:

-->
-->
-->
Extra: I cropped this layer of clouds and set it to soft light:

-->
-->
Download the .psd file.
a) Note that I didn't follow this sequence when I first created the layers (I usually create layers in random places). So of course, don't be afraid to play around with them.
b) Alas, I'm practically horrible with words (the F on my final English exam proves it). If there's something you don't understand, please don't hesitate to ask. :)
Previous tutorials?
more .psd files
click to download
| samples of use
| notes


· difficult to work with!
· works best for darker images (caps?). you'll probably need to lower brightness of your base.
· to reduce cyan, lower the opacity of the layer above the base.


· contains a texture made by unmasked_icons, here.
· to lighten, reduce the opacity of that texture.


· almost identical to the above tutorial's .psd.
· works best with colourful images.
Download all (.zip file).
My sincerest apologies to all the non-Photoshop users. :(
textures
Cloud textures


Light textures


Previous textures?
Sorry this was so lengthy. Hope it was useful!
*coughfriendmecough* :)
- 3 psd files
- 5 cloud textures
- 5 light textures
-->
Made in Photoshop CS; non-translatable.
the tutorial
01. Your base. We'll be working with this:
02. Create a Hue/Saturation layer, increasing the saturation to +20.
03. We're going to increase the 'redness' of Jack's bandana. It's not noticeable now, but it makes a difference in the end.
Create a Selective Colouring layer, with the following:
Reds: 0, 0, -20, 0
04. Now we're going to work on increasing the blues in the icon, starting with this:
Create a Curves layer, with the following points:
Red
I: 90, O: 90
I: 187, 173
Green
I: 80, O: 88
I: 170, O: 179
Blue
I: 158, O: 200
It should currently look like this:
05. Now we even out the tone of Jack's skin, by adding yellow.
Create a Colour Balance layer: 0, 0, -15
06. Another handy Hue/Saturation layer. Set the saturation to +15.
07. To brighten up the icon, create another Curves layer:
RGB
I; 175, O: 185
Red
I: 80, O: 93
I: 168, O: 181
Blue
I: 146, O: 141
Now it's looking like this:
08. To further intensify the blue, we again add a Selective Colouring layer:
Reds: -100, +7, +75, 0
Yellows: +100, -25, -45, 0
Blues: +70, -23, -58, 0
Neutrals: +17, -15, -36, -10
Becoming this:
09. Add another Hue/Saturation layer, setting saturation to +35
10. Finally, more blueness. Add another Selective Colouring layer:
Reds: -100, +60, +34, -26
Yellows: -100, -33, -41, 0
Neutrals: +23, 0, -10, -6
So it looks like this:
11. Now for the background. I used a texture by gender, changed the colour balance, cropped, set to multiply and brightened:
-->
-->
-->
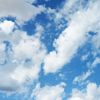
Extra: I cropped this layer of clouds and set it to soft light:
-->
-->
Download the .psd file.
a) Note that I didn't follow this sequence when I first created the layers (I usually create layers in random places). So of course, don't be afraid to play around with them.
b) Alas, I'm practically horrible with words (the F on my final English exam proves it). If there's something you don't understand, please don't hesitate to ask. :)
Previous tutorials?
more .psd files
click to download
| samples of use
| notes
· difficult to work with!
· works best for darker images (caps?). you'll probably need to lower brightness of your base.
· to reduce cyan, lower the opacity of the layer above the base.
· contains a texture made by unmasked_icons, here.
· to lighten, reduce the opacity of that texture.
· almost identical to the above tutorial's .psd.
· works best with colourful images.
Download all (.zip file).
My sincerest apologies to all the non-Photoshop users. :(
textures
Cloud textures
Light textures
Previous textures?
Sorry this was so lengthy. Hope it was useful!
*coughfriendmecough* :)