(no subject)
Hello again. Merry Christmas, Happy Hanukkah, Happy New Year, and any other festivities I may have missed. Once again, I have a small round of pictures that I hope will hint at fascinating things to come later.
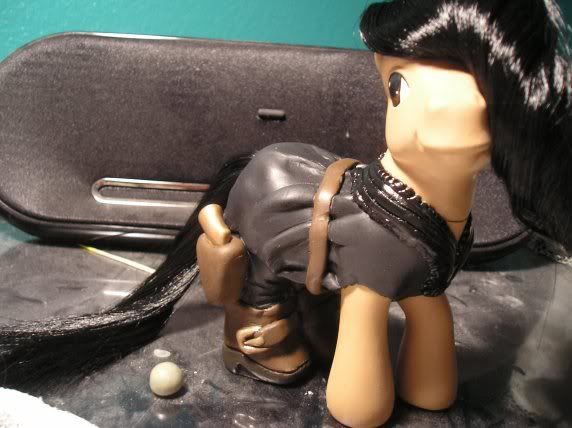
First off, Liz is aaaaalmost done. In this picture you can see her final painting, mostly in shades of black. The brown on her accessories isn't show-accurate, I'll admit, but the extra visual interest was essential to keep from losing the little detail I had. She's been sealed with a couple different sealers to give her some texture; most of her clothing has a dull finish, but the 'metal' of her buckles and gun grips is sealed with a gloss finish, as is the satiny ruffle around her neck.
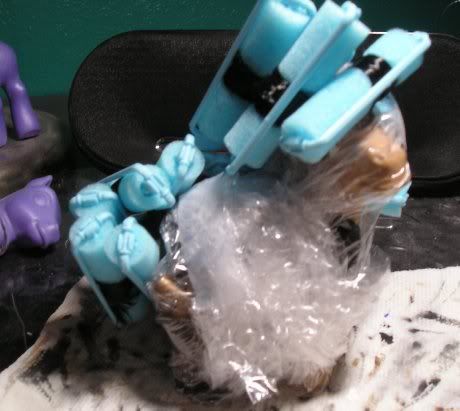
This is the second-to-last step in her transformation: hair styling. With the exception of a few specific colors, Dollyhair nylon styles really well. Wrap it up in braids or curlers and throw some boling water over it, and it'll stay until you mess with it again. I've taken the curlers out since this picture was taken, but no 'after' photos yet because I haven't decided if I actually like it yet and I may redo it.
I have to make a confession: I'm really not happy with how Liz is coming out. Her basecoat was the wrong consistency from the start, which I didn't realize until I'd already done a lot of other work on her. None of the other ponies I've airbrushed since finishing her have had this problem, which I think was caused by thinning the paint with the medium I use for handpainting rather than water, but it's led to lots of little 'wounds' in her paint job that I haven't been able to repair because the paint I'd been saving congealed despite being in a sealed container. Add to that the problems of old sculpting compound that I discussed in my last post, and you end up with a pony who's really not up to my usual standards out of a combination of media issues and frustration making me say "to hell with it" on a few important details. But in some ways, that's why I did her first out of all the ponies in this project: I was expecting something to go wrong with it, and I expected that to happen when I was just starting out, so I started with the character I had the least emotional attachment to and whose design would involve most of her being covered up while on display anyway. She'll look great on the shelf once she's done, but she's not looking so hot up close right now.
In news that I am more enthused about, work on Rory and my dormant Angel continue apace:
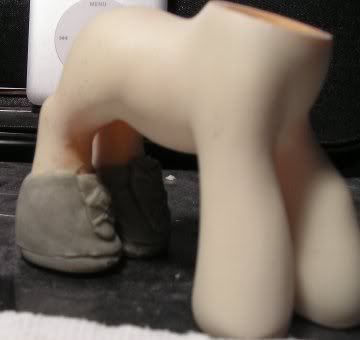
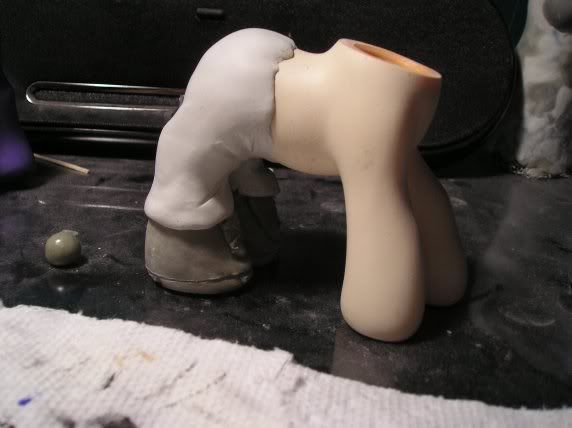
Neither of these pictures is that interesting, but put together they're another little look into how I sculpt. Unless there's something weird going on with the layering, I always prefer to work from the bottom up and the back forward. Rory is currently at another 'decisions, decisions' point, as I work out exactly how I'm going to do his hair and the top half of his costume. I'm basing it on the stag do shirt and bodywarmer from "The Vampires of Venice," so at this point the question is how the layers are going to interact and how much I'll have to do before reattaching his head.
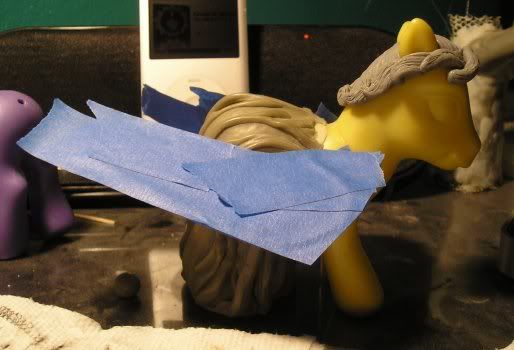
This picture is an interesting one because it's showcasing a new-to-me technique. Yep, that's painter's tape making up the frame of the wing, a tip I picked up from Don't Eat The Paint, a Breyer customizer's blog. Obviously she and I are working in very different styles, but a lot of the information crosses over and I've found her tips helpful on more than one occasion. I've already used a small amount of tape as the base for a bit of tiny sculpting I did on the attacking Angel's face (still no pictures until I can show you the full effect of the resculpted head on the body), but this will be my first foray into larger-scale use. You can still see the outline of the original guide wire (although I've repositioned it to lay flatter than the original angle I was playing with), which will still be necessary for support and probably joined by another one before I'm through. This is obviously a very rough shape; I haven't decided exactly what I want the finished wings to look like so I'm still thinking about that before I cut the tape down.
In the background of this picture you can also see my iPod in its dock, which is essential to my process. I cannot work without sound of some kind, and I am both persnickety and capricious about my music, so in situations like this where my hands are constantly too busy and dirty to poke at the player at any given moment I opt for podcasts. By the logo on the screen, I can tell you that at that moment I was listening to the S.T.E.A.M. Geeks podcast, a free steampunk discussion podcast put out semi-regularly by The League Of S.T.E.A.M.. Yes, I've fallen into the fringes of that particular trend, and I do have a set of steampunk ponies in the very very tentative planning stages for after I've finished the Series Five set.
The other podcast I listen to constantly is the ever-hilarious Kevin and Ursula Eat Cheap, in which esteemed artist, accidental children's book author, and all-around fascinating person Ursula Vernon and her boyfriend Kevin Sonney (who also appears to be a wonderful person, but with whom I am less familiar and so cannot adjectivize to the same extent) eat and rate prepackaged food, accompanied by a beagle, several cats, and occasionally a border collie. Really, these guys don't need my endorsement, but on the off chance that anyone reading my blog isn't following Ursulav, you need to be.
So that's where I am. A lot of planning and not a lot of action, as usual, but I intend to have Liz completely done and ready for her full photoshoot (new photography equipment for Christmas, yay!) before my next post. Stay tuned!

First off, Liz is aaaaalmost done. In this picture you can see her final painting, mostly in shades of black. The brown on her accessories isn't show-accurate, I'll admit, but the extra visual interest was essential to keep from losing the little detail I had. She's been sealed with a couple different sealers to give her some texture; most of her clothing has a dull finish, but the 'metal' of her buckles and gun grips is sealed with a gloss finish, as is the satiny ruffle around her neck.

This is the second-to-last step in her transformation: hair styling. With the exception of a few specific colors, Dollyhair nylon styles really well. Wrap it up in braids or curlers and throw some boling water over it, and it'll stay until you mess with it again. I've taken the curlers out since this picture was taken, but no 'after' photos yet because I haven't decided if I actually like it yet and I may redo it.
I have to make a confession: I'm really not happy with how Liz is coming out. Her basecoat was the wrong consistency from the start, which I didn't realize until I'd already done a lot of other work on her. None of the other ponies I've airbrushed since finishing her have had this problem, which I think was caused by thinning the paint with the medium I use for handpainting rather than water, but it's led to lots of little 'wounds' in her paint job that I haven't been able to repair because the paint I'd been saving congealed despite being in a sealed container. Add to that the problems of old sculpting compound that I discussed in my last post, and you end up with a pony who's really not up to my usual standards out of a combination of media issues and frustration making me say "to hell with it" on a few important details. But in some ways, that's why I did her first out of all the ponies in this project: I was expecting something to go wrong with it, and I expected that to happen when I was just starting out, so I started with the character I had the least emotional attachment to and whose design would involve most of her being covered up while on display anyway. She'll look great on the shelf once she's done, but she's not looking so hot up close right now.
In news that I am more enthused about, work on Rory and my dormant Angel continue apace:


Neither of these pictures is that interesting, but put together they're another little look into how I sculpt. Unless there's something weird going on with the layering, I always prefer to work from the bottom up and the back forward. Rory is currently at another 'decisions, decisions' point, as I work out exactly how I'm going to do his hair and the top half of his costume. I'm basing it on the stag do shirt and bodywarmer from "The Vampires of Venice," so at this point the question is how the layers are going to interact and how much I'll have to do before reattaching his head.

This picture is an interesting one because it's showcasing a new-to-me technique. Yep, that's painter's tape making up the frame of the wing, a tip I picked up from Don't Eat The Paint, a Breyer customizer's blog. Obviously she and I are working in very different styles, but a lot of the information crosses over and I've found her tips helpful on more than one occasion. I've already used a small amount of tape as the base for a bit of tiny sculpting I did on the attacking Angel's face (still no pictures until I can show you the full effect of the resculpted head on the body), but this will be my first foray into larger-scale use. You can still see the outline of the original guide wire (although I've repositioned it to lay flatter than the original angle I was playing with), which will still be necessary for support and probably joined by another one before I'm through. This is obviously a very rough shape; I haven't decided exactly what I want the finished wings to look like so I'm still thinking about that before I cut the tape down.
In the background of this picture you can also see my iPod in its dock, which is essential to my process. I cannot work without sound of some kind, and I am both persnickety and capricious about my music, so in situations like this where my hands are constantly too busy and dirty to poke at the player at any given moment I opt for podcasts. By the logo on the screen, I can tell you that at that moment I was listening to the S.T.E.A.M. Geeks podcast, a free steampunk discussion podcast put out semi-regularly by The League Of S.T.E.A.M.. Yes, I've fallen into the fringes of that particular trend, and I do have a set of steampunk ponies in the very very tentative planning stages for after I've finished the Series Five set.
The other podcast I listen to constantly is the ever-hilarious Kevin and Ursula Eat Cheap, in which esteemed artist, accidental children's book author, and all-around fascinating person Ursula Vernon and her boyfriend Kevin Sonney (who also appears to be a wonderful person, but with whom I am less familiar and so cannot adjectivize to the same extent) eat and rate prepackaged food, accompanied by a beagle, several cats, and occasionally a border collie. Really, these guys don't need my endorsement, but on the off chance that anyone reading my blog isn't following Ursulav, you need to be.
So that's where I am. A lot of planning and not a lot of action, as usual, but I intend to have Liz completely done and ready for her full photoshoot (new photography equipment for Christmas, yay!) before my next post. Stay tuned!