tutorial #1: lauren graham & friday night
Tutorials were requested by twistedlaletz for these icons:

I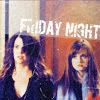
Since I experiment a lot with my coloring and change it with almost every icon batch, I don't remember exactly how I did these but I recreated them as best as I could and made tuts for the clones.
Sort of a disclaimer: parts of this coloring technique (the first 3-4 steps) I learned from a letsbebad's tutorial. So nothing terribly new here.
Oh and I use Photoshop CS 8.0.
Clone #1

-->
Duplicate the base. Set to screen, opacity 75%.
New layer, 96FD31 at softlight.
Selective color:
REDS:
C -95
Y +100
YELLOWS:
C -100
Y +100
GREENS:
M +95
Y + 100
B +100
Selective color:
REDS:
C -100
M +100
Y +100
B +5
YELLOWS:
c +100
M -35
Y -70
NEUTRALS:
C +100
Y -45
Duplicate base, put it on top of everything, set to softlight.
Color balance: Blue +80
Brightness/Contrast: +7
This texture by meivocis on multiply 53%.
This texture by peoplemachines on screen 100%.
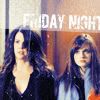
Clone #2
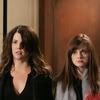
-->
Duplicate base, screen 80%.
New layer, 96FD31 at softlight.
Selective color:
REDS:
C -95
Y +100
YELLOWS:
C -100
Y +100
GREENS:
M +95
Y + 100
B +100
Selective color:
REDS:
C -100
M +100
Y +100
B +5
YELLOWS:
c +100
M -35
Y -70
NEUTRALS:
C +100
Y -45
Duplicate base, put it on top, softlight 80%.
Color balance: +62 +15 +85
Selective color:
REDS:
C +32
M -38
Y +50
YELLOWS:
C -100
CYANS:
C -100
Y -100
Brightness/contrast:
-5
+5
This texture by meivocis on normal 50%. Put it above their heads and tilt it a little.
This texture by peoplemachines on screen 100%.
The text was written in Gesso font.
I
Since I experiment a lot with my coloring and change it with almost every icon batch, I don't remember exactly how I did these but I recreated them as best as I could and made tuts for the clones.
Sort of a disclaimer: parts of this coloring technique (the first 3-4 steps) I learned from a letsbebad's tutorial. So nothing terribly new here.
Oh and I use Photoshop CS 8.0.
Clone #1

-->

Duplicate the base. Set to screen, opacity 75%.
New layer, 96FD31 at softlight.
Selective color:
REDS:
C -95
Y +100
YELLOWS:
C -100
Y +100
GREENS:
M +95
Y + 100
B +100
Selective color:
REDS:
C -100
M +100
Y +100
B +5
YELLOWS:
c +100
M -35
Y -70
NEUTRALS:
C +100
Y -45
Duplicate base, put it on top of everything, set to softlight.
Color balance: Blue +80
Brightness/Contrast: +7
This texture by meivocis on multiply 53%.
This texture by peoplemachines on screen 100%.
Clone #2

-->

Duplicate base, screen 80%.
New layer, 96FD31 at softlight.
Selective color:
REDS:
C -95
Y +100
YELLOWS:
C -100
Y +100
GREENS:
M +95
Y + 100
B +100
Selective color:
REDS:
C -100
M +100
Y +100
B +5
YELLOWS:
c +100
M -35
Y -70
NEUTRALS:
C +100
Y -45
Duplicate base, put it on top, softlight 80%.
Color balance: +62 +15 +85
Selective color:
REDS:
C +32
M -38
Y +50
YELLOWS:
C -100
CYANS:
C -100
Y -100
Brightness/contrast:
-5
+5
This texture by meivocis on normal 50%. Put it above their heads and tilt it a little.
This texture by peoplemachines on screen 100%.
The text was written in Gesso font.