Tutorial
Tutorial requested by september_nine
Making an icon in this style:

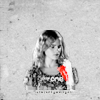

Note: Style highly inspired by mata090680 I don't really claim credit for it. I'll do the tutorials for the exact icon up there, but do a vague summary at the end for other icons.
- - - - - - - - - In Detail- - - - - - - - -
1.Take this texture:
by dusty_memories and paste this texture
over the top and set to Multiply 100%.
2. Take this pic from i♥watson.net. Don't panic about this next bit- there are two ways of doing it:
a) Go to your selection tool and choose the Magnetic Lasso Tool (PS users). It will stick to similar colours/shades so you can drag it around Emma and it should stick to her. When your finished drawing the line around her (and the chair) click on the anchor point that marks where you started to create the selection. Rub out any left overs of the background. (If I don't explain it well enough, check out this tutorial by chocolatejewels)
b) Rub out the background (sounds easier but is much harder)
ETA: c) elea24 has found you can also do this step with the freehand selection tool in PSP(8).
3.Copy and paste the selection as a new layer, just in case you accidentally lose the selection. Resize to width 75, height 95 :
and paste onto the textures from step 1.
4. Desaturate (or add a Gradient Map Layer). Duplicate Emma twice, set the first to Screen 50% and the 2nd to Soft Light 50% (You should have 3 layers of her now, the first should be set to Normal 100%)
5. Layer>> New Adjustment Layer>> Brightness/Contrast: Brightness -10, Contrast:+10
6. Add a little colourful brush or a light texture, some tiny text and your done! (I recommend tiny text to be font Georgia size "4") I used this texture by loveicon (thanks, verisiel ^_^)
- - - - - - - - - Summary - - - - - - - - -
1. take a texture as your base
2. find a pic that has a light background or a flat background.
3. Either rub out your background or use the Magnetic Lasso Tool (PS) or the Freehand Selection Tool (PSP) to select what you want from the picture
4. Resize to fit inside your icon, copy and paste onto texture
5. Duplicate twice so you have 3 layers of the pic on top of the background. Set first to Normal 100%, second to Screen, third to Soft Light- play around with opacitys until your happy with the contrast.
6. Add a colourful brush and some tiny text- whatever you like ;) Scroll down to the comments and see what others have come up with :D
Feel free to ask questions. I'll try my best to answer them satisfactorly!
Would LOVE to see results!
Making an icon in this style:
Note: Style highly inspired by mata090680 I don't really claim credit for it. I'll do the tutorials for the exact icon up there, but do a vague summary at the end for other icons.
- - - - - - - - - In Detail- - - - - - - - -
1.Take this texture:

by dusty_memories and paste this texture

over the top and set to Multiply 100%.
2. Take this pic from i♥watson.net. Don't panic about this next bit- there are two ways of doing it:
a) Go to your selection tool and choose the Magnetic Lasso Tool (PS users). It will stick to similar colours/shades so you can drag it around Emma and it should stick to her. When your finished drawing the line around her (and the chair) click on the anchor point that marks where you started to create the selection. Rub out any left overs of the background. (If I don't explain it well enough, check out this tutorial by chocolatejewels)
b) Rub out the background (sounds easier but is much harder)
ETA: c) elea24 has found you can also do this step with the freehand selection tool in PSP(8).
3.Copy and paste the selection as a new layer, just in case you accidentally lose the selection. Resize to width 75, height 95 :

and paste onto the textures from step 1.
4. Desaturate (or add a Gradient Map Layer). Duplicate Emma twice, set the first to Screen 50% and the 2nd to Soft Light 50% (You should have 3 layers of her now, the first should be set to Normal 100%)
5. Layer>> New Adjustment Layer>> Brightness/Contrast: Brightness -10, Contrast:+10
6. Add a little colourful brush or a light texture, some tiny text and your done! (I recommend tiny text to be font Georgia size "4") I used this texture by loveicon (thanks, verisiel ^_^)
- - - - - - - - - Summary - - - - - - - - -
1. take a texture as your base
2. find a pic that has a light background or a flat background.
3. Either rub out your background or use the Magnetic Lasso Tool (PS) or the Freehand Selection Tool (PSP) to select what you want from the picture
4. Resize to fit inside your icon, copy and paste onto texture
5. Duplicate twice so you have 3 layers of the pic on top of the background. Set first to Normal 100%, second to Screen, third to Soft Light- play around with opacitys until your happy with the contrast.
6. Add a colourful brush and some tiny text- whatever you like ;) Scroll down to the comments and see what others have come up with :D
Feel free to ask questions. I'll try my best to answer them satisfactorly!
Would LOVE to see results!