kotono: step 23
This is your last chance to seal up any pores with model magic. Don't be an idiot like me...;__;
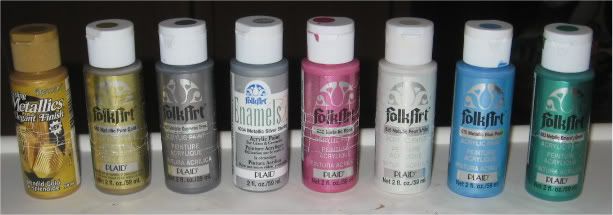
You can pick whatever paints you wish, but for the sake of sanity, here are the paints I'll be using:

From left to right...
DecoArt Dazzling Metallics Splendid Gold
FolkArt 660 Metallic Pure Gold
FolkArt 667 Metallic Gunmetal Gray (hereafter referred to as "steel")
FolkArt Enamels 4034 Metallic Silver Sterling
FolkArt 652 Metallic Rose
FolkArt 659 Metallic Pearl White
FolkArt 670 Metallic Blue Pearl
FolkArt 653 Metallic Emerald Green (you'll see...)
I do not recommend using gold spraypaint for this prop because of the heart gems on the wings. If you spray, those will be covered up. If you discover a way to spraypaint this without coating the hearts, please share? :) Likewise, if you spray everything else but brush on the heart frames, the gold will not match. And I'm all about matching. ^___^
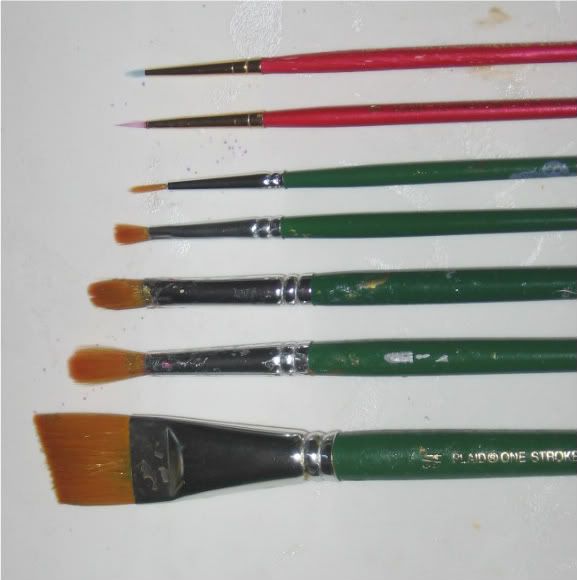
Your brush selection is up to you, but just for reference, these are the brushes I'll be using:

(from bottom to top)
large angular, medium round, small filbert, small flat, small round, extra small round, tiny spotter

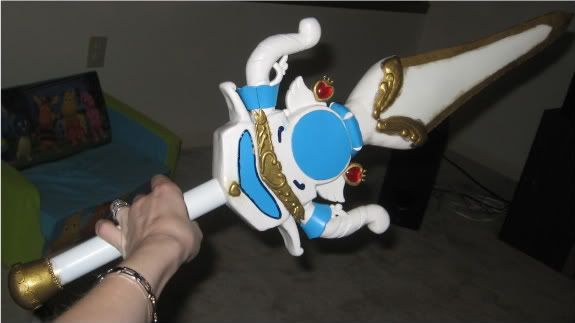
Note: the edge of the blade isn't supposed to be gold...I messed up. ^^;
First, paint the gold details. I'm using two different shades of gold and here's why. The FolkArt gold (the darker, dull gold) has a tendency to tarnish and turn green. O_o Dunno why. But it sucks when it happens. The DecoArt gold (the lighter, brighter gold) takes a billion coats before it becomes opaque. However, when these two paints are layered, you get a brilliant gold finish that doesn't tarnish (as far as I know, anyway). So add coats of the FolkArt gold down first until it's opaque. Then, apply the DecoArt gold by using a drybrushing technique. This also gives it dimension, which is VERY cool, IMO. Also, by doing the gold first, any dry brush strokes that go beyond its intended borders will be covered up with its neighbor color and cuts down on the need for touch-ups.

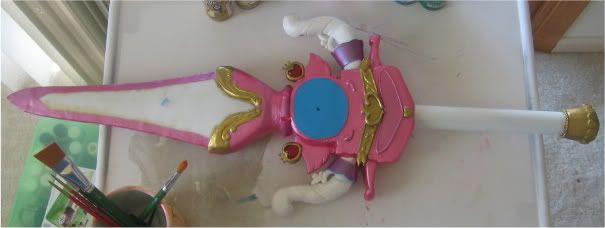
Next is dark pink. Be sure to cover the inside of the foam pieces on the hand guard. Pretend that the dark pink part on the white hand guard pieces is painted all the way...because I forgot to seal the inside of it! *head desk* Stagnation = DO NOT WANT!
[I forgot to take a picture for this. Oh well...]
Now fill in the blade with blue. This is where your angular and flat brushes come in handy. You can actually paint this in at any time you choose. Painting it at this point was a mental strategy to make me think I was closer to being done than I really was. XD Happy thoughts, happy thoughts, happy thoughts...

Next is light pink. Add the pink paint to white to get a pale shade. Kinda like baby pink. My favorite! ^___^ Try not to pass the borders on the hand guard.
Then go over all the white areas with the white paint, including the handle. I had a lot of spots where pink or gold splattered or my brush touched by accident. Because this white paint is so thin, I used a thicker matte white paint as a base to cover the stray paint and then went over it again with the gloss. Much less work and I'm all for that!
After this dries, you can now attach the dark pink ruffly things to the core. After mulling over which kind to use, I decided on super glue.
Okay, by now you're probably wondering what's up with the steel and green paints. Well, now we're going to artificially age the gold and silver parts.
For gold, mix these paints together (in order of most to least):
DecoArt gold
Steel
Green (and this should be a VERY tiny bit!)
Mix it all up until it reminds you of the nooks and crannies you find in gold plated armor. Kinda like Twilight Princess Zelda! Plain gold with no depth or dimension is BOOOOOOOORING!
Now then! Shove this pukey mixture into the detailed nooks and crannies. Go kinda bonkers with it. However, before moving on to the next area, gently wipe away the excess with a soft towel you don't mind parting with or with one of those baby soft paper towels I keep seeing commercials for... >____>
Before:

After:

...okay so my flash killed it. but it's there. The lack of definition in this area made it super difficult to get this to work.
Now let's do the same thing for the large silver heart decoration. in order of most to least, here's what your mixture should look like:
Silver
Steel
Green (again, a TINY bit!)
Using one of your tiny brushes (preferably the small round), trace the dents in the puff paint design. Much like the gold details below the blade, there isn't much definition due to the paint settling. Wipe away very lightly so you don't get rid of everything you put on there.
Another thing I decided to do was apply a dry-brush technique over the blade. First, I did a layer of lighter blue but wasn't quite satisfied with it so I went over that with white for more depth. It makes it look more like a crystal with the added dimension.
I had some before/during/after pictures of this, but once again, my flash killed it. You'll see it on the next picture, though. MOVING ON!
Add a clear coat of spray paint, and voila! Super smooth, shiny and candy-liscious! This also keeps the paint from rubbing off on your gloves.

Out door picture...no flash...can you see it now? ;~~~;
For some reason, varnish makes craft foam curl, so that's why I didn't use it for this project. There's foam everywhere!!!

Next, glue the silver heart to the light pink circle. Used my super duper epoxy E-6000 stuff. ^_^
Note: If you have a clear plastic dome to attach to this part, do it now. I looked and looked and looked but couldn't find one.
It's looking great, but we're not quite done yet!
TIME FOR GEMS!!


And...we're done! By the way, please don't blow up the earth. It's where I keep all my cosplay stuff! :P

Little-known fact: I made two of these side by side...? XP