christie: tutorial 002
A tutorial was requested by kaleidoscopeday for this:

Program: PS CS
Level: Beginner
1]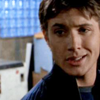
Original cropped image from JRA Unlimited.
2]
Duplicate twice and set both to Screen 100%.
3]

Create a new layer, fill with #004A75 and set to Exclusion 60%.
4]

Create a new layer, fill with #99C5DF and set to Soft Light 100%.
5]

Create a new layer, fill with #DF9999 and set to Soft Light 60%.
6]

Create a new layer, fill with #FBF5E3 and set to Soft Light 60%.
7]
Create a new layer and stamp a copy of all of your previous layers onto that layer (it's like merging all without actually merging them) by pressing CTRL+SHIFT+ALT+E.
8]
Duplicate your stamped layer (the one you created in step 7) and set the duplicate to Color Burn, 100%.
9]

Create a new layer, fill with #61DCF0 and set to Color Burn 100%. Erase the parts off his face and hair. (In any icon, erase a color burn wherever the coloring doesn't look right!!)
10]
Go to Layer >> New Adjustment Layer >> Brightness/Contrast. For this icon, I set Brightness at +19 and Contrast at +2. It will vary from icon to icon.
DONE!

Program: PS CS
Level: Beginner
1]

Original cropped image from JRA Unlimited.
2]

Duplicate twice and set both to Screen 100%.
3]


Create a new layer, fill with #004A75 and set to Exclusion 60%.
4]


Create a new layer, fill with #99C5DF and set to Soft Light 100%.
5]


Create a new layer, fill with #DF9999 and set to Soft Light 60%.
6]


Create a new layer, fill with #FBF5E3 and set to Soft Light 60%.
7]

Create a new layer and stamp a copy of all of your previous layers onto that layer (it's like merging all without actually merging them) by pressing CTRL+SHIFT+ALT+E.
8]

Duplicate your stamped layer (the one you created in step 7) and set the duplicate to Color Burn, 100%.
9]


Create a new layer, fill with #61DCF0 and set to Color Burn 100%. Erase the parts off his face and hair. (In any icon, erase a color burn wherever the coloring doesn't look right!!)
10]

Go to Layer >> New Adjustment Layer >> Brightness/Contrast. For this icon, I set Brightness at +19 and Contrast at +2. It will vary from icon to icon.
DONE!