(no subject)
Icon tutorial! With curves, LOTS AND LOTS OF CURVES. And other adjustment layers.

This tutorial works best for images that are saturated with yellow, orange or red. I specifically made it to give the curved look for video game screen caps. (I make tons of Kingdom Hearts icons)
Make a new Curves layer:
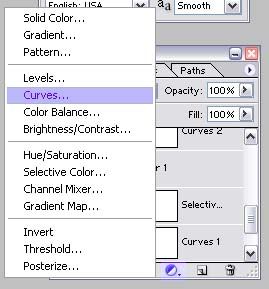
And use the following settings:
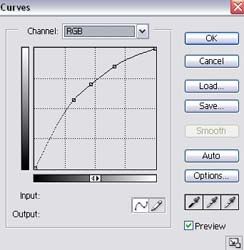
Input: 82
Output: 146
Input: 119
Output: 179
Input: 168
Output: 217
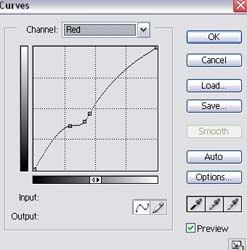
Input: 115
Output: 117
Input: 104
Output: 102
Input: 72
Output: 91
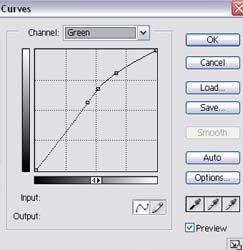
Input: 110
Output: 144
Input: 132
Output: 173
Input: 170
Output: 208
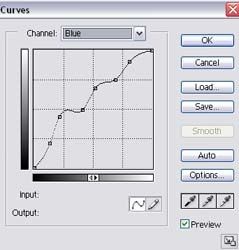
Input: 33
Output: 53
Input: 53
Output: 111
Input: 104
Output: 128
Input: 132
Output: 173
Input: 178
Output: 192
Input: 206
Output: 230
Another Adjustment Layer, this time, make it Selective Color
Reds - Cyan: -67, Magenta: +8, Yellow: +42, Black: +27
Yellows - Cyan: +100, Magenta: +37, Yellow: -50, Black: -30
Cyans - Cyan: +100, Magenta: +100, Yellow: +100, Black: +100
Blues - Cyans: +100, Magenta: +53, Yellow: +59, Black: +21
Neutrals - Cyans: +41, Magenta: -5, Yellow: -43, Black: +38
A new Adjustment layer: Curves
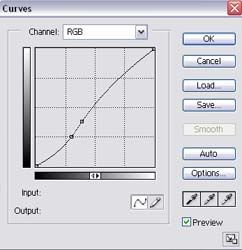
Input: 76
Output: 64
Input: 99
Output: 97
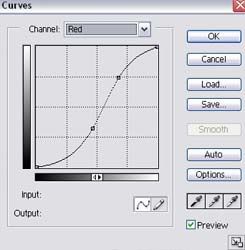
Input: 173
Output: 189
Input: 118
Output: 82
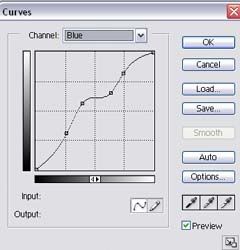
Input: 66
Output:79
Input: 100
Output: 144
Input: 162
Output: 167
Input: 190
Output: 210
Create a new layer (just a regular one this time) and press Ctrl+Alt+Shift+e and set it to Soft Light
Another Adjustment Layer: Channel Mixer
Red:
Red - +100
Green - +10
Blue - -8
Blue:
Red - +6
Green - -2
Blue - +100
And a final Adjustment Layer: Color Balance
Midtones: -12, +28, -17
Shadows: -85, +5, +26
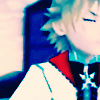
And that's it! You can add all the touches you'd like, I'd love to see what you made!
Also, see here to be an affiliate with walky_talky

This tutorial works best for images that are saturated with yellow, orange or red. I specifically made it to give the curved look for video game screen caps. (I make tons of Kingdom Hearts icons)
Make a new Curves layer:

And use the following settings:

Input: 82
Output: 146
Input: 119
Output: 179
Input: 168
Output: 217

Input: 115
Output: 117
Input: 104
Output: 102
Input: 72
Output: 91

Input: 110
Output: 144
Input: 132
Output: 173
Input: 170
Output: 208

Input: 33
Output: 53
Input: 53
Output: 111
Input: 104
Output: 128
Input: 132
Output: 173
Input: 178
Output: 192
Input: 206
Output: 230
Another Adjustment Layer, this time, make it Selective Color
Reds - Cyan: -67, Magenta: +8, Yellow: +42, Black: +27
Yellows - Cyan: +100, Magenta: +37, Yellow: -50, Black: -30
Cyans - Cyan: +100, Magenta: +100, Yellow: +100, Black: +100
Blues - Cyans: +100, Magenta: +53, Yellow: +59, Black: +21
Neutrals - Cyans: +41, Magenta: -5, Yellow: -43, Black: +38
A new Adjustment layer: Curves

Input: 76
Output: 64
Input: 99
Output: 97

Input: 173
Output: 189
Input: 118
Output: 82

Input: 66
Output:79
Input: 100
Output: 144
Input: 162
Output: 167
Input: 190
Output: 210
Create a new layer (just a regular one this time) and press Ctrl+Alt+Shift+e and set it to Soft Light
Another Adjustment Layer: Channel Mixer
Red:
Red - +100
Green - +10
Blue - -8
Blue:
Red - +6
Green - -2
Blue - +100
And a final Adjustment Layer: Color Balance
Midtones: -12, +28, -17
Shadows: -85, +5, +26

And that's it! You can add all the touches you'd like, I'd love to see what you made!
Also, see here to be an affiliate with walky_talky