Here be another tutorial :0
Yaaay, another tutorial x) For PSCS2
[1]
Start with a base. Im using this one of Sora x)
[2]
Sharpen, if necessary.
[3] Duplicate your base three (3) times. Set the first one to Screen, inverse the colors, and drop the opacity to 50% Set the second layer to Hard Light. Desaturate the third layer and set that to Hard Light.
Now it should look sorta like
(Noteeee: If your icon seems to be too bright, lower the opacity of the layer on screen, or set that same screen layer to Multiply.)
[4]
Set that to Difference. It now should look a little like
[5] Make a new layer, and stamp visible. (Ctrl + Alt + Shift + E) Set this layer to Hue, at Fifty (50) percent. Now, delete the blue layer under it, and you can now see the change. It should look a little like
[6]
Take that light texture (By teh_indy , i think) and set it to screen.
[7] Now, make a new layer, and stamp visible. (ctrl + alt + shift + e) Load up the default actions, "Image Effects" Now, select the sepia toning (grayscale) option.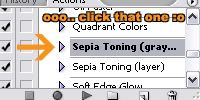
Set the Sepia layer to Lighten, at fifty (50) percent.
[8]
Your icon should look a little like this. Noww, add anything else you want, and you're done! X)
[1]

Start with a base. Im using this one of Sora x)
[2]

Sharpen, if necessary.
[3] Duplicate your base three (3) times. Set the first one to Screen, inverse the colors, and drop the opacity to 50% Set the second layer to Hard Light. Desaturate the third layer and set that to Hard Light.
Now it should look sorta like

(Noteeee: If your icon seems to be too bright, lower the opacity of the layer on screen, or set that same screen layer to Multiply.)
[4]

Set that to Difference. It now should look a little like

[5] Make a new layer, and stamp visible. (Ctrl + Alt + Shift + E) Set this layer to Hue, at Fifty (50) percent. Now, delete the blue layer under it, and you can now see the change. It should look a little like

[6]

Take that light texture (By teh_indy , i think) and set it to screen.

[7] Now, make a new layer, and stamp visible. (ctrl + alt + shift + e) Load up the default actions, "Image Effects" Now, select the sepia toning (grayscale) option.

Set the Sepia layer to Lighten, at fifty (50) percent.
[8]

Your icon should look a little like this. Noww, add anything else you want, and you're done! X)