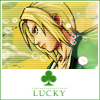
Icon Tutorial No. 9: Tsunade
Tutorial requested by 
shikon_hime! Sorry this is out so late >< Busy week! Anyway, this was the Best Coloring icon of Week 28 (Out of the Box) for
kunoichi_stills. 7 steps!
Level: Easy
Program: Adobe Photoshop 7.0 (probably transferable)
Go from this to this:
1. Start out with this picture of Tsunade and crop it at 96x96 px so that the focus is on Tsunade. (I crop at 96x96 because it saves quality--and you don't have to worry about your border covering up the edges when you add it.)
(Helpful Hint No. 1: Preset your measurements (Where Can I Do This?))
You should see something like this:
2. Create a new layer and fill it with #DAFFB2. Set this to OVERLAY at 50% opacity.
You should see something like this:
3. Create a new layer and fill it with this pattern by moi. (Save the pattern to your computer, then go to EDIT>>DEFINE PATTERN. You'll have the pattern on your palate.) Set this layer to SOFT LIGHT at 75% opacity.
You should see something like this:
4. Use these two textures by
myrasis ([1]and [2]) and set 1 to SCREEN at 100%. Erase any light bubbles that cover Tsunade's face. Set 2 to LIGHTEN at 100%.
You should see something like this:
5. Use the rectangle tool and create a large triangle that fills about 2/5th the entire icon in #FFFFFF.
You should see something like this:
6. Create a new layer and use this brush by
big_rock_show once in #47962E.
You should see something like this:
7. Save your icon and then open a new 100x100 px document. Reopen your just saved icon and paste it onto the plain document. Add a dotted border using this brush by me in #47962E, and we're all done!
Your finished product should look something like this:
_________
Was this tutorial helpful? Confusing? Too hard? Feedback would be wonderful!
[x] Like what you see? FRIEND
wicked_avis to stay updated on fresh tutorials, icons, textures, and more!

shikon_hime! Sorry this is out so late >< Busy week! Anyway, this was the Best Coloring icon of Week 28 (Out of the Box) for

kunoichi_stills. 7 steps!
Level: Easy
Program: Adobe Photoshop 7.0 (probably transferable)
Go from this to this:

1. Start out with this picture of Tsunade and crop it at 96x96 px so that the focus is on Tsunade. (I crop at 96x96 because it saves quality--and you don't have to worry about your border covering up the edges when you add it.)
(Helpful Hint No. 1: Preset your measurements (Where Can I Do This?))
You should see something like this:

2. Create a new layer and fill it with #DAFFB2. Set this to OVERLAY at 50% opacity.
You should see something like this:

3. Create a new layer and fill it with this pattern by moi. (Save the pattern to your computer, then go to EDIT>>DEFINE PATTERN. You'll have the pattern on your palate.) Set this layer to SOFT LIGHT at 75% opacity.
You should see something like this:

4. Use these two textures by

myrasis ([1]and [2]) and set 1 to SCREEN at 100%. Erase any light bubbles that cover Tsunade's face. Set 2 to LIGHTEN at 100%.
You should see something like this:

5. Use the rectangle tool and create a large triangle that fills about 2/5th the entire icon in #FFFFFF.
You should see something like this:

6. Create a new layer and use this brush by
big_rock_show once in #47962E.
You should see something like this:

7. Save your icon and then open a new 100x100 px document. Reopen your just saved icon and paste it onto the plain document. Add a dotted border using this brush by me in #47962E, and we're all done!
Your finished product should look something like this:

_________
Was this tutorial helpful? Confusing? Too hard? Feedback would be wonderful!
[x] Like what you see? FRIEND

wicked_avis to stay updated on fresh tutorials, icons, textures, and more!