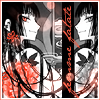
Icon Tutorial No. 21: Yuuko4
Requested by
bella_serenity. This icon won Best Color at
xxxholic_stillWeek 22.
Level: Easy
Program: Adobe Photoshop 7.0
Go from this to this:
This tutorial makes just about everything look good, so any base will do just great.
1. Start with this picture of Yuuko and crop it at 96x96 so there's plenty of room on the side.
You should see something like this:
2. Duplicate this layer (CTRL A>>CTRL C>>CTRL V) and sharpen it with FILTER>>SHARPEN>>SHARPEN. Change it to 50% opacity and merge it (LAYER>>MERGE VISIBLE -or- Shift+Ctrl+E) so when we copy it later the reflection will be just as sharpened.
You should see something like this:
3. Create a new layer and fill it with #F45B44. Set this layer to HUE at 100%.
You should see something lik ethis:
4. Create another new layer and fill it with #000000. Change it to HUE at 100%--your canvas should turn B/W. Take out the 5 pt eraser tool and erase the parts of the layer that cover her eye, earring, and tatoo.
You should see something like this:
5. Select the rectangle marquee tool and then reselect the first area. Using the tool, select Yuuko's face. Copy the selected area (CTRL C) and then flip the canvas (IMAGE>>ROTATE CANVAS>>FLIP IMAGE HORIZONTAL). Paste on the area you copied (CTRL V). Move it to the right side. It should be in B/W. Now, flip the icon again (IMAGE>>ROTATE CANVAS>>FLIP IMAGE HORIZONTAL).
You should see something like this:
6. Select the rectangle tool and make a slim black rectangle separating the two Yuuko's.
You should see something like this:
7. Rotate your canvas again: IMAGE>>ROTATE CANVAS>>90 Degrees CW. Then type in 'femme fatale' in JaneAusten, 13 pt, Smooth, #F45B44.
You should see something like this:
8. Rotate your image back (IMAGE>>ROTATE CANVAS>>90 Degrees CW) and paste on this edited texture by
ianthinae(I moved a few of the dots around and changed the overall coloring by using HUE). Set this layer to LINEAR DODGE at 100%.
You should see something like this:
9. Save your icon as a .png to preserve quality, then open a blank 100x100 white document. Reopen your icon and paste it onto the blank document (CTRL A>>CTRL C>>CTRL V). Use this line border brush by me in #F45B44 and there you have it! Icon shineyness!
Your finished product should look like this:
_________
Was this tutorial helpful? Confusing? Too hard? Feedback would be wonderful!
[x] Like what you see? FRIEND
wicked_avis to stay updated on fresh tutorials, textures, brushes, and icons!
bella_serenity. This icon won Best Color at
xxxholic_stillWeek 22.
Level: Easy
Program: Adobe Photoshop 7.0
Go from this to this:

This tutorial makes just about everything look good, so any base will do just great.
1. Start with this picture of Yuuko and crop it at 96x96 so there's plenty of room on the side.
You should see something like this:

2. Duplicate this layer (CTRL A>>CTRL C>>CTRL V) and sharpen it with FILTER>>SHARPEN>>SHARPEN. Change it to 50% opacity and merge it (LAYER>>MERGE VISIBLE -or- Shift+Ctrl+E) so when we copy it later the reflection will be just as sharpened.
You should see something like this:

3. Create a new layer and fill it with #F45B44. Set this layer to HUE at 100%.
You should see something lik ethis:

4. Create another new layer and fill it with #000000. Change it to HUE at 100%--your canvas should turn B/W. Take out the 5 pt eraser tool and erase the parts of the layer that cover her eye, earring, and tatoo.
You should see something like this:

5. Select the rectangle marquee tool and then reselect the first area. Using the tool, select Yuuko's face. Copy the selected area (CTRL C) and then flip the canvas (IMAGE>>ROTATE CANVAS>>FLIP IMAGE HORIZONTAL). Paste on the area you copied (CTRL V). Move it to the right side. It should be in B/W. Now, flip the icon again (IMAGE>>ROTATE CANVAS>>FLIP IMAGE HORIZONTAL).
You should see something like this:

6. Select the rectangle tool and make a slim black rectangle separating the two Yuuko's.
You should see something like this:

7. Rotate your canvas again: IMAGE>>ROTATE CANVAS>>90 Degrees CW. Then type in 'femme fatale' in JaneAusten, 13 pt, Smooth, #F45B44.
You should see something like this:

8. Rotate your image back (IMAGE>>ROTATE CANVAS>>90 Degrees CW) and paste on this edited texture by
ianthinae(I moved a few of the dots around and changed the overall coloring by using HUE). Set this layer to LINEAR DODGE at 100%.
You should see something like this:

9. Save your icon as a .png to preserve quality, then open a blank 100x100 white document. Reopen your icon and paste it onto the blank document (CTRL A>>CTRL C>>CTRL V). Use this line border brush by me in #F45B44 and there you have it! Icon shineyness!
Your finished product should look like this:

_________
Was this tutorial helpful? Confusing? Too hard? Feedback would be wonderful!
[x] Like what you see? FRIEND

wicked_avis to stay updated on fresh tutorials, textures, brushes, and icons!