Icon Tutorial No. 7: Sasuke
Requested by 
shikon_hime, this icon features selective coloring, so it may not be transferable (it's possible if you use a new #FFFFFF/000000 layer set on hue, then erase the places you want color). Enjoy!
Level: Easy
Program: Adobe Photoshop 7.0
Go from this to this:
1. Take this picture of Sasuke and crop it at 96x96 px, making sure not to focus almost exclusively on his face.
(Helpful Hint No. 1: Preset your measurements (Where Can I Do This?))
You should see something like this:
2. Duplicate the first layer (CTRL A>>CTRL C>>CTRL V) and move it to the left so that there's only half of Sasuke's face showing.
You should see something like this:
3. Select the second layer (the one on the left) and, using the magic wand tool, select the gold of Sasuke's eye and his Curse Seal marks. Once you've gotten them all, CTRL C>>CTRL V and set this layer on top.
(Helpful Hint No. 2: Magnify the screen to 300-400% so you can see better. (You Should See))
You should see something like this on the layers toolbar :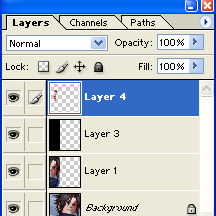
4. Make a new layer and fill it with #000000. Move this layer between the two layers you just made so that only the Curse Seal marks/iris are visible. Set this new layer to HUE at 100% and move it to the left so it does not cover any of the original layer--the Sasuke on the left should be desaturized save the curse seal marks/iris.
You should see something like this:
5. Separate the two layers with a 3 px line in #FFF6DF.
You should see something like this:
6. Use this texture by me and set it on top at SCREEN, 100%. Then use this texture (also by me) and move it to the side so it's right on top of the Sasuke on the left. Set this to SCREEN, 100%.
You should see something like this:
7. Make a long rectangle in #FFF6DF towards the bottom of the icon.
You should see something like this:
8. Type the word 'Curses' in JaneAusten, #C03D20, font size 20. Move it so it covers the rectangle slightly, towards the middle. Change blending options to Stroke, 2pt, in #FFF6DF. Then type the words "some are taken" in Castellar, #C03D20, font size 6. The spaces in between are there so the words don't overlap.
You should see something like this:
9. Make a new layer and add tiny type in #C03D20, using this brush by moi. FILTER>>SHARPEN>>SHARPEN if you think the color is too light and/or the dots aren't defined enough.
You should see something like this:
10. Save the document as a .png (to preserve quality), then open a new 100x100 px document. Open your just-saved icon and paste it on. Don't move it--it'll be perfectly centered. Then use this dotted border brush by me in #C03D20. There! All done!
Your finished product should look something like this:
_________
Was this tutorial helpful? Confusing? Too hard? Feedback would be wonderful!
[x] Like what you see? FRIEND
wicked_avis to stay updated on fresh tutorials, icons, textures, and more!

shikon_hime, this icon features selective coloring, so it may not be transferable (it's possible if you use a new #FFFFFF/000000 layer set on hue, then erase the places you want color). Enjoy!
Level: Easy
Program: Adobe Photoshop 7.0
Go from this to this:

1. Take this picture of Sasuke and crop it at 96x96 px, making sure not to focus almost exclusively on his face.
(Helpful Hint No. 1: Preset your measurements (Where Can I Do This?))
You should see something like this:

2. Duplicate the first layer (CTRL A>>CTRL C>>CTRL V) and move it to the left so that there's only half of Sasuke's face showing.
You should see something like this:

3. Select the second layer (the one on the left) and, using the magic wand tool, select the gold of Sasuke's eye and his Curse Seal marks. Once you've gotten them all, CTRL C>>CTRL V and set this layer on top.
(Helpful Hint No. 2: Magnify the screen to 300-400% so you can see better. (You Should See))
You should see something like this on the layers toolbar :

4. Make a new layer and fill it with #000000. Move this layer between the two layers you just made so that only the Curse Seal marks/iris are visible. Set this new layer to HUE at 100% and move it to the left so it does not cover any of the original layer--the Sasuke on the left should be desaturized save the curse seal marks/iris.
You should see something like this:

5. Separate the two layers with a 3 px line in #FFF6DF.
You should see something like this:

6. Use this texture by me and set it on top at SCREEN, 100%. Then use this texture (also by me) and move it to the side so it's right on top of the Sasuke on the left. Set this to SCREEN, 100%.
You should see something like this:

7. Make a long rectangle in #FFF6DF towards the bottom of the icon.
You should see something like this:

8. Type the word 'Curses' in JaneAusten, #C03D20, font size 20. Move it so it covers the rectangle slightly, towards the middle. Change blending options to Stroke, 2pt, in #FFF6DF. Then type the words "some are taken" in Castellar, #C03D20, font size 6. The spaces in between are there so the words don't overlap.
You should see something like this:

9. Make a new layer and add tiny type in #C03D20, using this brush by moi. FILTER>>SHARPEN>>SHARPEN if you think the color is too light and/or the dots aren't defined enough.
You should see something like this:

10. Save the document as a .png (to preserve quality), then open a new 100x100 px document. Open your just-saved icon and paste it on. Don't move it--it'll be perfectly centered. Then use this dotted border brush by me in #C03D20. There! All done!
Your finished product should look something like this:

_________
Was this tutorial helpful? Confusing? Too hard? Feedback would be wonderful!
[x] Like what you see? FRIEND

wicked_avis to stay updated on fresh tutorials, icons, textures, and more!