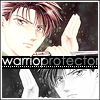
Icon Tutorial No. 23: Yuuhi
This icon won First Place at Week 56 of
watase_awards and is easy peasy in a few steps.
Level: Easy
Program: Adobe Photoshop 7.0
Go from this to this:

01. Start with this image of Yuuhi and crop it at 96x96 so you have a good amount of space on the side.
You should see something like this:

02. Duplicate the layer (CTRL A>>CTRL C>>CTRL V) and sharpen ths layer by going to FILTER>>SHARPEN>>SHARPEN. Set this layer to 75% opacity.
You should see something like this:

03. Paste another copy (CTRL V) of the first layer and go to FILTER>>BLUR>>GAUSSIAN BLUR, setting the radius to 7.5. Set this layer to 75% opacity. Then use a rounded eraser to erase the area covering Yuuhi face so it's not so bright. This effect makes the entire base much more bright and vibrant.
You should see something like this:

04. Merge all the layers (CTRL+SHIFT+E). Use the rectangle marquee tool to select the area around Yuuhi's face, copying it (CTRL C). Now flip the image by going to IMAGE>>ROTATE IMAGE>>FLIP CANVAS HORIZONTAL. Paste the area you selected area by going to CTRL V. Move the new selected area to the bottom of the canvas.
You should see something like this:

05. Use the rectangle shape tool to make a strip in #000000 slightly above the copy of the image.
You should see something like this:

06. Text Time: 1) type in "warrior" in #FFFFFF Century Gothic in 13 PT. 2) type in "protector" in #FFFFFF Century Gothic in 13 PT. Change opacity of 'protector' to 50%. Move this second area so the 'p' overlaps the last 'r' in 'warrior'.
You should see something like this:

07. Create a new layer and use this dotted border brush by me in #FFFFFF right under the text.
You should see something like this:

08. Use the rectangle tool again and make a #000000 rectangle directly above the Yuuhi on the bottom. Set this rectangle to HUE at 100%.
You should see something like this:

09. Merge all the layers again (CTRL+SHIFT+E) and open an new 100x100 px document. Paste the merged icon on top (CTRL A>>CTRL C>>CTRL V and then use this border brush by me in #000000. THERE! All done!
Your finished product should look like this:

_________
Was this tutorial helpful? Confusing? Too hard? Feedback would be wonderful!
[x] Like what you see? FRIEND

wicked_avis to stay updated on fresh tutorials, textures, brushes, and icons!