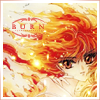
Icon Tutorial No. 24: Hikaru
First Place icon at
bishoujo_awardsWeek 126. Made in 9 simple steps!
Level: Easy
Program: Adobe Photoshop 7.0
Go from this to this:
This tutorial is best used for bases that include rich colors, preferably warm ones. It works with pretty much everything, though, so you can easily make it into something completely different.
01. Start with this image and crop it at 94x94 px so the focus is on Hikaru. You will get a little bit of Umi's hair in a corner--that's OK.
You should see something like this:
02. Create a new layer. Using a small, soft round brush, color in the blue hair in the corner using #EFBE7A. Add a tiny dot of #EB8A71 so it looks more natural. Set this layer to COLOR at 100% opacity. This disguises Umi's hair as fire, or something like it. Merge this layer in with the previous one by CTRL+E.
You should see something like this:
03. Duplicate the layer (CTRL A>>CTRL C>>CTRL V) and sharpen it by going to FILTER>>SHARPEN>>SHARPEN. Set this layer to 35% opacity.
You should see something like this:
04. Copy another layer (CTRL V) and them go to FILTER>>BLUR>>GAUSSIAN BLUR. Set the radius to 7.5 and click OK. Set this layer to OVERLAY at 100% opacity. Your picture should be considerably brightened up.
You should see something like this:
05. Open this texture by
myrasisand copy it onto your document. Set this layer to SCREEN at 100% for those cool little sparkles.
You should see something like this:
06. Because I'm strange, I'm rotating the image. Go to IMAGE>>ROTATE CANVAS>>FLIP CANVAS HORIZONTOL. Now text time: type in 'b u r n' in [Castellar, 6 pt, SHARP, #F21F16]. Change the blending options so there's OUTER GLOW at 75%.
You should see something like this:
07. Create a new layer and add this edited brush by
big_rock_showin #F21F16 so that the text is smack dab in the middle.
You should see something like this:
08. Create a new layer and fill it with #FFFFFF. Set this layer to HUE at 15% to make it slightly duller. Merge all the layers by pressing CTRL+SHIFT+E.
You should see something like this:
09. Open a new 100x100 document. Use this corner border brush by me in #D78A74, then paste on your icon (CTRL A>>CTRL C>>CTRL V). Save the icon and you are done!
Your finished product should look like this:
_________
Was this tutorial helpful? Confusing? Too hard? Feedback would be wonderful!
[x] Like what you see? FRIEND
wicked_avis to stay updated on fresh tutorials, textures, brushes, and icons!
bishoujo_awardsWeek 126. Made in 9 simple steps!
Level: Easy
Program: Adobe Photoshop 7.0
Go from this to this:

This tutorial is best used for bases that include rich colors, preferably warm ones. It works with pretty much everything, though, so you can easily make it into something completely different.
01. Start with this image and crop it at 94x94 px so the focus is on Hikaru. You will get a little bit of Umi's hair in a corner--that's OK.
You should see something like this:

02. Create a new layer. Using a small, soft round brush, color in the blue hair in the corner using #EFBE7A. Add a tiny dot of #EB8A71 so it looks more natural. Set this layer to COLOR at 100% opacity. This disguises Umi's hair as fire, or something like it. Merge this layer in with the previous one by CTRL+E.
You should see something like this:

03. Duplicate the layer (CTRL A>>CTRL C>>CTRL V) and sharpen it by going to FILTER>>SHARPEN>>SHARPEN. Set this layer to 35% opacity.
You should see something like this:

04. Copy another layer (CTRL V) and them go to FILTER>>BLUR>>GAUSSIAN BLUR. Set the radius to 7.5 and click OK. Set this layer to OVERLAY at 100% opacity. Your picture should be considerably brightened up.
You should see something like this:

05. Open this texture by
myrasisand copy it onto your document. Set this layer to SCREEN at 100% for those cool little sparkles.
You should see something like this:

06. Because I'm strange, I'm rotating the image. Go to IMAGE>>ROTATE CANVAS>>FLIP CANVAS HORIZONTOL. Now text time: type in 'b u r n' in [Castellar, 6 pt, SHARP, #F21F16]. Change the blending options so there's OUTER GLOW at 75%.
You should see something like this:

07. Create a new layer and add this edited brush by
big_rock_showin #F21F16 so that the text is smack dab in the middle.
You should see something like this:

08. Create a new layer and fill it with #FFFFFF. Set this layer to HUE at 15% to make it slightly duller. Merge all the layers by pressing CTRL+SHIFT+E.
You should see something like this:

09. Open a new 100x100 document. Use this corner border brush by me in #D78A74, then paste on your icon (CTRL A>>CTRL C>>CTRL V). Save the icon and you are done!
Your finished product should look like this:

_________
Was this tutorial helpful? Confusing? Too hard? Feedback would be wonderful!
[x] Like what you see? FRIEND

wicked_avis to stay updated on fresh tutorials, textures, brushes, and icons!