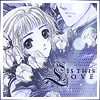
Icon Tutorial No. 28: Suu2
(Sorry for the extreme delay in pushing out requested tutorials--I'm currently up to my knees with eleven to go XDD)
Tutorial requested by
ilusionaryheart. This icon won Second Place at
clamp_bishoujo/Week 60 and as easy (eating) pie. EIGHT STEPS!
Level: Easy
Program: Adobe Photoshop 7.0
Go from this to this:
This tutorial works well with almost any base, but in particular those which have shaded regions (for the dots tp show up better!).
01. Start with this picture and crop it at 94x94 px so that Suu is the main focus.
You should see something like this:
02. Duplicate the layer (CTRL A>>CTRL C>>CTRL V) and sharpen it (FILTER>>SHARPEN>>SHARPEN). I changed the opacity to 85% so that the image wasn't too pixelated but it's different with each picture.
You should see something like this:
03. Create a new layer and fill it with #393C96. Set this layer to OVERLAY at 40% to darken the picture. Then create another new layer and fill it with the same color. This time, set the layer to HUE at 100%.
You should see something like this:
04. Slap on this light gradient by me (CTRL A>>CTRL C>>CTRL V). Set this layer to SCREEN at 100%.
You should see something like this:
05. Paste on this favorite light texture by
ianthinaeand set it to SCREEN at 100%.
You should see something like this:
06. Create a new layer. Select this dotted text brush by me and start dotting the right bottom edge in #000000. It doesn't have to be very neat--just keep things straight and fill up as much as possible. Set this layer to OVERLAY 100%.
You should see something like this:
07. Text time! Type "L" in 18 pt, smooth, Ruritania, #050645. Then type in "i s t h i s" in 5 pt, strong, Castellar, #050645 and "o v e" in the same, except 6 pt. Change all the blending options so there's an outher glow at 75%.
You should see something like this:
08. Merge all the layers by hitting CTRL+SHIFT+E. Then open up a new 100x100 document and paste your new icon onto it (CTRL A>>CTRL V>>CTRL V). Use this border brush by moi in #050645 and you are ready to save!
Your finished product should look like this:
_________
Was this tutorial helpful? Confusing? Too hard? Feedback would be wonderful!
[x] Like what you see? FRIEND
wicked_avis to stay updated on fresh tutorials, textures, brushes, and icons!
Tutorial requested by
ilusionaryheart. This icon won Second Place at
clamp_bishoujo/Week 60 and as easy (eating) pie. EIGHT STEPS!
Level: Easy
Program: Adobe Photoshop 7.0
Go from this to this:

This tutorial works well with almost any base, but in particular those which have shaded regions (for the dots tp show up better!).
01. Start with this picture and crop it at 94x94 px so that Suu is the main focus.
You should see something like this:

02. Duplicate the layer (CTRL A>>CTRL C>>CTRL V) and sharpen it (FILTER>>SHARPEN>>SHARPEN). I changed the opacity to 85% so that the image wasn't too pixelated but it's different with each picture.
You should see something like this:

03. Create a new layer and fill it with #393C96. Set this layer to OVERLAY at 40% to darken the picture. Then create another new layer and fill it with the same color. This time, set the layer to HUE at 100%.
You should see something like this:

04. Slap on this light gradient by me (CTRL A>>CTRL C>>CTRL V). Set this layer to SCREEN at 100%.
You should see something like this:

05. Paste on this favorite light texture by
ianthinaeand set it to SCREEN at 100%.
You should see something like this:

06. Create a new layer. Select this dotted text brush by me and start dotting the right bottom edge in #000000. It doesn't have to be very neat--just keep things straight and fill up as much as possible. Set this layer to OVERLAY 100%.
You should see something like this:

07. Text time! Type "L" in 18 pt, smooth, Ruritania, #050645. Then type in "i s t h i s" in 5 pt, strong, Castellar, #050645 and "o v e" in the same, except 6 pt. Change all the blending options so there's an outher glow at 75%.
You should see something like this:

08. Merge all the layers by hitting CTRL+SHIFT+E. Then open up a new 100x100 document and paste your new icon onto it (CTRL A>>CTRL V>>CTRL V). Use this border brush by moi in #050645 and you are ready to save!
Your finished product should look like this:

_________
Was this tutorial helpful? Confusing? Too hard? Feedback would be wonderful!
[x] Like what you see? FRIEND

wicked_avis to stay updated on fresh tutorials, textures, brushes, and icons!