Icon Tutorial #1
Okay, so here’s the tutorial I promised. I use Photoshop 6.0 (I know, I’m so retro) and I’m pretty sure it’s translatable to later versions of Photoshop, and possibly other programs. But I’m not sure.
This is my first tutorial, so I hope that it’s helpful to someone out there.
It’ll show you how to go from
to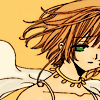
Step one:

Take your base and do some cleaning up. I erased the background and some of the black stuff at the top of Sakura’s head.
Step two:

This is really nitpicky, and can be skipped if you’d like. But to make the base look a bit cleaner, I copy the original base (Select >> all then Edit >> copy) OR (ctrl + A then ctrl + C)
Once the base is selected and copied, paste it over the original base (Edit >> paste) OR (ctrl + V)
Then, Gaussian blur that sucker (mine’s set to 1.4 pixels) by going to (Filter >> blur >> Gaussian blur >> ok) Once it’s blurred, set the layer to color burn at 15%

Repeat step two again only this time, set the new layer to soft light @ 100%

Step three:

Now, it’s time to color your base! Use your imagination or use the eyedropper to determine how you want to color your base. Create a new layer and set it to multiply.
I use my mouse to color icons because I am a masochist with carpal tunnel and I use the paintbrush tool with varying brush sizes to color.
For my icons, I tend to use a lot of oranges and yellows and reds, just because I feel they’re the easiest to work with. Color your character in and, if you want, the background. I usually choose a nice burnt yellow color.
Step four:

>>
Next, I make a new layer and use the paint bucket tool to fill in a dark blue (for this icon I used #030D26) This layer should be on top. Then, set it to exclusion @ 100%
Sometimes, if I’ll stop here and save the icon. Other times, like this time, I continue on.
Step five:
>>
I make another new layer, set on top, and fill it with the same color blue (#030D26) Only this time, I set the layer to screen @ 100%
Step six:

>>
I make another new layer, set on top, and fill it in with a really pale brown (#FFEAD8) Set it to color burn @ 100%
Step seven:

>>
I make another new layer, set on top, and fill it in with a nice brown color (#97621C) Set it to soft light @ 100%
Step eight:

Go back to the original base, at the very bottom, and copy it. Paste it to the top of all the layers (should be layer 8) Once there, set it to soft light @ 100%
This point is also when I typically stop. Everything after this is perfectly optional, as I don’t do it for every icon I make.
Step nine:

Sakura has really pretty green eyes. And I like her green eyes. So, on top of the layers, I set a new layer to screen. I take a green color (#4AE03B) and fill in Sakura’s eye. Then I adjust the screen layer in it’s opacity so that Sakura’s eye doesn’t look really scary. For this icon, I settle for 65%
Step ten:
I also like to add some shadow and depth to icons from time to time. Go back to the layer where you colored Sakura in (should be layer 3) and add a new layer above that, on multiply 100%
Then, taking a paintbrush that’s soft and slightly fuzzy around the edges, give her some shadow. Make sure not to make it too dark, since it’s set to multiply.
And you’re done! That’s all there is to it. I hope this tutorial was helpful to you. I’d love to see what you all made.
Please, use this tutorial as reference in making your own icons if you’d like, but please don’t copy it step-by-step. This is meant to be an aid, not a guide.
Also, feel free to use the finished product, just be sure to credit.
This is my first tutorial, so I hope that it’s helpful to someone out there.
It’ll show you how to go from
to
Step one:
Take your base and do some cleaning up. I erased the background and some of the black stuff at the top of Sakura’s head.
Step two:
This is really nitpicky, and can be skipped if you’d like. But to make the base look a bit cleaner, I copy the original base (Select >> all then Edit >> copy) OR (ctrl + A then ctrl + C)
Once the base is selected and copied, paste it over the original base (Edit >> paste) OR (ctrl + V)
Then, Gaussian blur that sucker (mine’s set to 1.4 pixels) by going to (Filter >> blur >> Gaussian blur >> ok) Once it’s blurred, set the layer to color burn at 15%
Repeat step two again only this time, set the new layer to soft light @ 100%
Step three:
Now, it’s time to color your base! Use your imagination or use the eyedropper to determine how you want to color your base. Create a new layer and set it to multiply.
I use my mouse to color icons because I am a masochist with carpal tunnel and I use the paintbrush tool with varying brush sizes to color.
For my icons, I tend to use a lot of oranges and yellows and reds, just because I feel they’re the easiest to work with. Color your character in and, if you want, the background. I usually choose a nice burnt yellow color.
Step four:
>>
Next, I make a new layer and use the paint bucket tool to fill in a dark blue (for this icon I used #030D26) This layer should be on top. Then, set it to exclusion @ 100%
Sometimes, if I’ll stop here and save the icon. Other times, like this time, I continue on.
Step five:
>>
I make another new layer, set on top, and fill it with the same color blue (#030D26) Only this time, I set the layer to screen @ 100%
Step six:
>>
I make another new layer, set on top, and fill it in with a really pale brown (#FFEAD8) Set it to color burn @ 100%
Step seven:
>>
I make another new layer, set on top, and fill it in with a nice brown color (#97621C) Set it to soft light @ 100%
Step eight:
Go back to the original base, at the very bottom, and copy it. Paste it to the top of all the layers (should be layer 8) Once there, set it to soft light @ 100%
This point is also when I typically stop. Everything after this is perfectly optional, as I don’t do it for every icon I make.
Step nine:
Sakura has really pretty green eyes. And I like her green eyes. So, on top of the layers, I set a new layer to screen. I take a green color (#4AE03B) and fill in Sakura’s eye. Then I adjust the screen layer in it’s opacity so that Sakura’s eye doesn’t look really scary. For this icon, I settle for 65%
Step ten:
I also like to add some shadow and depth to icons from time to time. Go back to the layer where you colored Sakura in (should be layer 3) and add a new layer above that, on multiply 100%
Then, taking a paintbrush that’s soft and slightly fuzzy around the edges, give her some shadow. Make sure not to make it too dark, since it’s set to multiply.
And you’re done! That’s all there is to it. I hope this tutorial was helpful to you. I’d love to see what you all made.
Please, use this tutorial as reference in making your own icons if you’d like, but please don’t copy it step-by-step. This is meant to be an aid, not a guide.
Also, feel free to use the finished product, just be sure to credit.