(no subject)
Icon/animation tutorial
from this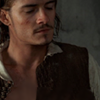
to this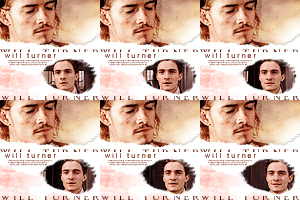
Photoshop 7 / ImageReady 7
Okay...*breaths in*
Here is my second attempt at making an animation tutorial, the first one was kinda vague, so I'll be explaining everything in this one. *mad cackling*
I have the frames I used in this icon downloadable , in case anyone would like to practice with them/go along with the tut - or what not. download frames here
If you're just interested in the animation part, go ahead and scroll down to PART 2: ANIMATION
*breaths out*...ok here we go
Heres what we have --->
this is what we want -->
PART 1: MAKING YOUR ICON
Step 1: Touch ups
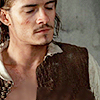
_First start off by sharpening the base.
_Duplicate the layer 2 times.
_Set them both to "screen"
Step 2: Coloring/Textures
_Add this texture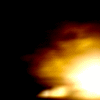
and set it to "screen" credit to itsmylifex
_Hit "ctrl+u" and lower the saturation to -46
_Now, you want it up there in the corner, so click "ctrl+t" and position it to the area you want.

_Duplicate the screen and hit "ctrl+t" again.
_Right click in the box area, and scroll down to "Flip Horizontal" and position the the left side, around the shoulder area
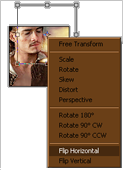
_Create a new layer and set it to "Color"
_Fill it with color #FFA28D
and lower the opacity to 34%
_Create a new layer above the colored layer and set to "Overlay"
_Fill with color #FFD1A5
and set the opacity to 21%
_Merge Visible
_Duplicate the layer, and set it to "Soft Light"
Wow, that's pretty orange. Might wanna desaturate it a little
_Click "ctrl+u" and lower the saturation to -73
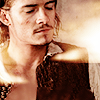
Step 3: Borders and Text
_Create a new layer
_Go to your brush tool
_I'm gonna use this brush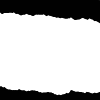
- credit to (I can't for the life of me remeber who made this)
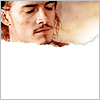
_Using the color white, use the brush around the chin
I was kinda going for a paper tear look...so if you wanna excentuate that look, add a new layer, and using color black, make a jagged line around where the end of the brush meets the backround. Lower the opacity a little to make it look more like a shadow.
_Add a new layer. Using your Rectangle Tool, Fill in the area below the border with color white.
I thought the backround was too boring just being plain white, so I added this brush in a pinky color

Now for the text!
_Using font "chocolate box" (forgot where I found this font) write will turner in color #521000, size 9pt
_Highlight the text and hit "ctrl+t"
_A box will appear, and you wanna put in 300 in the 3rd box on the right side. (This just spaces out the font more, so it fills more space)
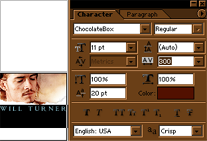
_Now in the layer box, right click the text layer and select "rasterize layer"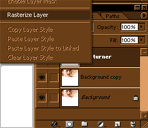
_Using the Rectanglular Marquee Tool (selecting tool), select half of "will turner"
_Hit "ctrl+c" (to copy the selected area) then click delete or backspace on your keyboard (to delete the selected area)
_Deselect the area, and create a new layer
_Hit "ctrl+v" and the area you deleted will be pasted as a new layer and move it down to the bottem
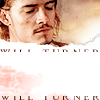
_Add new layer
_Switch to font style "Arial"
_Using the same color, write will turner again in size 7pt
_Add yet another layer, and add a few lines of text in size 1pt below will turner
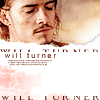
_Merge Visible
_Duplicate the finished layer once
And there! All done with that part! phew...now on to animation *sweats*
PART 2: ANIMATION
ugh...this is where it gets tricky. And I know the way I do the animation is probably pretty confusing..but this is the only way I know how to do it. If anyone knows an easier way to do this, I would love you for all eternity if you'd let me know how.
You can download the frames I'm using (here) if you would like to go along with the tut.
Step 1: Setting up ImageReady and resizing
_First open up ImageReady and paste all the frames (in sequential order) into the window.
_Click the little arrow in the top right hand corner of the Animation Box and select "Make Frames From Layers"
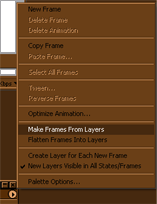
_To resize, click the "Image" tab in the toolbar at the top.
_Select "Image Size..." And set the width size to 130 and click OK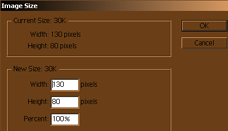
Now all your frames should be loaded
_Select the first frame and click "ctrl+c" to copy it
Step 2: Setting the Frames
_Switch back over to Adobe Photoshop to your finished icon
_Paste the frame you just copied inbetween the two layers of your finished icon
_Lower the opacity of the top layer so you can see the frame underneath.
_Positon the frame where you want it (in this case on the bottem right corner)
_Using the eraser, erase the top layer over the area where your frame is
_Then set the opacity back to 100%

*If you want to improve the look of the frames/get em all spiffy looking
_Sharpen the frame
_Duplicate 2 times
_Set the middle frame to "screen"
_And the top layer to "soft light" and set the opacity to 30%
To make things easier later on, merge the frames together so theres just one layer (starting on the softlight layer merge down (ctrl+e) into the screened frame, then merge down into the normal frame so it becomes one layer)
_I wanted to get the animation to kinda blend in with the icon, so I added another layer and filled it with color #FFA28D and set it to color, opacity 33%
_And add another layer and fill with color #FFD1A5 setting it to overlay, opacity 12% NOTE: Make sure these two layers are above your frame and below the icon base
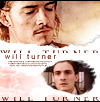
_Now, "Merge Visible" (ctrl+shift+e)
_Save As (ctrl+shift+s) as a jpeg file - maximum quality - into whatever folder your prefer. To make things easier for later on, name your files as 1,2,3...so you know what order they go in for the animation
_After you saved, click back a step in your history box so you back to all your layers again
_Switch back to ImageReady and copy your second frame
_Paste the copied frame above your first frame and repeat all the previous steps
*Remeber to save each time you add a new frame (saving in sequential order)
Step 3: Final Animation
Ok, so you've got all your frames saved in a folder right? There should be 11 files, since there were 11 frames
_Open the folder where you saved your frames
_Copy each and paste into a 100x100 sized window in ImageReady
_Down in the animation box, click the arrow in the top right corner and select "make frames from layers"
All the frames should now be loaded in the animation box
_Fiddle around with the frames delay time if the animation is too quick for your liking
_When your satisfied with the speed, go into file and scroll down to "Save Optimized As..."
_Save as file type "Images Only [*.gif]
And that's it! Your finished!
*gasps for air* That was a whopper
There was alot of stuff here, and I'm sure it was all pretty confusing so feel free to ask any questions. I'll be glad to try and clear things up for you ^_^
from this

to this

Photoshop 7 / ImageReady 7
Okay...*breaths in*
Here is my second attempt at making an animation tutorial, the first one was kinda vague, so I'll be explaining everything in this one. *mad cackling*
I have the frames I used in this icon downloadable , in case anyone would like to practice with them/go along with the tut - or what not. download frames here
If you're just interested in the animation part, go ahead and scroll down to PART 2: ANIMATION
*breaths out*...ok here we go
Heres what we have --->

this is what we want -->

PART 1: MAKING YOUR ICON
Step 1: Touch ups
_First start off by sharpening the base.
_Duplicate the layer 2 times.
_Set them both to "screen"

Step 2: Coloring/Textures
_Add this texture

and set it to "screen" credit to itsmylifex
_Hit "ctrl+u" and lower the saturation to -46
_Now, you want it up there in the corner, so click "ctrl+t" and position it to the area you want.

_Duplicate the screen and hit "ctrl+t" again.
_Right click in the box area, and scroll down to "Flip Horizontal" and position the the left side, around the shoulder area

_Create a new layer and set it to "Color"
_Fill it with color #FFA28D

and lower the opacity to 34%
_Create a new layer above the colored layer and set to "Overlay"
_Fill with color #FFD1A5

and set the opacity to 21%
_Merge Visible
_Duplicate the layer, and set it to "Soft Light"
Wow, that's pretty orange. Might wanna desaturate it a little
_Click "ctrl+u" and lower the saturation to -73

Step 3: Borders and Text
_Create a new layer
_Go to your brush tool
_I'm gonna use this brush

- credit to (I can't for the life of me remeber who made this)
_Using the color white, use the brush around the chin
I was kinda going for a paper tear look...so if you wanna excentuate that look, add a new layer, and using color black, make a jagged line around where the end of the brush meets the backround. Lower the opacity a little to make it look more like a shadow.
_Add a new layer. Using your Rectangle Tool, Fill in the area below the border with color white.

I thought the backround was too boring just being plain white, so I added this brush in a pinky color

Now for the text!
_Using font "chocolate box" (forgot where I found this font) write will turner in color #521000, size 9pt
_Highlight the text and hit "ctrl+t"
_A box will appear, and you wanna put in 300 in the 3rd box on the right side. (This just spaces out the font more, so it fills more space)

_Now in the layer box, right click the text layer and select "rasterize layer"

_Using the Rectanglular Marquee Tool (selecting tool), select half of "will turner"
_Hit "ctrl+c" (to copy the selected area) then click delete or backspace on your keyboard (to delete the selected area)
_Deselect the area, and create a new layer
_Hit "ctrl+v" and the area you deleted will be pasted as a new layer and move it down to the bottem

_Add new layer
_Switch to font style "Arial"
_Using the same color, write will turner again in size 7pt
_Add yet another layer, and add a few lines of text in size 1pt below will turner

_Merge Visible
_Duplicate the finished layer once
And there! All done with that part! phew...now on to animation *sweats*
PART 2: ANIMATION
ugh...this is where it gets tricky. And I know the way I do the animation is probably pretty confusing..but this is the only way I know how to do it. If anyone knows an easier way to do this, I would love you for all eternity if you'd let me know how.
You can download the frames I'm using (here) if you would like to go along with the tut.
Step 1: Setting up ImageReady and resizing
_First open up ImageReady and paste all the frames (in sequential order) into the window.
_Click the little arrow in the top right hand corner of the Animation Box and select "Make Frames From Layers"

_To resize, click the "Image" tab in the toolbar at the top.
_Select "Image Size..." And set the width size to 130 and click OK

Now all your frames should be loaded
_Select the first frame and click "ctrl+c" to copy it
Step 2: Setting the Frames
_Switch back over to Adobe Photoshop to your finished icon
_Paste the frame you just copied inbetween the two layers of your finished icon
_Lower the opacity of the top layer so you can see the frame underneath.
_Positon the frame where you want it (in this case on the bottem right corner)
_Using the eraser, erase the top layer over the area where your frame is
_Then set the opacity back to 100%

*If you want to improve the look of the frames/get em all spiffy looking
_Sharpen the frame
_Duplicate 2 times
_Set the middle frame to "screen"
_And the top layer to "soft light" and set the opacity to 30%
To make things easier later on, merge the frames together so theres just one layer (starting on the softlight layer merge down (ctrl+e) into the screened frame, then merge down into the normal frame so it becomes one layer)
_I wanted to get the animation to kinda blend in with the icon, so I added another layer and filled it with color #FFA28D and set it to color, opacity 33%
_And add another layer and fill with color #FFD1A5 setting it to overlay, opacity 12% NOTE: Make sure these two layers are above your frame and below the icon base

_Now, "Merge Visible" (ctrl+shift+e)
_Save As (ctrl+shift+s) as a jpeg file - maximum quality - into whatever folder your prefer. To make things easier for later on, name your files as 1,2,3...so you know what order they go in for the animation
_After you saved, click back a step in your history box so you back to all your layers again

_Switch back to ImageReady and copy your second frame
_Paste the copied frame above your first frame and repeat all the previous steps
*Remeber to save each time you add a new frame (saving in sequential order)
Step 3: Final Animation
Ok, so you've got all your frames saved in a folder right? There should be 11 files, since there were 11 frames
_Open the folder where you saved your frames
_Copy each and paste into a 100x100 sized window in ImageReady
_Down in the animation box, click the arrow in the top right corner and select "make frames from layers"
All the frames should now be loaded in the animation box
_Fiddle around with the frames delay time if the animation is too quick for your liking
_When your satisfied with the speed, go into file and scroll down to "Save Optimized As..."
_Save as file type "Images Only [*.gif]
And that's it! Your finished!
*gasps for air* That was a whopper
There was alot of stuff here, and I'm sure it was all pretty confusing so feel free to ask any questions. I'll be glad to try and clear things up for you ^_^