making brushes from images
A tutorial rundown on how to make your own brushes
(using photoshop cs)
I’ve often seen people ask how to make brushes, and I’ve often seen people complain about people always using the same old same brushes, too.
Hence, this tutorial.
It’s very simple and primitive, but it teaches the basics on how to make a brush.
Select an image you’d like to turn into a brush.
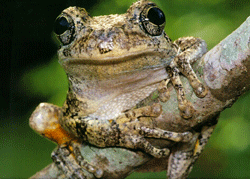
In my case, it was a pic of a frog.
Note: You don’t have to use an image from anywhere. If you know your way around photoshop, then you can surely make something unique without the use of an image file. ;)
Depending on the program you’re using, you might have to desaturate (ctrl + shift + u) your image first.
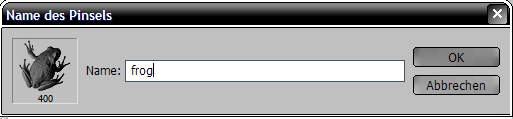
Crop or resize your image till it has the size you’d like, then go to edit -> define brush. A little window should open with a preview and pixel size of your brush.
[
]
Type in the name, and you’re done.
[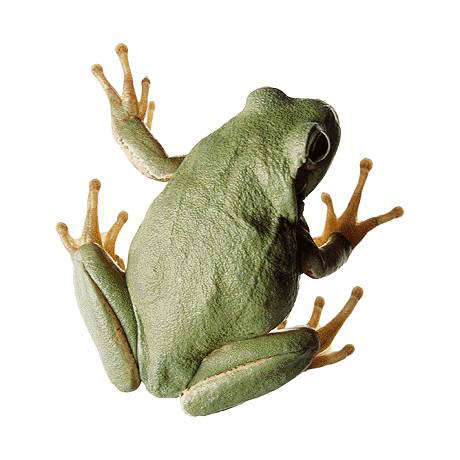
] original image
[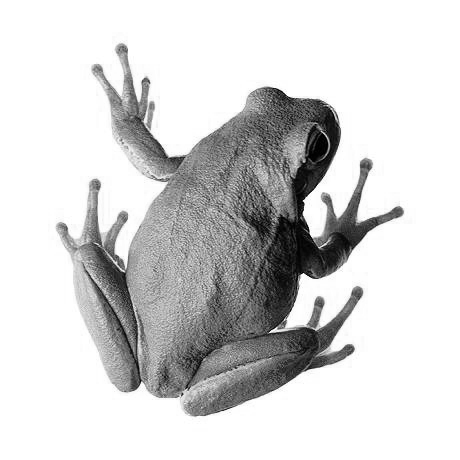
] desaturated image
[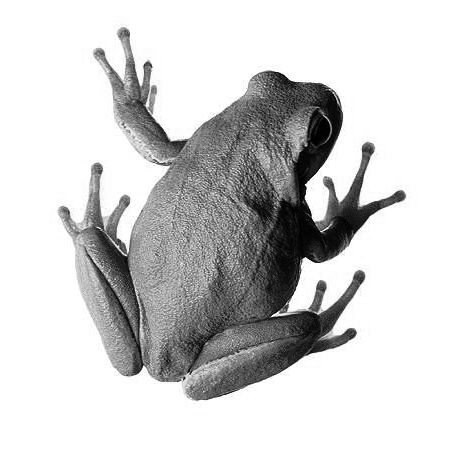
] brush with white background
Now.
Some of you might have chosen an image that might have a lot going on in the background.
[
] example image
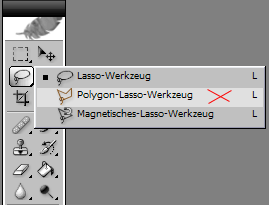
If you don’t want your brush to turn out as shown below, you might have to use your polygon tool and draw a close frame around that part of your image you’d like to turn into a brush. Every colored pixel in your image will turn into part of the brush. All white pixels will remain transparent. So make sure that the pixels you don't want in your brush are not present in your image.
[
] example brush
After you’ve done that, select a soft brush and erase the background.
Then apply the settings as described above.
If you’re fed up with your brush and no longer want to use it, just open your brushes (b), scroll down to the brush you’ve created, right-click, and delete.
If you have many images you’d like to turn into brushes another day, then I recommend that you prepare them (as in the first two or three steps) and then saving them as .png files because of the pixel quality.
If you would like to save your brush as a .abr file right-click on your canvas to open the brush-list and then click on the little arrow to open the menu. From there, you open the preset manager.
In the preset manager window, hit (ctrl + a) to select all brushes, then, while holding down the shift key, click on the brush you’d like to keep.
Then click on the delete button.
Click on done and then right-click on your canvas again to open the brush-list yet another time.
If your window is empty now, click on the arrow again and select ‘new brush preset.’ A window will open with your brush in it. Name it and hit enter.
Click on the arrow yet another time and then click on ‘save brushes.’
Give them a name, hit enter and you’re done.
Very simple, and very short.
If you’d like me to add things to this tutorial, just comment.
If there’s something wrong, feel free to comment.
If you’ve tried it out and it worked or didn’t work, please feel free to comment.
Anything else, comment. =P
Have fun making your own brushes!
(using photoshop cs)
I’ve often seen people ask how to make brushes, and I’ve often seen people complain about people always using the same old same brushes, too.
Hence, this tutorial.
It’s very simple and primitive, but it teaches the basics on how to make a brush.
Select an image you’d like to turn into a brush.
In my case, it was a pic of a frog.
Note: You don’t have to use an image from anywhere. If you know your way around photoshop, then you can surely make something unique without the use of an image file. ;)
Depending on the program you’re using, you might have to desaturate (ctrl + shift + u) your image first.
Crop or resize your image till it has the size you’d like, then go to edit -> define brush. A little window should open with a preview and pixel size of your brush.
[
]
Type in the name, and you’re done.
[
] original image
[
] desaturated image
[
] brush with white background
Now.
Some of you might have chosen an image that might have a lot going on in the background.
[
] example image
If you don’t want your brush to turn out as shown below, you might have to use your polygon tool and draw a close frame around that part of your image you’d like to turn into a brush. Every colored pixel in your image will turn into part of the brush. All white pixels will remain transparent. So make sure that the pixels you don't want in your brush are not present in your image.
[
] example brush
After you’ve done that, select a soft brush and erase the background.
Then apply the settings as described above.
If you’re fed up with your brush and no longer want to use it, just open your brushes (b), scroll down to the brush you’ve created, right-click, and delete.
If you have many images you’d like to turn into brushes another day, then I recommend that you prepare them (as in the first two or three steps) and then saving them as .png files because of the pixel quality.
If you would like to save your brush as a .abr file right-click on your canvas to open the brush-list and then click on the little arrow to open the menu. From there, you open the preset manager.
In the preset manager window, hit (ctrl + a) to select all brushes, then, while holding down the shift key, click on the brush you’d like to keep.
Then click on the delete button.
Click on done and then right-click on your canvas again to open the brush-list yet another time.
If your window is empty now, click on the arrow again and select ‘new brush preset.’ A window will open with your brush in it. Name it and hit enter.
Click on the arrow yet another time and then click on ‘save brushes.’
Give them a name, hit enter and you’re done.
Very simple, and very short.
If you’d like me to add things to this tutorial, just comment.
If there’s something wrong, feel free to comment.
If you’ve tried it out and it worked or didn’t work, please feel free to comment.
Anything else, comment. =P
Have fun making your own brushes!