optimizing file sizes in Image Ready
Tutorials explaining what I am about to explain have been posted many times before, but since those tutorials can’t seem to be found when needed, I thought I’d just type one up again.
Note: follow the links to view screen shots.
Today, we’ll learn how to shrink an animated icon’s file-size (kb) in Image Ready.
If you have just created an animated icon that involves a lot of color or many frames, you’ll maybe have the trouble that it’s too big (in file-size) to upload as an LJ icon.
One thing you can do to shrink this, is delete a few frames in your animation window.
Depending on what kind of an icon it is, this can ruin the smoothness of the animation. This is most common in mini-movies or tweened animations.
So choose the frames you delete well, and when tweening, don’t just delete every second frame or so. Just twean again, and play around with your settings (e.g. by using fewer frames between tween start and tween end.)
Another thing you can do is desaturate all the layers in your animation. You might find that your icon loses some of its charm when it loses it’s color.
And apart from that, desaturation might not always shrink much of an icon’s total kb. (Perhaps adjusting your levels can help here. That would be ctrl + l in Photoshop. Hit the auto-button if you’re not well acquainted with levels.)
So, what you can do instead is optimize your saving options.
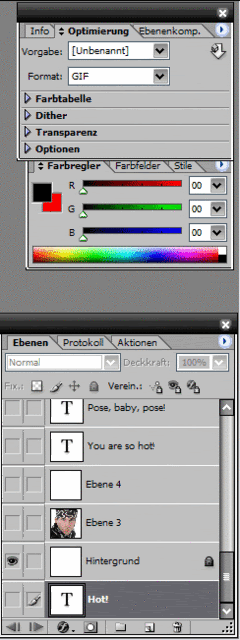
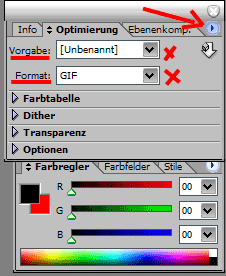
By default an optimization window should already be visible in the top right corner of your screen. If not, go to window -> optimization and click.
In the window, there should be three tabs. Open the one for optimization.
There should be two dropdown windows. In one you can set your presets, in the other your format.
Because (as of yet) animated files can only be saved as .gif, you’ll have to select that.
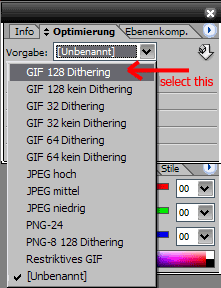
For quality, we shall use the presets GIF 128 dithering.
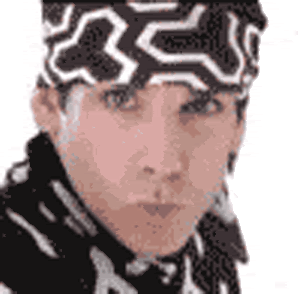
Note: “Dithering refers to the interpolation of unavailable colors by mixing pixels of (usually two) available colors in certain patterns and ratios.” I couldn’t have phrased it any better than that. Here are two image examples, once with and once without the use of dithering. (These are ~100x100 frames resized to ~300x300)
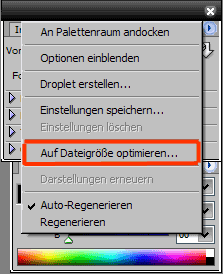
Still in the optimization window, at the top right-hand corner, there is a little arrow which points to the right. Click on that, and another sub-window should open. In there, there should be an option that says something like ‘optimize to file size.’
Click on that, and a new window will open.
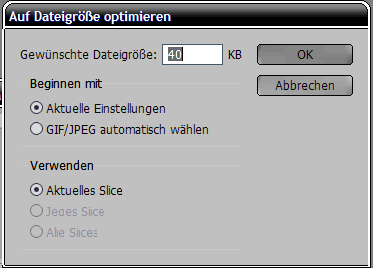
This is where you give the command for file size. If you intend to use your .gif as an LJ-icon, just type in 40 kb and hit ok.
After that, you can save your .gif. It will automatically be manipulated, so it has a maximum of 40 kb.
Note: Some of the quality of your images will always be lost when shrinking the file size. Where there once were many different colors, there might now be only half as many. So to prevent major quality-loss, I suggest that you tweak your .gif (as explained at the beginning of the tutorial) to get the file size as close to 40 kb as possible - while making sure the animation is still smooth and the colors still vibrant.
That was all for now.
Should something be unclear or confusing, please feel free to ask a question.
Thank you very much for your attention.
Note: follow the links to view screen shots.
Today, we’ll learn how to shrink an animated icon’s file-size (kb) in Image Ready.
If you have just created an animated icon that involves a lot of color or many frames, you’ll maybe have the trouble that it’s too big (in file-size) to upload as an LJ icon.
One thing you can do to shrink this, is delete a few frames in your animation window.
Depending on what kind of an icon it is, this can ruin the smoothness of the animation. This is most common in mini-movies or tweened animations.
So choose the frames you delete well, and when tweening, don’t just delete every second frame or so. Just twean again, and play around with your settings (e.g. by using fewer frames between tween start and tween end.)
Another thing you can do is desaturate all the layers in your animation. You might find that your icon loses some of its charm when it loses it’s color.
And apart from that, desaturation might not always shrink much of an icon’s total kb. (Perhaps adjusting your levels can help here. That would be ctrl + l in Photoshop. Hit the auto-button if you’re not well acquainted with levels.)
So, what you can do instead is optimize your saving options.
By default an optimization window should already be visible in the top right corner of your screen. If not, go to window -> optimization and click.
In the window, there should be three tabs. Open the one for optimization.
There should be two dropdown windows. In one you can set your presets, in the other your format.
Because (as of yet) animated files can only be saved as .gif, you’ll have to select that.
For quality, we shall use the presets GIF 128 dithering.
Note: “Dithering refers to the interpolation of unavailable colors by mixing pixels of (usually two) available colors in certain patterns and ratios.” I couldn’t have phrased it any better than that. Here are two image examples, once with and once without the use of dithering. (These are ~100x100 frames resized to ~300x300)
Still in the optimization window, at the top right-hand corner, there is a little arrow which points to the right. Click on that, and another sub-window should open. In there, there should be an option that says something like ‘optimize to file size.’
Click on that, and a new window will open.
This is where you give the command for file size. If you intend to use your .gif as an LJ-icon, just type in 40 kb and hit ok.
After that, you can save your .gif. It will automatically be manipulated, so it has a maximum of 40 kb.
Note: Some of the quality of your images will always be lost when shrinking the file size. Where there once were many different colors, there might now be only half as many. So to prevent major quality-loss, I suggest that you tweak your .gif (as explained at the beginning of the tutorial) to get the file size as close to 40 kb as possible - while making sure the animation is still smooth and the colors still vibrant.
That was all for now.
Should something be unclear or confusing, please feel free to ask a question.
Thank you very much for your attention.