Tutorials - Icon and Banner
Here are two tutorials, for Photoshop elements 4.0 and above but I'm sure it can be translated xD
Step 1: Take your base, crop it to 100 x 100 and name it Original
Step 2: Duplicate your original and name it Copy so you have in your Layers panel:
COPY
ORIGINAL
Sharpen them both twice.
Step 3: Desaturate (CTRL SHIFT U) the original layer. Step 4: Go to Filter > Render > Lense Flare
And add in a little light effect onto the coloured layer (COPY)
Step 5: Set that layer (COPY) to 50% opacity
Step 6: Go to Layer > New Adjustment Layer > Brightness/Contrast and use these settings:
Brightness: 46
Contrast: 29
(This may not fit the picture. Play about with them.)
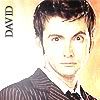
Step 7: In Times New Roman size 10 add in some text. I’m going to write David.
Finished Result...
1. Make a new canvas size 400px x 300px
2. Paste (CTRL + V) your image. I’m using this one which is a pic from The Runaway Bride HERE
3. Then go to LAYER > NEW ADJUSTMENT LAYER > BRIGHTNESS/CONTRAST and use these settings:
Brightness: 44
Contrast: 53
(You may need to change these settings to fit the picture)
4. Add some text using the font Carnivalee Freakshow which is available from dafont.com and the colour #000000 (black) but if it doesn’t fit your picture you may want to change this… I’m adding in the text “The Doctor”.
5. Merge all the layers down and select all (CTRL + A), copy (CTRL + C) and then make a new canvas, sizes 402px x 302px and paste (CTRL + V) into the centre.
6. Add a dotted border, I used THIS brush.

This should be something similar to your result:

Hope you like XD
Step 1: Take your base, crop it to 100 x 100 and name it Original
Step 2: Duplicate your original and name it Copy so you have in your Layers panel:
COPY
ORIGINAL
Sharpen them both twice.
Step 3: Desaturate (CTRL SHIFT U) the original layer. Step 4: Go to Filter > Render > Lense Flare
And add in a little light effect onto the coloured layer (COPY)
Step 5: Set that layer (COPY) to 50% opacity
Step 6: Go to Layer > New Adjustment Layer > Brightness/Contrast and use these settings:
Brightness: 46
Contrast: 29
(This may not fit the picture. Play about with them.)
Step 7: In Times New Roman size 10 add in some text. I’m going to write David.
Finished Result...
1. Make a new canvas size 400px x 300px
2. Paste (CTRL + V) your image. I’m using this one which is a pic from The Runaway Bride HERE
3. Then go to LAYER > NEW ADJUSTMENT LAYER > BRIGHTNESS/CONTRAST and use these settings:
Brightness: 44
Contrast: 53
(You may need to change these settings to fit the picture)
4. Add some text using the font Carnivalee Freakshow which is available from dafont.com and the colour #000000 (black) but if it doesn’t fit your picture you may want to change this… I’m adding in the text “The Doctor”.
5. Merge all the layers down and select all (CTRL + A), copy (CTRL + C) and then make a new canvas, sizes 402px x 302px and paste (CTRL + V) into the centre.
6. Add a dotted border, I used THIS brush.
This should be something similar to your result:
Hope you like XD