Simple Colorbar Tutorial
Just a simple little tutorial as requested by jh4e - but made for everyone who'd like to learn how to make simplistic colorbars.
How to make colorbars - the easy way!
This craptacular tutorial uses Adobe ImageReady 3.0, but it can be used for any type of graphics program.
1) First off, decide on the subject of your colorbar. For this one, I'll be remaking a Mahaado colorbar. Colorbars can be about any damn thing you please, so go wild! :)
2) Open up a New document: for this one, the size will be 600x100.
3) Pick you first screenshot to use, and crop it to 100x100; clean it up if it's necessary by using Image > Adjust > Auto Levels and Auto Contrast.
4) Desaturate the image (Ctrl+Shift+U), and then bring up the Hue/Saturation window (Ctrl+U). Make sure Colorize is checked ON. Since the first color in a rainbow is red, we'll be looking for an appropriate redness - the default one usually works. Click OK, and Mahaado is now scarlet!
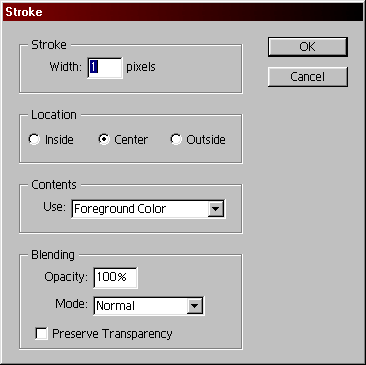
5) If you want a border for the image (I usually do), then click on the Dropper tool and pick out a shade in the picture that you like - for this, I clicked Mahaado's chin - then hit Ctrl+A to select the entire picture. Go to Edit > Stroke and use these settings:

6) Select the entire picture again, then hit Ctrl+C to Copy it. Click on your new document, then hit Ctrl+V to Paste the red Mahaado onto the blank canvas. Scoot him over to the far left side, and you have a piece of your colorbar done!
7) Simply repeat Steps 3-6 for the next five colors, until you end up with something similar to this as your final piece:

8) If you prefer to, you can hit Layer > Merge Visible (or Ctrl+Shift+E does the same thing) to merge the six layers into one. And you have your finished colorbar! *fanfare*
Seems easy enough, right? ^_^ Reminds me that I have to go back and start remaking some of my older ones.
How to make colorbars - the easy way!
This craptacular tutorial uses Adobe ImageReady 3.0, but it can be used for any type of graphics program.
1) First off, decide on the subject of your colorbar. For this one, I'll be remaking a Mahaado colorbar. Colorbars can be about any damn thing you please, so go wild! :)
2) Open up a New document: for this one, the size will be 600x100.
3) Pick you first screenshot to use, and crop it to 100x100; clean it up if it's necessary by using Image > Adjust > Auto Levels and Auto Contrast.
4) Desaturate the image (Ctrl+Shift+U), and then bring up the Hue/Saturation window (Ctrl+U). Make sure Colorize is checked ON. Since the first color in a rainbow is red, we'll be looking for an appropriate redness - the default one usually works. Click OK, and Mahaado is now scarlet!
5) If you want a border for the image (I usually do), then click on the Dropper tool and pick out a shade in the picture that you like - for this, I clicked Mahaado's chin - then hit Ctrl+A to select the entire picture. Go to Edit > Stroke and use these settings:

6) Select the entire picture again, then hit Ctrl+C to Copy it. Click on your new document, then hit Ctrl+V to Paste the red Mahaado onto the blank canvas. Scoot him over to the far left side, and you have a piece of your colorbar done!
7) Simply repeat Steps 3-6 for the next five colors, until you end up with something similar to this as your final piece:

8) If you prefer to, you can hit Layer > Merge Visible (or Ctrl+Shift+E does the same thing) to merge the six layers into one. And you have your finished colorbar! *fanfare*
Seems easy enough, right? ^_^ Reminds me that I have to go back and start remaking some of my older ones.